Advanced topics
Accessibility
Introduction
This document is written for blind and visually impaired users of MuseScore 2.x. It is not intended to provide a full description of all of the features of MuseScore; you should read this in conjunction with the regular MuseScore documentation.
MuseScore comes with support for the free and open source NVDA screen reader for Windows. The features in this document have been tested on Windows with NVDA. There is no support at the moment for other screen readers such as Jaws for Windows, or VoiceOver for macOS, which may work differently, or not at all.
At this point in time, MuseScore 2.x is mostly accessible as a score reader, not so much as a score editor. This document will focus on the score reading features, with only a brief description of score editing.
Initial setup
When you run MuseScore for the first time, you may want to permanently disable the Start Center window. To do so, go close the Start Center window first, then the Edit menu (Alt+E), choose Preferences, and in there, uncheck Show Start Center. Save and close the preferences window.
Finding your way around
The user interface in MuseScore works much like other notation programs, or other document-oriented programs in general. It has a single main document window in which you can work with a score. MuseScore supports multiple document tabs within this window. It also supports a split-screen view to let you work with two documents at once, and you can have multiple tabs in each window.
In addition to the score window, MuseScore has a menu bar that you can access via the shortcuts for the individual menus:
- File: Alt+F
- Edit: Alt+E
- View: Alt+V
- Add: Alt+A
- Notes: Alt+N
- Layout: Alt+L
- Style: Alt+S
- Plugins: Alt+P
- Help: Alt+H
Of these, only the File menu is of much interest when using MuseScore as a score reader. Once opening a menu, it may take several presses of the Up or Down keys before everything is read properly.
There are also a number of toolbars, palettes, and subwindows within MuseScore, and you can cycle through the controls in these using Tab (or Shift+Tab to move backwards through this same cycle). When you first start MuseScore, or load a score, focus should be in the main score window. Pressing Tab takes you to a toolbar containing a series of buttons for operations like New, Open, Play, and so forth. Tab will skip any buttons that aren't currently active. The names and shortcuts (where applicable) for these buttons should be read by your screen reader.
Once you have cycled through the buttons on the toolbar, the next window Tab will visit is the Palette. This would be used to add various elements to a score, but it is not currently accessible except for two buttons that are visited by Tab: a drop down to select between different workspaces (a saved arrangement of palettes), and a button to create a new workspace.
If you have opened one of the optional windows, such as the Inspector, or the Selection Filter, the Tab key will also visit these. You can close windows you do not need by going to the View menu and making sure none of the first set of checkboxes are selected (the windows that appear before the Zoom settings). By default, only the Start Center, Palettes and Inspector should be selected. See Initial Setup for instructions for disabling the Start Center. F9 can be used to toggle the Palettes while F8 will toggle the Inspector.
To return focus to the score window after visiting the toolbar, or a subwindow, press Esc. This also clears any selection you may have made in the score window.
The score window
When you first start MuseScore 2.x, an empty example score entitled “My First Score” is loaded by default. If you wish to experiment with editing features, this would be a good place to begin. Otherwise, you will probably want to start by loading a score. MuseScore uses the standard shortcuts to access system commands like Ctrl+O (Mac: Cmd+O) to open a file, Ctrl+S (Mac: Cmd+S) to save, Ctrl+W (Mac: Cmd+W) to close, etc.
If you press Ctrl+O (Mac: Cmd+O) to load a score, you are presented with a fairly standard file dialog. MuseScore can open scores in its own format (MSCZ or MSCX) as well as import scores in the standard MusicXML format, in MIDI format, or from a few other programs such as Guitar Pro, Capella, and Band-in-a-Box. Once you have loaded a score, it is displayed in a new tab within the score window. You can move between the tabs in the score window using Ctrl+Tab (does not apply for Mac).
There are a few interesting things you can do with a loaded score besides reading it note by note. You can press Space to have MuseScore play the score for you. You can use File / Export to convert to another format, including PDF, PNG, WAV, MP3, MIDI, MusicXML, etc. And of course, you can print it via File / Print or Ctrl+P (Mac: Cmd+P).
If a score contains multiple instruments, it may already have linked parts generated. Linked parts are presented as part tabs within score tabs, but currently, there is no way to navigate these part tabs using the keyboard. The parts would not normally contain information different from the score; they would just be displayed differently (each part on its own page). If a score does not already have parts generated, you can do so through File / Parts, and that dialog is accessible. If you wish to print the parts, you can work around the inability of accessing part tabs individually by using the File / Export Parts dialog, which automatically exports PDF’s (or other formats) for all parts in one step.
Score reading
When you first load a score, the score window has the keyboard focus, but there will be nothing selected. The first step to reading a score is to select something, and the most natural place to begin is with the first element of the score. Ctrl+Home (Mac: Cmd+Home) will do this. You will probably also want to use this, should you ever clear your selection by pressing Esc.
As you navigate between elements, your screen reader should give the name of the selected element (most likely the clef at the beginning of the top staff of your score). You will hear it read the name of the element (for example, “Treble clef”) and also give position information (for example, “Measure 1; Beat 1; Staff 1”). The amount of information read is not currently customizable, but we tried to place the most important first so you can quickly move on to the next element before it has finished reading, or just ignore the rest of what is read. Pressing Shift currently interrupts the reading, which might also be useful.
Most navigation in MuseScore is centered around notes and rests only – it will skip clefs, key signatures, time signatures, barlines, and other elements. So if you just use the standard Right and Left keys to move through your score, you will only hear about notes and rests (and the elements attached to them). However, there are two special navigation commands that you will find useful to gain a more complete summarization of the score:
- Next element: Ctrl+Alt+Shift+Right (Mac: Cmd+Option+Shift+Right)
- Previous element: Ctrl+Alt+Shift+Left (Mac: Cmd+Option+Shift+Left
These commands include clefs and other elements that the other navigation commands skip, and also navigate through all voices within the current staff, whereas other navigation commands such as Right and Left only navigate through the currently selected voice until you explicitly change voices. For instance, if you are on a quarter note on beat 1 of measure 1, and there are two voices in that measure, then pressing Right will move on to the next note of voice 1—which will be on beat 2—whereas pressing Ctrl+Alt+Shift+Right (Mac: Cmd+Option+Shift+Right) will stay on beat 1 but move to the note on voice 2. Only once you have moved through all notes on the current beat on the current staff will the shortcut move you on to the next beat. The intent is that this shortcut should be useful for navigating through a score if you don’t already know what the contents are.
When you navigate to an element, your screen reader should read information about it. For notes and rests, it will also read information about elements attached to them, such as lyrics, articulations, chord symbols, etc. For the time being, there is no way to navigate directly to these elements.
One important note: Up and Down by themselves, with Shift, or with Ctrl / Cmd are not useful shortcuts for navigation! Instead, they change the pitch of the currently selected note or notes. Be careful not to inadvertently edit a score you are trying to read. Up and Down should only be used with Alt/Option if your intent is navigation only. See the list of navigation shortcuts below.
Moving forwards or backwards in time
The following shortcuts are useful for moving “horizontally” through a score:
- Next element: Ctrl+Alt+Shift+Right
- Previous element: Ctrl+Alt+Shift+Left
- Next chord or rest: Right
- Previous chord or rest: Left
- Next measure: Ctrl+Right
- Previous measure: Ctrl+Left
- Go to measure: Ctrl+F
- First element: Ctrl+Home
- Last element: Ctrl+End
Moving between notes at a given point in time
-
The following shortcuts are useful for moving “vertically” through a score:
-
Next element: Ctrl+Alt+Shift+Right
- Previous element: Ctrl+Alt+Shift+Left
- Next higher note in voice, previous voice, or staff above: Alt+Up
- Next lower note in voice, next voice, or staff below: Alt+Down
- Top note in chord: Ctrl+Alt+Up
- Bottom note in chord: Ctrl+Alt+Down
The Alt+Up and Alt+Down commands are similar to the Ctrl+Alt+Shift+Right and Ctrl+Alt+Shift+Left commands in that they are designed to help you discover the content of a score. You do not need to know how many notes are in a chord, how many voices are in a staff, or how many staves are in a score in order to move vertically through the score using these commands.
Filtering score reading
Excluding certain elements like lyrics, or chord names while reading the score is possible by using the Selection filter (F6). Uncheck those elements you don't want to read.
Score playback
The Space bar serves both to start and stop playback. Playback will start with the currently selected note if one is selected; where playback was last stopped if no note is selected; or at the beginning of the score on first playback.
MuseScore supports looped playback so you can repeat a section of a piece for practice purposes. To set the “in” and “out” points for the loop playback via the Play Panel (F11):
- First select the note in the score window where the loop should start
- Go to the Play Panel and press the Set loop In position toggle button
- Back to the score window, navigate to the note where you want the loop to end
- Switch again to Play Panel, and press the Set loop Out position toggle button
- To enable or disable the loop, press the Loop Playback toggle button
You can also control the loop playback and control other playback parameters, such as overriding the basic tempo of a score, using the View / Play Panel (F11).
Score editing
Score editing is currently not very accessible – too many score elements require intervention of the mouse in order to place objects onto a score. Additionally, visual reference and manual adjustment of the position of various elements is sometimes necessary due to MuseScore's limited support for conflict avoidance of elements.
In contrast, MuseScore does often provide ample default, and a platform to experiment with the basics of note input.
To enter note input mode, first navigate to the measure in which you would like to enter notes, then press “N”. Almost everything about note input is designed to be keyboard accessible, and the standard documentation should be good to help you through the process. Bear in mind that MuseScore can either be in note input or normal mode, and it won’t always be clear which mode of these you are in. When in doubt, press Esc. If you were in note input mode, this will take you out. If you were in normal mode, you will stay there, although you will also lose your selection.
Customization
You can customize the keyboard shortcuts using Edit / Preferences / Shortcuts. At some point, we may provide a set of special accessibility-optimized shortcuts and/or a way of saving and loading sets of shortcut definitions.
External links
Albums
The Album Manager allows you to prepare a list of multiple scores and save the list as an album file ("*.album"), print all the scores as one long print job with consistent page numbers, or even join the scores into a single new MSCZ score. This is ideal for preparing an exercise book or combining multiple movements of an orchestration.
To open the Album Manager, go to File → Album...
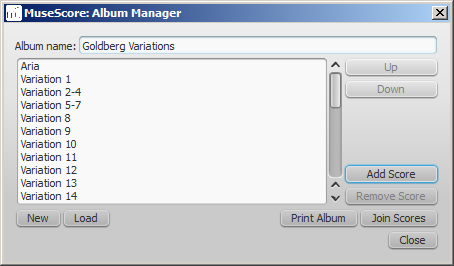
Create album
- To create a new album, click the New button. Fill in a title in the "Album Name:" box at the top.
- To add scores to the album, click Add Score. A file selection dialog will appear and let you choose one or multiple scores from your file system. Click OK.
- The scores you add will appear in a list in the Album Manager. You can rearrange their order by selecting a score and clicking the Up or Down button.
Load album
If you have previously created an album, you can open it through the Album Manager by clicking the Load button. A file selection dialog will appear to let you load the .album file from your file system.
Print album
To print an album as if it were a single document, click Print Album. The scores loaded into the Album Manager are printed in the order they are listed in with the correct page numbers, ignoring the page number offset values in Layout → Page Settings... → First page number for all but the first score. As the album is printed in one print job, double-sided printing (duplex printing) also works as expected.
Join scores
To combine multiple scores into a single .mscz file, click Join Scores. The scores are combined in the selected order into one single score. If not already present, line- and section breaks are added to the last measure or frame of each score in the combined file.
All style settings are taken from the first score, different style settings from subsequent score are ignored.
All the scores should have the same number of parts and staves for this to work correctly, ideally with the same instruments in the same order. If the scores have the same total number of instruments but not the same ones, or not in the same order, then the instrument names from the first score will overwrite ones from subsequent scores. If some of the scores have fewer instruments than the first score, then empty staves will be created for those sections. Any part or staff that is not present in the first score will be lost in the joined score.
Save album
Upon clicking the Close button, you will be prompted to save your album as a .album file. This file is not the same as a joined score; it simply consists of the list of scores. Album files can be loaded into the Album Manager as described above.
Cross-staff notation
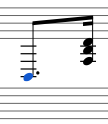
In piano scores, it is common to write a musical phrase extending across both staves—bass and treble. This can be entered in MuseScore as follows:
-
Enter all notes in one staff:
-
Ctrl+Shift+↓ moves the selected note, or chord to the next staff (Mac: ⌘+Shift+↓):
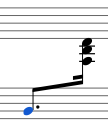
Note : this moves the whole chord, not just a single note from a multi note chord. If you need notes in the old staff at the same place, use voices.
-
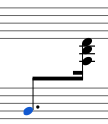
To adjust the beam, double-click it to show the handles. Use the keyboard arrows or drag the handles to change the beam angle and position:
See also
- Connect barlines: How to extend barlines over multiple staves.
External links
- How to span a chord or stem over two staves (MuseScore "Howto")
Early music features
MuseScore 2 offers several specialized functions to create engravings of early music (particularly medieval and renaissance) akin to commercial editions from the 20th century onwards.
Unbarred (or unmetered) notation
In MuseScore, notes lasting longer than the duration of a measure are normally tied across barlines. However MuseScore has a special feature which allows it to display the note values intact, without splitting and tying them in this way. This enables you to notate music which is unbarred (i.e. not divided into measures), such as that of the renaissance:
- From the menu bar, select Style→General...→Score.
- Tick the box labelled "Display note values across measure bar."
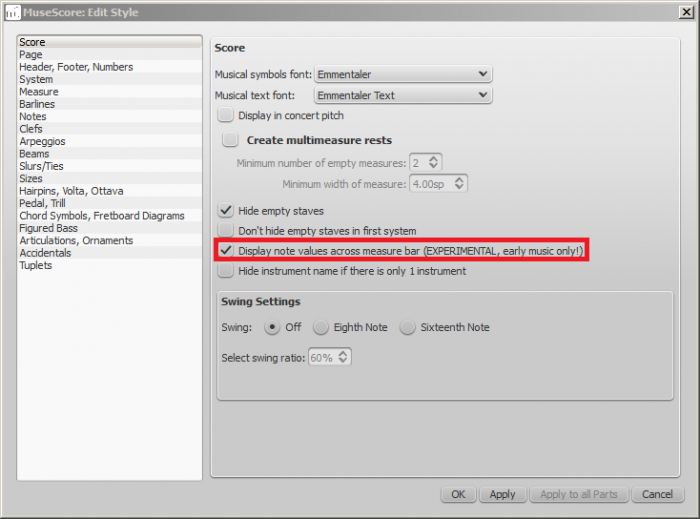
- Click "OK" or "Apply." The existing score is immediately updated.
Example
- The example below shows an excerpt from the original score of "De Profundis Clamavi" for 4 voices by Nicolas Champion:

- The same excerpt displayed in MuseScore:

- And after activating "Display note values across measure bar."

- To get rid of the barlines, just untick the “Show barlines” box in the Staff properties dialog. See also Mensurstrich (below).
Note: The feature is still in development and may contain bugs. The longest supported note value is the longa (a dotted longa is still broken up and tied over).
Mensurstrich
Since a complete lack of barlines could make performing the music more difficult for current musicians, many modern engravers settled on a compromise called Mensurstrich, where barlines are drawn between, but not across, staves.

To place barlines between staves:
- Enter edit mode by double-clicking a barline in a staff above where you want the Mensurstriche;
- Hold Shift and drag the lower handle of the barline down until it meets the top of the staff below;
- Hold Shift and drag the upper handle of the barline down until it meets the bottom of the current staff;
- Exit edit mode by pressing Esc or clicking on a blank area of the document window.
Alternatively, you can use the Inspector:
- In the staff below the proposed Mensurstriche, uncheck "Show barlines" in the Staff properties dialog;
- In the staff above where you want the Mensurstriche, right-click on one barline and chose Select→All Similar Elements in Same Staff;
- In the Inspector, under "Barline," make the following settings: "Spanned staves" = 2; "Spanned from" = 8; "Spanned to = "0."
Note: To reset barlines, select the relevant barlines and make the following settings: "Spanned staves" = 1; "Spanned from" = 0; "Spanned to = "8."
Ambitus
Before there was the concept of an absolute pitch, performers were required to transpose vocal music to a singable range for their ensemble "on the fly." To aid them, an ambitus was sometimes included, marking the entire range of a voice at the beginning of the piece.
To apply an ambitus, use one of the following methods:
- Drag the ambitus symbol (from the Lines palette of the Advanced workspace) onto a clef.
- Select a clef, then double-click the ambitus symbol (in the Lines palette of the Advanced workspace).

When applied, the ambitus automatically displays the note range of the score: if there is a section break then only the note range of the section is displayed. Beyond the section break a new ambitus may be applied.
The note range of the ambitus can be adjusted manually by selecting it and changing the "Top note" and "Bottom note" values in the Inspector. For automatic adjustment click the Update Range button in the inspector.
Mensural time signatures
In the mensural notation system, time signatures did not define the length of a measure, but the length of breves and semibreves. MuseScore supports mensural time symbols as a display method in the Time signature properties dialog rather than as symbols, but they are just for show, as the proportion of e.g. half notes per whole notes cannot be modified.
One way to make use of these symbols is to replicate when composers of the renaissance had multiple voices in different time signatures simultaneously without using tuplets. Edit the time signature on a per-staff basis, as long as the beginning and end of a measure in all staves match up. If they do not, then consider increasing the size of the measures to the lowest common denominator.
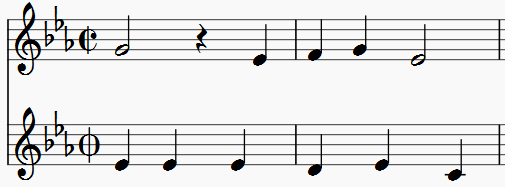
De Profundis Clamavi for 5 voices by Josquin Des Prez
See also
Figured bass
Adding a new figured bass indication
- Select the note to which the figured bass applies
- Press the Figured Bass shortcut (default Ctrl+G; can be changed in Preferences)
- Enter the text in the editor 'blue box' as required (see below)
- Press Space to move to the next note ready for another figured bass indication (or click outside the editor box to exit it)
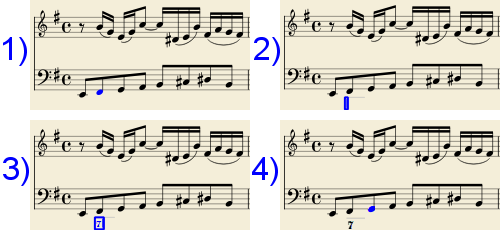
With Space, the editor advances to the next note, or rest of the staff to which figured bass is being added. To move to a point in between, or to extend a figured bass group for a longer duration, see below Group Duration.
Tab advances the editing box to the beginning of the next measure.
Shift+Space moves the editing box to the previous staff note or rest.
Shift+Tab moves the editing box to the beginning of the previous measure.
Text format
Digits
Digits are entered directly. Groups of several digits stacked one above the other are also entered directly in a single text, stacking them with Enter:
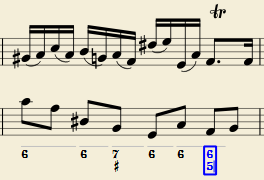
Accidentals
Accidentals can be entered using regular keys:
| To enter: | type: |
|---|---|
| double flat | bb |
| flat | b |
| natural | h |
| sharp | # |
| double sharp | ## |
These characters will automatically turn into the proper signs when you leave the editor. Accidentals can be entered before, or after a digit (and of course, in place of a digit, for altered thirds), according to the required style; both styles are properly aligned, with the accidental 'hanging' at the left, or the right.
Combined shapes
Slashed digits or digits with a cross can be entered by adding \, / or + after the digit (combining suffixes); the proper combined shape will be substituted when leaving the editor:
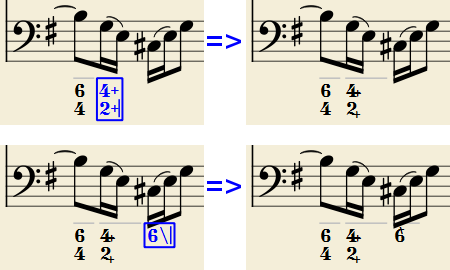
The built-in font can manage combination equivalence, favoring the more common substitution:
1+, 2+, 3+, 4+ result in  (or
(or  )
)
and 5\, 6\, 7\, 8\, 9\ result in  (or
(or  )
)
Please remember that / can only by combined with 5; any other 'slashed' figure is rendered with a question mark.
+ can also be used before a digit; in this case it is not combined, but it is properly aligned ('+' hanging at the left side).
Parentheses
Open and closed parentheses, both round: '(', ')' and square: '[', ']', can be inserted before and after accidentals, before and after a digit, before and after a continuation line; added parentheses will not disturb the proper alignment of the main character.
Notes:
- The editor does not check that parentheses, open and closed, round or square, are properly balanced.
- Several parentheses in a row are non-syntactical and prevent proper recognition of the entered text.
- A parenthesis between a digit and a combining suffix ('+', '\', '/') is accepted, but prevents shape combination.
Continuation lines
Continuation lines are input by adding an '_' (underscore) at the end of the line. Each digit of a group can have its own continuation line:

Continuation lines are drawn for the whole duration of the figured bass group.
'Extended' continuation lines
Occasionally, a continuation line has to connect with the continuation line of a following group, when a chord degree has to be kept across two groups. Examples (both from J. Boismortier, Pièces de viole, op. 31, Paris 1730):

In the first case, each group has its own continuation line; in the second, the continuation line of the first group is carried 'into' the second.
This can be obtained by entering several (two or more) underscores "__" at the end of the text line of the first group.
Duration
Each figured bass group has a duration, which is indicated by a light gray line above it (of course, this line is for information only and it is not printed or exported to PDF).
Initially, a group has the same duration of the note to which it is attached. A different duration may be required to fit several groups under a single note or to extend a group to span several notes.
To achieve this, each key combination of the list below can be used:
- to advance the editing box by the indicated duration
AND - to set the duration of the previous group up to the new editing box position.
Pressing several of them in sequence without entering any figured bass text repeatedly extends the previous group.
| Type: | to get: |
|---|---|
| Ctrl+1 | 1/64 |
| Ctrl+2 | 1/32 |
| Ctrl+3 | 1/16 |
| Ctrl+4 | 1/8 (quaver) |
| Ctrl+5 | 1/4 (crochet) |
| Ctrl+6 | half note (minim) |
| Ctrl+7 | whole note (semibreve) |
| Ctrl+8 | 2 whole notes (breve) |
(The digits are the same as are used to set the note durations)
Setting the exact figured bass group duration is only mandatory in two cases:
- When several groups are fit under a single staff note (there is no other way).
- When continuation lines are used, as line length depends on the group duration.
However, it is a good practice to always set the duration to the intended value for the purposes of plugins and MusicXML.
Editing existing figured basses
To edit a figured bass indication already entered:
- Select it, or the note it belongs to and press the same Figured Bass shortcut used to create a new one
or - Double-click it
The usual text editor box will open with the text converted back to plain characters ('b', '#' and 'h' for accidentals, separate combining suffixes, underscores, etc.) for simpler editing.
Once done, press Space to move to a next note, or click outside the editor box to exit it, as for newly created figured basses.
Style
To configure how figured bass is rendered: from the menu, select Style → General.… → Figured Bass.
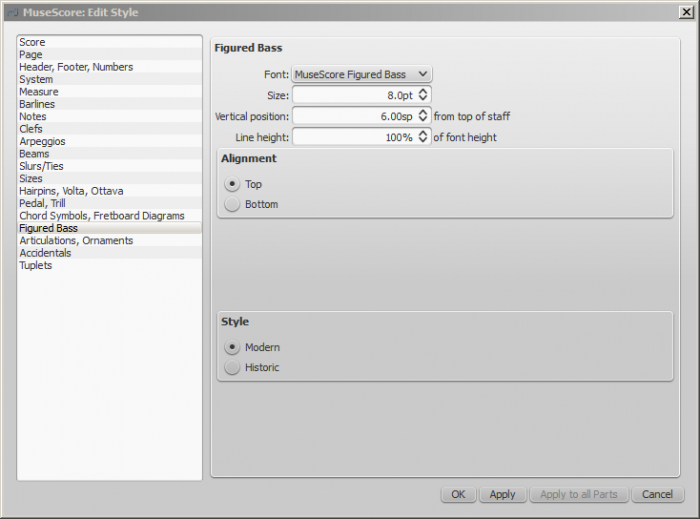
- Font: The dropdown list contains all the fonts which have been configured for figured bass. A standard installation contains only one font, "MuseScore Figured Bass," which is also the default font.
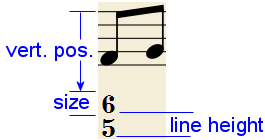
- Size: Select a font-size in points. Note: This value is also modified by any change made to Scaling (Layout → Page Settings.…), or Scale ("Staff properties").
- Vertical Position: The distance (in spatia) from the top of the staff to the top margin of the figured bass text. Negative values go up (figured bass above the staff) and positive values go down (figured bass below the staff: a value greater than 4 is needed to step over the staff itself).
-
Line Height: The distance between the base line of each figured bass line, as a percentage of font size.
The following picture visualizes each numeric parameter:
-
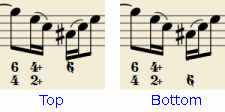
Alignment: Select the vertical alignment: with Top, the top line of each group is aligned with the main vertical position and the group 'hangs' from it (this is normally used with figured bass notation and is the default); with Bottom, the bottom line is aligned with the main vertical position and the group 'sits' on it (this is sometimes used in some kinds of harmonic analysis notations):
-
Style: Chose between "Modern" or "Historic." The difference between the two styles is shown below:
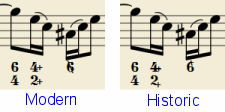
Proper syntax
For the relevant substitutions and shape combinations to take effect and for proper alignment, the figured bass mechanism expects input texts to follow some rules (which are in any case, the rules for a syntactical figured bass indication):
- There can be only one accidental (before or after), or only one combining suffix per figure;
- There cannot be both an accidental and a combining suffix;
- There can be an accidental without a digit (altered third), but not a combining suffix without a digit.
- Any other character not listed above is not expected.
If a text entered does not follow these rules, it will not be processed: it will be stored and displayed as it is, without any layout.
Summary of keys
| Type: | to get: |
|---|---|
| Ctrl+G | Adds a new figured bass group to the selected note. |
| Space | Advances the editing box to the next note. |
| Shift+Space | Moves the editing box to the previous note. |
| Tab | Advances the editing box to the next measure. |
| Shift+Tab | Moves the editing box to the previous measure. |
| Ctrl+1 | Advances the editing box by 1/64, setting the duration of the previous group. |
| Ctrl+2 | Advances the editing box by 1/32, setting the duration of the previous group. |
| Ctrl+3 | Advances the editing box by 1/16, setting the duration of the previous group. |
| Ctrl+4 | Advances the editing box by 1/8 (quaver), setting the duration of the previous group. |
| Ctrl+5 | Advances the editing box by 1/4 (crochet), setting the duration of the previous group. |
| Ctrl+6 | Advances the editing box by a half note (minim), setting the duration of the previous group. |
| Ctrl+7 | Advances the editing box by a whole note (semibreve), setting the duration of the previous group. |
| Ctrl+8 | Advances the editing box by two whole notes (breve), setting the duration of the previous group. |
| Ctrl+Space | Enters an actual space; useful when figure appears "on the second line" (e.g., 5 4 -> 3). |
| BB | Enters a double flat. |
| B | Enters a flat. |
| H | Enters a natural. |
| # | Enters a sharp. |
| ## | Enters a double sharp. |
| _ | Enters a continuation line. |
| __ | Enters an extended continuation line. |
File formats
MuseScore can import and export a wide variety of file formats, allowing you to share and publish scores in the format that best meets your needs.
MuseScore native format
MuseScore saves files in the following native formats:
- *.MSCZ: The default MuseScore file format. Being compressed it takes up relatively little disk space.
- *.MSCX: An uncompressed MuseScore file format.
- .*.MSCZ, / .*.MSCX,: These are backup files. Notice the point (full stop) added before the file name, and the comma added to the file extension.
A note about fonts: MuseScore does not embed text fonts in saved or exported native format files. If you want your MuseScore file to be viewed by other MuseScore users, make sure you are using the built-in FreeSerif or FreeSans font families for your text, or a font that the other parties have installed too. If a system does not have the fonts specified in your original file, MuseScore will use a fallback option, which may cause your score to appear differently.
MuseScore format (*.mscz)
MSCZ is the standard MuseScore file format and recommended for most uses. A score saved in this format takes up very little disk space, but preserves all the necessary information. The format is a ZIP-compressed version of .mscx files and includes any images.
Uncompressed MuseScore format (*.mscx)
MSCX is the uncompressed version of the MuseScore file format. A score saved in this format will retain all information, except images. It can be opened with a text editor, allowing the user access to the file's source code.
MuseScore backup file (.*.mscz,) or (.*.mscx,)
Backup files are created automatically and saved in the same folder as your normal MuseScore file. The backup copy contains the previously saved version of the MuseScore file and can be important if your normal copy becomes corrupted, or for looking at an older version of the score.
The backup file adds a period to the beginning of the file name (.) and a comma (,) to the end (e.g. if your normal file is called "untitled.mscz", the backup copy will be ".untitled.mscz,"), and the period and comma need to be removed from the name in order to open the backup file in MuseScore. As it is stored in the same folder as your normal MuseScore file, you may also need to give it a unique name (e.g. changing ".untitled.mscz," to "untitled-backup1.mscz").
Note: In order to see the MuseScore backup files, you may need to change your system settings to "Show hidden files". See also How to recover a backup copy of a score (MuseScore 2.x).
Graphic files (export only)
MuseScore can export a score as a graphic file in either PDF, PNG or SVG format.
PDF (*.pdf)
PDF (Portable Document Format) files are ideal for sharing your sheet music with others who do not need to edit the content. This is a very widely-used format and most users will have a PDF viewer of some kind on their computers.
To set the resolution of exported PDFs:
- From the menu bar, chose Edit→Preferences... (Mac: MuseScore→Preferences...), and select the "Export" tab;
- Set the resolution in the "PDF" section.
PNG (*.png)
PNG (Portable Network Graphics) files are based on a bitmap image format, widely supported by software on Windows, Mac OS, and Linux, and very popular on the web. MuseScore creates PNG images as they would appear if printed, one image per page.
To set the resolution of exported PNG images:
- From the menu bar, chose Edit→Preferences... (Mac: MuseScore→Preferences...), and select the "Export" tab;
- Set the resolution and transparency in the PNG/SVG section.
Note: If you want to create images that show only parts of the score (with or without screen-only items such as frame boxes, invisible notes, and out-of-range note colors), use Image capture instead.
SVG (*.svg)
SVG (Scalable Vector Graphics) files can be opened by most web browsers (except Internet Explorer before version 9) and most vector graphics software. However, most SVG software does not support embedded fonts, so the appropriate MuseScore fonts must be installed to view these files correctly. SVG is the format used on MuseScore.com for all scores saved online since May 2017 (coinciding with the release of MuseScore 2.1: before this the format was PNG).
To set resolution and transparency of exported SVG files, see the instructions under PNG (above). Note that MuseScore does not (yet) support gradients on export (although it does for images in a score).
Audio files (export only)
MuseScore can create normalised, stereo audio of the score in any of the following formats: WAV, MP3, OGG VORBIS, FLAC. To export an audio file:
- From the menu, select File → Export...;
- Chose the desired format from the dropdown menu, then press Save.
You can adjust the sample rate of all audio formats as follows:
- From the menu bar, select Edit→Preferences... (Mac: MuseScore→Preferences...), and click on the Export tab;
- Set "Sample rate" in the "Audio" section.
WAV audio (*.wav)
WAV (Waveform Audio Format) is an uncompressed sound format. This was developed by Microsoft and IBM, and is widely supported by software for Windows, OS X, and Linux. It is an ideal format for use when creating CDs, as full sound quality is preserved. For sharing via email or the internet, use a compressed alternative such as MP3.
MP3 (*.mp3)
MP3 is a very widely-used compressed audio format. MP3 files are ideal for sharing and downloading over the internet due to their relatively small size.
For Windows and Mac users with an older version of MuseScore (Windows: prior to 2.2, Mac prior to 2.3.2), an additional library, lame_enc.dll (Windows) or libmp3lame.dylib (Mac), must be installed to create MP3 files (for Linux, it is up to the distribution maintainer whether or not to include this). MuseScore will prompt you for its location on the first attempt of an MP3 export. You can get it at http://lame.buanzo.org/.
Some Mac users may find MuseScore encounters an error loading the MP3 library, possibly due to that library being a 32-bit library. A 64-bit build that will work with MuseScore is available from http://thalictrum.com/en/products/lame (note that it is necessary to rename the file to libmp3lame.dylib for MuseScore to recognize it). Homebrew users just need to run brew install lame.
As of version 2.1 you can set the MP3 bitrate:
- From the menu bar, chose Edit→Preferences... (Mac: MuseScore→Preferences...), and select the "Export" tab;
- Set the MP3 bitrate in the "Audio" section.
FLAC audio (*.flac)
Free Lossless Audio Codec (FLAC) is compressed audio format. FLAC files are approximately half the size of uncompressed audio and just as good quality. Windows and OS X do not have built-in support for FLAC, but software such as the free and open source VLC media player can play FLAC files on any operating system.
Ogg Vorbis (*.ogg)
Ogg Vorbis is intended as a patent-free replacement for the popular MP3 audio format (which MuseScore also supports—see above). Like MP3, Ogg Vorbis files are relatively small (often a tenth of uncompressed audio), but some sound quality is lost. Windows and OS X do not have built-in support for Ogg Vorbis. However, software such as VLC media player and Firefox can play Ogg files on any operating system.
Share with other music software
MuseScore can import and export MusicXML and MIDI files; it is also able to import a variety of native format files from other music notation programs.
MusicXML (*.xml, *.musicxml)
MusicXML is the universal standard for sheet music. It is the recommended format for sharing sheet music between different scorewriters, including MuseScore, Sibelius, Finale, and more than 100 others. As of version 2.2, MuseScore exports as .musicxml, and imports both, *.xml and *.musicxml.
Compressed MusicXML (*.mxl)
Compressed MusicXML creates smaller files than regular MusicXML. This is a newer standard and isn't as widely supported by older scorewriters, but MuseScore has full import and export support.
MIDI (*.mid, *.midi, *.kar)
MIDI (Musical Instrument Digital Interface) is a format widely supported by sequencers and music notation software. For details of the protocol see the MIDI Association website.
MIDI files are very useful for playback purposes but contain little in the way of score layout information (formatting, pitch spelling, voicing, ornaments, articulations, repeats, key signatures etc.). To share files between different music notation software, MusicXML is recommended instead.
For details about how to import MIDI files see MIDI import.
MuseData (*.md) (import only)
MuseData is a format developed by Walter B. Hewlett beginning in 1983 as an early means of sharing music notation between software. It has since been eclipsed by MusicXML, but several thousand scores in this format are still available online.
Capella (*.cap, *.capx) (import only)
CAP and CAPX files are created by the score writer, Capella. MuseScore imports version 2000 (3.0) or later fairly accurately (2.x doesn't work, while the *.all format from 1.x versions is not supported at all).
Bagpipe Music Writer (*.bww) (import only)
BWW files are created by the niche score writer, Bagpipe Music Writer.
BB (*.mgu, *.sgu) (import only)
BB files are created by the music arranging software, Band-in-a-Box. MuseScore's support is currently experimental.
Overture (*.ove) (import only)
OVE files are created by the score writer Overture. This format is mainly popular in Chinese-language environments, such as Mainland China, Hong Kong, and Taiwan. MuseScore's support is currently experimental.
Guitar Pro (*.gtp, *.gp3, *.gp4, *.gp5, *.gpx) (import only)
GP files are created by Guitar Pro.
See also
External links
Fretboard diagrams
A range of fretboard (or chord) diagrams for the guitar are pre-provided in the Fretboard Diagrams palette in the Advanced Workspace (versions prior to 2.0.3 feature only one diagram).
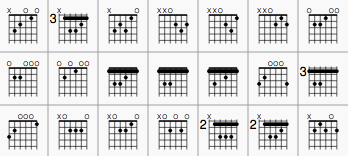
You can create a chord diagram for any fretted, stringed instrument by editing an existing one. It can be saved to a custom palette for future use if required.
Add a fretboard diagram
To add a fretboard diagram to the score, use one of the following methods:
- Select a note in voice 1 and double-click a fretboard diagram from a palette.
- Drag and drop a fretboard diagram from a palette to the desired position in the score.
Edit fretboard diagram
- Right-click on a diagram in the score and select Fretboard Diagram Properties....
- Adjust the number of instrument strings, using the "Strings" spin box at the bottom left of the window.
- Adjust the fret position number using the scroll bar on the right-hand side.
- Adjust how many frets to display (height-wise) using the "Frets" spin-box at the bottom right of the window.
- To place a dot on a string fret, click on that fret. To remove the dot, click on the fret again.
- Click just above the diagram to toggle a string between:
- Open (o)
- Mute/unplayed (x)
- No indication.
- To create a barre or partial barre:
i. Make sure the desired fret position is clear of black dots (click on a dot to remove it);
ii. Hold Shift and click on the fret where you want the barre to begin. Note: Only one barre can be applied per diagram;
iii. To delete a barre, click on the black dot where the barre begins.
For example, to create a full-barre F# chord, from a C chord:
- Place the C fretboard diagram on the score, right-click on it and select Fretboard Diagram Properties....
- Click on the relevant fret positions to establish the fingering dots.
-
Set "Frets" to "4" and fret number (right-hand scroll bar) to "2." The diagram should now look like this:
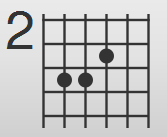
-
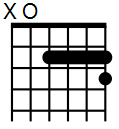
Create the barre by holding Shift and clicking on the second fret of the 6th string. Click "OK" to exit and you should get this:
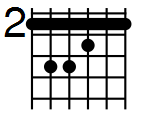
The same principle applies if you want a partial barré. For example, the partial barré in an A7 chord is created by pressing Shift, then clicking on the 4th string, second fret:
Adjust position, size, color
The size ("Scale"), color and position of a fretboard diagram can be changed by clicking on it and altering the relevant values in the Inspector.
The position of the fretboard diagram can also be adjusted in Edit mode:
- Double-click on the diagram (or click on it and press Ctrl+E (Mac: Cmd+E); or right-click on it and select Edit element).
- Press the arrow keys for fine positioning (0.1 sp. at a time); or press Ctrl+Arrow (Mac: Cmd+Arrow) for larger adjustments (1 sp. at a time).
Fretboard diagram style
Some default properties of fretboard diagrams (barre thickness, vertical position, size etc.) can be adjusted from the menu: select Style → General… → Chord Symbols, Fretboard Diagrams. Any changes made here affect all existing diagrams, as well as those applied subsequently.
MIDI import
MuseScore kan importere MIDI filer (.mid/.midi/.kar) og konvertere dem til musiknotation. Filer importeres ved at bruge standard Åbn funktionen.
Import af filer
Programmet vil i første omgang omsætte MIDI til notation, med brug af standard indstillinger. Et MIDI Import Panel , med en liste af kanaler, vil blive vist i bunden af skærmen, sammen med de mulige indstillinger for hver kanal (Kun kanaler som indholder nodeinformation, vil blive vist). Indstillingerne kan ændres kanal for kanal, og data kan derefter re-importeres: Knappen "Aktivér" i toppen af panelet, vil straks udføre ændringerne. "Fortryd" knappen vil annulere ændringer, som ikke er gemt. Det fædige resultat skulle gerne være, at filen overføres til nodearket i en bedre kvalitet.
Brug Skift+hjul eller Ctrl+hjul til at forskyde indstillingerne vandret; brug musens hjul alene til at bladre gennem kanalerne (eller brug skyderne i højre side og forneden).
Hvis der er mere end en kanal, vil der blive indsat en ekstra kanal øverst, som ændrer alle kanaler på en gang.

I MIDI Import Panelet kan der vælges hvilke kanaler, der skal importeres, og rækkefølgen kan ændres. En række informationer om hver kanal vises: Lyd, nodelinjens navn, og sangtekster hvis der er nogen. Hvis kolonnen "Sangtekster" vIses, betyder det at der er en kanal med tekster, som kan knyttes til de øvrige kanaler via drop-down menuen.
MIDI import panelet opdaterer informationerne for det aktuelle nodeark, hvis brugeren har flere åbne. Når MIDI panelet ikke længere skal bruges, kan det lukkes ved at klikke på X i øverste venstre hjørne. Panelet kan åbnes igen ved tryk på knappen "Vis MIDI import panel", som kommer frem i bunden af skærmen, når panelet lukkes.
Når nodearket er blevet gemt, vil MIDI Import Panelet ikke være tilgængeligt, da MuseScore ikke længere er ved at importere en MIDI fil.
Indstillingsmuligheder
- MuseScore instrument
- Tildel et MuseScore instrument (fra instruments.xml eller fra en brugerdefineret xml fil fra Foretrukne) som definerer nodelinjerne navn, nøgle, transponering, artikulationer osv.
- Max. kvantificering
-
Kvantificer MIDI noder efter et fast gitter. Max. opløsningen for gitteret kan sættes fra rullemenuen:
- Værdi fra Foretrukne (standard) - værdien for kvantificering hentes fra billedet Foretrukne (på “Import” fanen)
- Kvart, Ottendedel, 16. del, 32. del, 64. del, 128. del - brugerdefineret værdi
-
Det aktuelle kvantificerings gitter er dog adaptivt, og reduceres når nodens varighed er kort, så kvantificerings værdien er forskellig for hver node. Der er dog en øvre grænse for kvantificerings værdien, der kan sættes af brugeren som "max. kvantificering".
Hvis noden f.eks. er lang -en halvnode - og max. kvantificering er sat til 8. del, så vil noden blive kvantificeret med 8. dels-node-gitteret, og ikke med halv- eller flerdelsnode, som det ellers er forudsat i algoritmen.
En sådan tilgang til kvantificeringen vil sikre at alle noder i nodearket (uanset længde) bliver korrekt kvantificeret. - Max. stemmer
- Sætter det maksimalt tilladte antal musikalske stemmer.
- Find tupletter
- Når denne mulighed er sat, vil der blive søgt efter tupletter, og det tilsvarende kvantificerings gitter vil blive anvendt. I undermenuen kan der vælges hvilke typer tupletter, der søges efter
- Menneskelig udførelse
- Hvis denne indstilling er sat, vil nøjagtigheden for MIDI-til-nodeark konverteringen blive reduceret, til fordel for læseligheden. Det er især brugbart for MIDI filer, som ikke er rettet ind, så et fast kvantificerings gitter kan bruges. For disse filer vil der, i hele musikstykket, blive brugt en automatisk rutine til søgning efter taktslag, som vil forsøge at bestemme taktstregernes placering.
- Halveret taktantal
- Denne indstilling kan bruges for MIDI files, som ikke er rettet ind (ved "menneskelig udførelse"). Det vil halvere antallet af takter i forhold til det der er fundet ved søgning efter taktslag. Kan specielt bruges hvis søgerutinen giver dobbelt så mange takter, som nødvendigt.
- Taktart
- Denne indstilling er til rådighed for MIÐI filer, som ikke er rettet ind. Brugeren kan vælge en passende taktart for hele stykket, hvis den detekterede værdi er forkert. Denne mulighed kan være nyttig, da den håndterer importerede tupletter korrekt, i modsætning til taktarten fra paletten.
- Del nodelinje
- Denne indstilling kan bruges på mange klaver kanaler - for at tildele noder til musikerens højre og venstre hånd. Der kan bruges fast tonehøjde opdeling - som kan indstilles fra et underpunkt - eller flydende opdeling (programmet vil nærmest gætte sig frem på basis af en hånds bredde).
For slagtøjskanaler vil hver trommelyd få sin egen nodelinie. Der er også et underpunkt, hvor man kan bestemme om der må anvendes kantede pararanteser om de nyoprettede tromme kanaler. - Nøgleændringer
- Små nøgler kan blive indsat på en nodelinje, for at få akkorder placeret tættere på de 5 linjer. Nøgleændringerne baseres på den gennemsnitlige tonehøjde for noderne i akkorden. Sammenbundne grupper af noder brydes ikke ved indsættelse af nøgler (skulle det ske bør det raporteres som en fejl på
importmidi_clef.cpp). Denne indstilling er ikke til rådighed for slagtøjslinjer. - Forenklede varigheder
- Reducerer antallet af pauser, for at give "simplere" node varigheder. Denne indstilling kan også fjerne pauser og forlænge noder på slagtøjslinjer.
- Vis staccato
- Indstillingen vil vise/skjule staccato markeringer i nodearket.
- Punkterede noder
- Bestemmer om MuseScore skal benytte punkterede noder eller bindebuer.
- Vis tempo tekst
- Viser/skjuler tempoangivelser i nodearket.
- Vis akkordnavne
- Viser/skjuler akkordnavne - hvis der er nogen - i nodearket, for XF MIDI fil formatet.
- Genkend optakt
- Når denne indstilling er valgt vil taktarten ikke blive ændret, når den første takt er kortere end den næste. Dette betegnes som en optakt, og vil gælde for alle spor under et.
- Genkend swing
- MuseScore forsøger at genkende swing, og automatisk erstatte et mønster af 4dels+8dels noder i trioler (for den mest almindelige swing fornemmelse, 2:1), eller en punkteret 8dels+16dels mønster (for shuffle, 3:1), med to 8dele og teksten “Swing” eller “Shuffle” i starten.
Master palette
The Master Palette is a repository of symbols used to populate the workspaces (Basic, Advanced, and Custom). It is also used to create new Time Signatures and Key Signatures.
To open, use either of the following options:
- Press Shift+F9 (Mac: fn+Shift+F9).
- From the menu, select View → Master Palette.
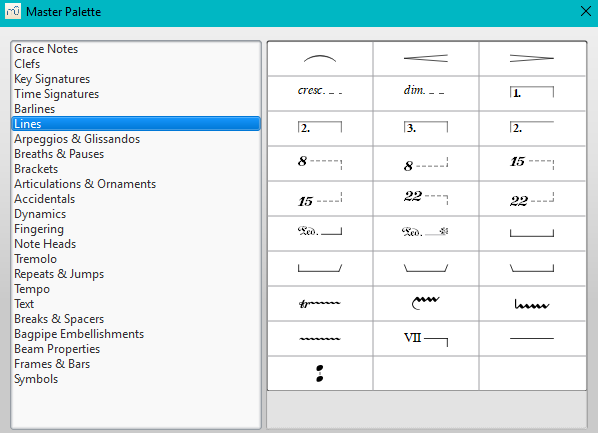
The Master palette is divided into sections based on symbol type. Hovering the mouse over an item shows a tool tip (a short definition in black on yellow background).
To transfer a Master palette item to a custom palette:
- Drag the symbol from the Master Palette window into a custom palette.
Note: Except for the Symbols section (below), it is not usual to add items directly to the score from the Master palette: use the workspace palettes instead. However, if desired, items can be added directly using either (i) drag-and-drop or (ii) by selecting one or more notes/rests and double-clicking the item.
Symbols
The Symbols section of the Master Palette is a large repository of hundreds of musical symbols in addition to those found in the preset workspaces. You can open it from the Master Palette, or directly from the score by using the shortcut Z.
Find a symbol
The symbols are listed under their respective musical font types: use the font menu on the bottom right of the box to specify Emmentaler, Gonville or Bravura. You can search for a particular symbol by entering a keyword in the search box.
Apply a symbol
To add an item to the score from the Symbols section, use any of the following options:
- Drag and drop a symbol onto a staff.
- Select a note or rest and double-click a symbol.
The position of the symbol can be adjusted by dragging or by changing the horizontal / vertical offsets in the Inspector. Color and visibility can also be adjusted in the Inspector.
Note: Elements from the Symbols section do not follow any positioning rules (in many cases unlike identical elements from other sections of the Master Palette), nor do they affect score playback.
Connect symbols
Elements from the Symbols section can be connected to each other on the score page, so that they can be moved as one unit:
- Apply first symbol to the score. Adjust position as required.
- Double click, or drag-and-drop, a second element onto the first symbol. Adjust position as required.
Drag the first element and the attached element will follow.
See also
- Palettes and workspaces
- Symbols and special characters (add musical symbols to text objects)
Note input modes
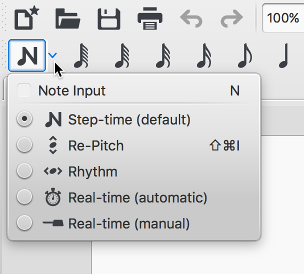
From version 2.1, you can enter notation using one of several new note input modes—in addition to the pre-existing Step-time and Re-pitch modes. These are accessed by clicking a small dropdown arrow next to the note entry button on the note input toolbar.
Step-time
This is the method of note entry that MuseScore has had from the beginning. You enter notes in Step-time mode by choosing a duration using the mouse or keyboard, and then choosing a pitch using the mouse, keyboard, MIDI keyboard or virtual piano.
For details see Basic note entry.
Re-pitch
Re-pitch mode allows you to correct the pitches of a sequence of notes while leaving their durations unchanged (not to be confused with Accidental: Respell pitches).
- Select a note as your starting point;
- If you are using a pre-2.1 version of the program press N to enter note-input mode. This step is optional from 2.1 onwards.
- Select the Re-Pitch option from the Note input drop-down menu (or, for pre-2.1 versions, from the note input toolbar); or use the keyboard shortcut, Ctrl+Shift+I (Mac: Cmd+Shift+I).
- Now enter pitches using the keyboard, MIDI keyboard or virtual piano keyboard.
You can also use the Re-pitch function to create a new passage from an existing one of the same sequence of durations—by copying and pasting the latter, then applying Re-pitch.
Rhythm
Rhythm mode allows you to enter durations with a single keypress. Combining Rhythm and Re-pitch modes makes for a very efficient method of note entry.
- Select your starting point in the score and enter Rhythm mode.
- Select a duration from the note input toolbar, or press a duration shortcut (numbers 1-9) on your computer keyboard. A note will be added to the score with the selected duration. In contrast to Basic note entry, pressing the . key will toggle dotting or not dotting all subsequent durations. All following rhythms will be dotted until the . key is pressed again. Unlike Basic note entry, the dot is to be pressed prior to entering the rhythm.
- Entering rests is similar to adding dotted notes. Press the 0 key to toggle entering rests. All rhythms entered will be rests until the 0 key is pressed again. This can be used concurrently with dotted notes.
- Continue pressing duration keys to enter notes with the chosen durations.
- Now use Re-pitch mode to set the pitches of the notes you just added.
Real-time (automatic)
The Real-time modes basically allow you to perform the piece on a MIDI keyboard (or MuseScore's virtual piano keyboard) and have the notation added for you. However, you should be aware of the following limitations which currently apply:
- It is not possible to use a computer keyboard for Real-time input
- You cannot enter tuplets or notes shorter than the selected duration
- You cannot enter notes into more than one voice at a time
However, these restrictions mean that MuseScore has very little guessing to do when working out how your input should be notated, which helps to keep the Real-time modes accurate.
In the automatic version of Real-time input, you play at a fixed tempo indicated by a metronome click. You can adjust the tempo by changing the delay between clicks from the menu: Edit → Preferences... → Note Input (Mac: MuseScore → Preferences... → Note Input).
- Select your starting position in the score and enter Real-time (automatic) mode.
- Select a duration from the note input toolbar.
- Press and hold a MIDI key or virtual piano key (a note will be added to the score).
- Listen for the metronome clicks. With each click the note grows by the selected duration.
- Release the key when the note has reached the desired length.
The score stops advancing as soon as you release the key. If you want the score to continue advancing (e.g. to allow you to enter rests) then you can use the Real-time Advance shortcut to start the metronome.
Real-time (manual)
In the manual version of Real-time input, you have to indicate your input tempo by tapping on a key or pedal, but you can play at any speed you like and it doesn't have to be constant. The default key for setting the tempo (called "Real-time Advance") is Enter on the numeric keypad (Mac: fn+Return), but it is highly recommended that you change this to a MIDI key or MIDI pedal (see below).
- Select your starting position in the score and enter Real-time (manual) mode.
- Select a duration from the note input toolbar.
- Press and hold a MIDI key or virtual piano key (a note will be added to the score).
- Press the Real-time Advance key. With each press the note grows by the selected duration.
- Release the note when it has reached the desired length.
Real-time Advance shortcut
The Real-time Advance shortcut is used to tap beats in manual Real-time mode, or to start the metronome clicks in automatic Real-time mode. It is called "Real-time Advance" because it causes the input position to more forward, or "advance", through the score.
The default key for Real-time Advance is Enter on the numeric keypad (Mac: fn+Return), but it is highly recommended that you assign this to a MIDI key or MIDI pedal via MuseScore's MIDI remote control. The MIDI remote control is available from the menu: Edit → Preferences... → Note Input (Mac: MuseScore → Preferences... → Note Input).
Alternatively, if you have a USB footswitch or computer pedal which can simulate keyboard keys, you could set it to simulate Enter on the numeric keypad.
See also
External links
- Video: Semi-Realtime MIDI Demo Part 1: New note entry modes (available as of MuseScore 2.1)
- Introduction to the new Repitch Mode (YouTube)
Noteheads
A range of alternative noteheads – in addition to the "normal" – can be found in the Note Heads palette of the Advanced workspace and via the Inspector (see Change notehead group, below).
Note: The design of the notehead may vary depending on the music font selected (Emmentaler, Gonville or Bravura). Those in the palette are displayed as half notes in Bravura font.
Notehead groups
MuseScore supports a number of notehead styles:
- Normal: A standard notehead.
- Crosshead (Ghost note): Used in percussion notation to represent cymbals. It also indicates muted and/or percussive effects in stringed instruments such as the guitar.
- Diamond: Used to indicate harmonic notes in instruments such as the guitar, violin etc.
- Slash: Used to notate rhythmic values.
- Triangle: Used in percussion notation.
- Shape notes: Do, Re, Mi, Fa, Sol, La, Ti.
- Circle cross: Used in percussion notation.
- Alternative Brevis: Used in early music notation.
- Brackets (Parentheses): When applied, these go around the existing note (or accidental).
Change notehead group
To change the shape of one or more noteheads in the score, use one of the following:
- Select one or more notes and double click a notehead in a palette
- Drag a notehead from a palette onto a note in the score.
- Select one or more notes and change the notehead in the Inspector, using the drop-down list under Note → Head group (not supported for drum staves).
Change notehead type
Occasionally you may need to change the apparent duration of a notehead—i.e. notehead type—without altering its actual, underlying duration:
- Select one or more notes.
- Chose one of the following options from the Inspector under Note → Head type:
- Auto: Automatic, i.e, apparent duration = actual duration.
- Whole: Whole notehead, regardless of actual duration.
- Half: Half notehead, regardless of actual duration.
- Quarter: Quarter notehead, regardless of actual duration.
- Breve: Breve notehead, regardless of actual duration.
Shared noteheads
When two notes in different voices, but of the same written pitch, fall on the same beat, one of two things may happen:
- The notes may share the same notehead.
- The notes may be offset: i.e. arranged side by side.
MuseScore follows standard music notation practice as follows:
- Notes with stems in the same direction do not share noteheads.
- Dotted notes do not share noteheads with undotted notes.
- Black notes do not share noteheads with white notes.
- Whole notes never share noteheads.
Note: If two unison notes occur in the same voice they are always offset.
Change offset noteheads to shared
Offset noteheads can be turned into shared noteheads in one of two ways:
- Make the smaller-value notehead invisible by selecting it and using the keyboard shortcut V (or unchecking the "Visible" option in the Inspector).
- Alter the notehead type of the shorter-duration note to match the longer one by switching "Head type" in the "Note" section of the Inspector.
Examples of notehead sharing
-
In the first example below, the notes of voices 1 and 2 share noteheads by default, because they are all black, undotted notes:
-
By contrast, in the next example, white notes cannot share noteheads with black notes, so are offset to the right:
To create a shared notehead, make the black eighth note invisible or change its head type to match that of the white note (as explained above):
Remove duplicate fret marks
In certain cases, a shared notehead, when pasted to a tablature staff, may result in two separate fret marks on adjacent strings. To correct this, make any extraneous tablature notes invisible by selecting them and using the keyboard shortcut V (or by unchecking the "visible" option in the Inspector).
External links
- Shape notes at Wikipedia.
- Ghost notes at Wikipedia.
Parts
MuseScore not only allows you to create and print the full score but also the individual instrument parts.
Note: In the current version of MuseScore, only one part can be generated per single staff (or grand staff or staff/TAB system). If you want to create a part for a particular voice, you need to ensure that it has its own staff as well.
Set up all parts at once
This is the most straightforward method. Parts are generated on a one-to-one basis from the corresponding Instruments in the score:
- From the menu, select File → Parts...;
- Click the New All button (parts are named with the instrument name, and a number added to differentiate parts that have the same label in the main score);
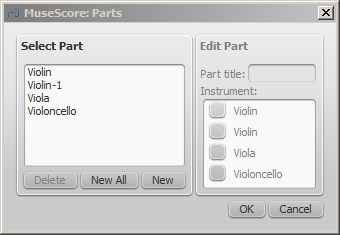
- Click OK.
The parts can now be accessed by clicking on tabs above the document window.
Define specific parts
This method allows you to generate specific parts (rather than all-at-once), or to alter a previous parts set-up. It also allows you to specify multi-instrument parts, and define part names differently from the corresponding instruments, if needed.
The following instructions use a string quartet as an example, but the same principles apply for any other ensemble:
- From the menu, select File → Parts...;
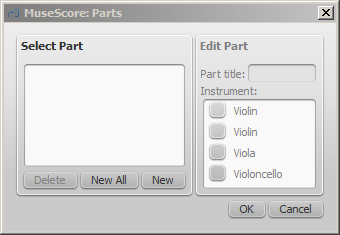
- In the Parts window click New to create a "part definition;"
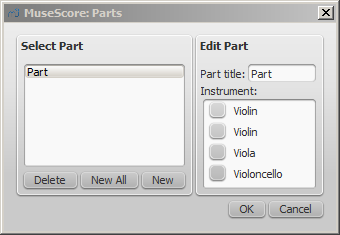
- In the right pane, type the words you want to use for the "Part title" (this also serves for the corresponding part of the filename when exporting);
- Pick the instrument that you want to appear in your part by marking the relevant box in the right-hand pane. Usually, you only want one instrument per part, but sometimes you might need a part that includes more than one instrument (such as multiple percussion staves). MuseScore allows you to mark as many instruments per part as you need;
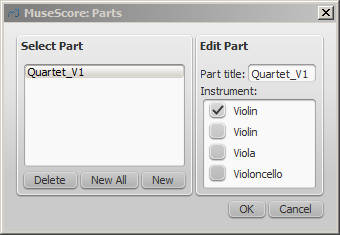
- Repeat steps two through four (above) for each part as needed;
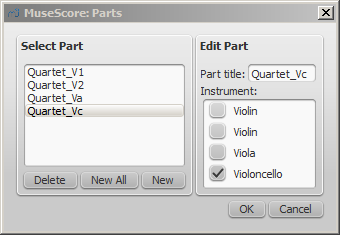
- Once you're done, click OK to dismiss the Parts window.
You have now finished setting up the parts. You do not need to do this again, unless you add or remove an instrument from your full score.
Delete a Part
- Open the Parts dialog (File → Parts...);
- Select the relevant Part in the "Select Part" section;
- Press Delete.
Export the parts
- From the menu, select File → Export Parts...;
- Navigate to the place you want them to be exported to and select the file format (PDF is the default);
- For filename just enter whatever prefix is useful for all parts, or leave the default (the filename of your score);
- Click OK.
This will generate files with the names "<title>" + "-" + "<part name>.<extension>". In addition, when exporting as PDF, this will also generate "<title>" + "-Score_And_Parts.pdf".
Save the parts
Parts and score are "linked", which means that any change to the content in one will affect the other, but changes to the layout will not. When you have the parts created, they are saved along with the score (if you open the score you have tabs for the score and every part you created).
However, if you wish to save a part individually:
- Make sure the part is "active." Select its tab if not;
- From the menu, select File → Save As....
Print a part
- Make sure the part is "active." Select its tab if not;
- From the menu, select File → Print to open the print dialog.
Plugins
Overview
Plugins are small pieces of code that add a particular feature to MuseScore. By enabling a plugin, a new menu option will be appended to the Plugins menu in MuseScore to accomplish a given action on the score or a part of it.
Some plugins come pre-installed with MuseScore—see →below. You can find many more plugins in the plugin repository. Some plugins there work with MuseScore 2; others will only work with older versions of MuseScore, some work with either.
To tell one from the other: for MuseScore 2.x the plugin code files have an extension of .qml, for older versions, it is .js.
Installation
Note that some plugins may require the installation of other components (fonts, e.g.) to work. Check the plugin's documentation for more information.
Most plugins are provided as ZIP archives, so download the plugin's .zip file and uncompress it to one of the directories mentioned below. If a plugin is provided directly as an (unzipped) .qml file, simply download and place into one of these directories.
Once a plugin is installed, it needs to be enabled in the Plugin Manager in order to use it—see →below.
Windows
MuseScore looks for pre-installed plugins in %ProgramFiles%\MuseScore 2\Plugins (or %ProgramFiles(x86)%\MuseScore 2\Plugins for the 64-bit versions) and in %LOCALAPPDATA%\MuseScore\MuseScore 2\plugins on Vista, Seven and 10 or C:\Documents and Settings\USERNAME\Local Settings\Application Data\MuseScore\MuseScore 2\plugins (adjusted to your language version) on XP.
To install new plugins, the above folders should not be used or modified. Instead you can add other plugins to %HOMEPATH%\Documents\MuseScore2\Plugins, or specify a different folder to look for plugins in MuseScore's Preferences.
macOS
On macOS, MuseScore looks for pre-installed plugins in the MuseScore bundle in /Applications/MuseScore 2.app/Contents/Resources/plugins (to reveal files in the app bundle, right click on MuseScore 2.app and choose "Show package contents") and in ~/Library/Application Support/MuseScore/MuseScore 2/plugins.
To install new plugins, the above folders should not be used or modified. Instead you can add other plugins to ~/Documents/MuseScore2/Plugins, or specify a different folder to look for plugins in MuseScore's Preferences.
Linux
In Linux, MuseScore looks for plugins in /usr/share/mscore-2.0/plugins and in ~/.local/share/data/MuseScore/MuseScore 2/plugins.
To install new plugins, the above folders should not be used or modified. Instead you can add other plugins to ~/Documents/MuseScore2/Plugins, or specify a different folder to look for plugins in MuseScore's Preferences.
Enable/disable plugins
To be able to access the installed plugins from the Plugins menu, they need to be enabled in the Plugin Manager:
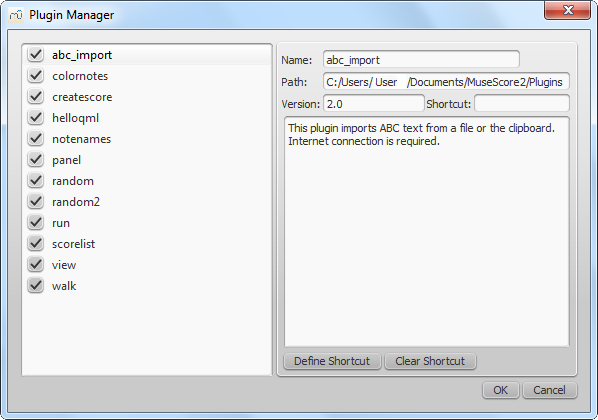
Create/edit/run plugins
It is possible to create new or edit existing plugins and run them via the Plugin Creator:
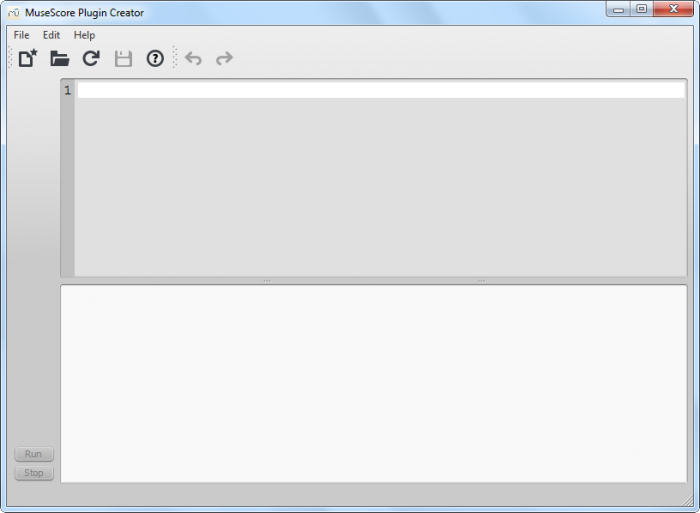
Here also the documentation of all available elements can be found
Plugins installed by default
Some plugins come pre-installed with MuseScore, but they are not enabled by default. See →above to enable plugins.
ABC Import
This plugin imports ABC text from a file or the clipboard. Internet connection is required, because it uses an external web-service for the conversion, which uses abc2xml and gets send the ABC data, returns MusicXML and imports that into MuseScore.
Break Every X Measures
This plugin enters line breaks in the interval you select on the selected measures or, if no measures are selected, the entire score. It is no longer being distributed and has been replaced by Edit → Tools → Add/Remove Line Breaks. If you ever used an early beta version of MuseScore 2, though, you may still see the plugin left over.
Notes → Color Notes
This demo plugin colors notes in the selected range (or the entire score), depending on their pitch. It colors the note head of all notes in all staves and voices according to the Boomwhackers convention. Each pitch has a different color. C and C♯ have a different color. C♯ and D♭ have the same color.
To color all the notes in black, just run that plugin again (on the same selection). You could also use the 'Remove Notes Color' plugin for this.
Create Score
This demo plugin creates a new score. It creates a new piano score with 4 quarters C D E F. It's a good start to learn how to make a new score and add notes from a plugin.
helloQml
This demo plugin shows some basic tasks.
Notes → Note Names
This plugin names notes in the selected range or the entire score. It displays the names of the notes (as a staff text) as per MuseScore's language settings, for voices 1 and 3 above the staff, for voices 2 and 4 below the staff, and for chords in a comma separated list, starting with the top note.
Panel
This demo plugin creates a GUI panel.
random
Creates a random score.
random2
Creates a random score too
run
This demo plugin runs an external command. Probably this will only work on Linux.
scorelist
This test plugin iterates through the score list.
ScoreView
Demo plugin to demonstrate the use of a ScoreView
Walk
This test plugin walks through all elements in a score
See also
Preferences
You can customize many of MuseScore's default behaviors via the menu: Edit→Preferences... (Mac: MuseScore→Preferences...).
The Preferences dialog has multiple tabs:

Reset All Preferences to Default will reset all preferences to the ones MuseScore had when you installed it.
Cancel will close the dialog without applying changes.
General
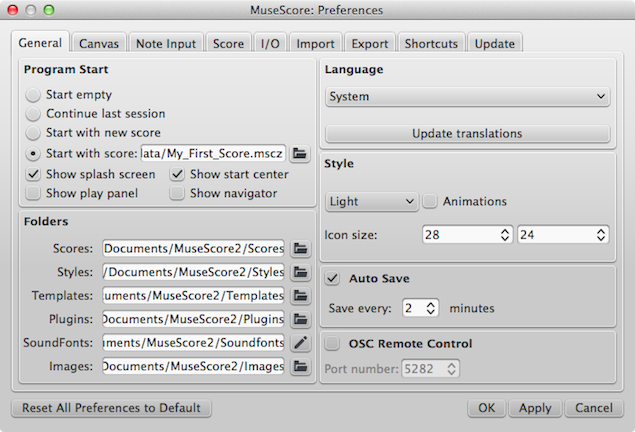
Here you can define:
- Program Start: Tick the boxes as appropriate to specify which score and what panels (Play Panel, Navigator, Start Center) you want to see when MuseScore opens.
- Folders: Specify the default folders for score files, style files, custom score templates, plugins, additional SoundFonts and images.
- Language: Chose the language used by the program. Translations may be updated from here too. Note that language translation updates can also be done via the menu: Help→Resource Manager.
- Theme / Style (prior to version 2.1): Specify a dark or light theme and the size of icons.
- Auto Save: How frequently the program autosaves.
- OSC Remote Control:
Canvas
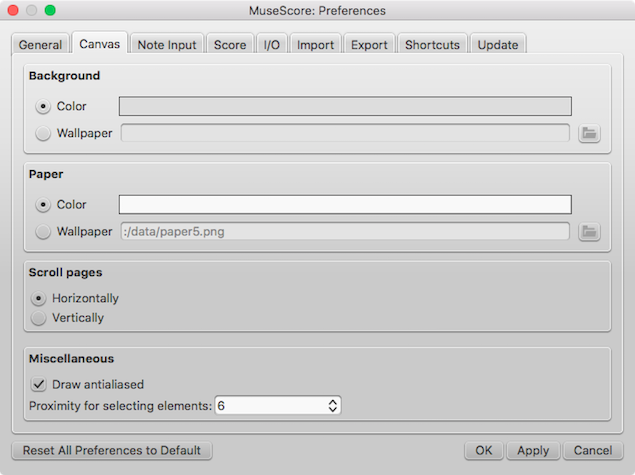
Use Canvas to set your preferred color and wallpaper for the score background and paper. The default "Background" is grey (RGB 221, 221, 221; Alpha 221) and the default "Paper," white.
- Background: Use this to set the color or background around the score pages. Select "Color" then click on the bar to the right and make a choice from the color picker; or select "Wallpaper," click on the file icon and set a background image.
- Paper : Sets the color or background of the score pages. Controls identical to "Background" (above).
- Scroll Pages: This defines the way that the pages are layed out in the score. Chose "Horizontally" for a row layout, or "Vertically" for a column layout.
- Miscellaneous: "Draw antialiased" (the default option) makes diagonal lines and edges of shapes look smoother. "Proximity for selecting elements" controls the distance the mouse may be from an object and still act on it. Smaller numbers require more precision, making it harder to click on small objects. Larger numbers are less precise, making it harder not to click on nearby objects unintentionally. Choose a comfortable working value.
Note input
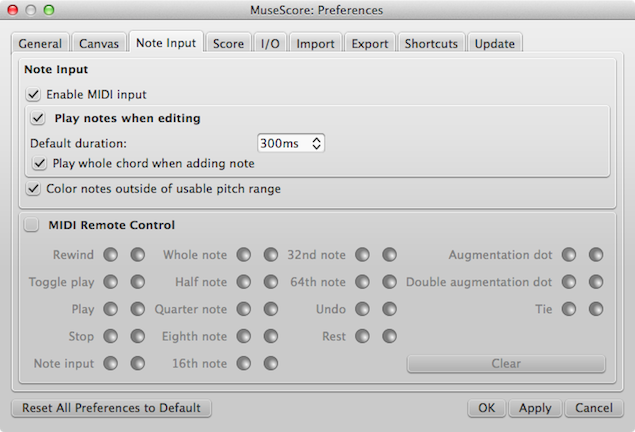
On this tab there are note input and MIDI remote control preferences. Here the following can be set:
Note Input
- Enable MIDI Input: Leave checked to allow MIDI input of notes.
- Color notes outside of usable pitch range: For details, see Coloring of notes outside an instrument's range and Usable pitch range (Staff properties: all staves).
- Delay between notes in automatic real-time mode (as of version 2.1): See Real-time (automatic).
- Play notes when editing: When ticked, MuseScore sounds the note when it is entered or selected. Tick "Play whole chord when adding note," if you want to hear all the notes of a chord when it is added to. You can also edit the "Default duration".
MIDI Remote Control
Midi Remote Control allows you to use certain keys on your MIDI keyboard to enter notes and rests and to select note durations, without involving the computer mouse or (computer) keyboard. The default setting is off.
To assign a command to a MIDI key:
- Ensure that "MIDI Remote Control" is checked (your MIDI keyboard should be connected befor opening the program).
- Click the red button next to the option you wish to assign a MIDI key to: the red button now lights up.
- Press a MIDI keyboard key. The red button becomes unlit and the green button lights up instead. The MIDI key has now been assigned to the desired option.
- Repeat "2" and "3" to assign other keys.
Once you have defined your key settings you can use the MIDI keyboard to control note input operations. You can verify your key settings by observing the MuseScore Note Input toolbar while pressing the MIDI keys.
To temporarily deactivate Midi Remote Control: uncheck "Midi Remote Control": all MIDI input key action buttons are now greyed out. Note: Your key assignments are always saved between MuseScore sessions and are not affected by deactivation.
Notes: (1) The "Clear" option turns off all the green buttons for the current MuseScore session but all the user-recorded MIDI key settings are retained and will be reloaded on the next session. (2) A MIDI key setting that is activated cannot afterwards be turned off, and the green button will always remain lit: however it can be overwritten with a different MIDI key by using the red button again. (3) If the same MIDI key is accidentally assigned to more than one option, then all the associated green buttons remain lit although only one will work. To fix, see "(2)".
Score
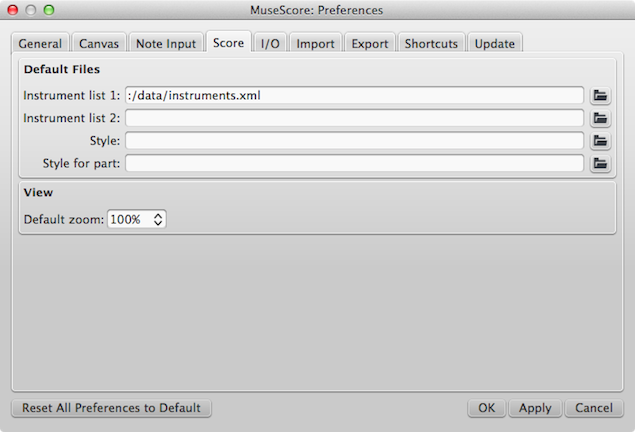
Score preferences include
- Default instrument list files (two may be selected)
- Default style for score and parts
- Default zoom
I/O
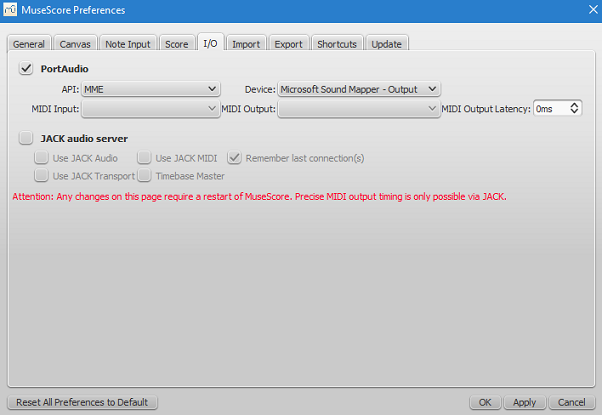
API / Device
This enables you to set the audio interface (API) and specify the device to be used for audio playback: e.g. built-in speakers/headphones, USB headset, wireless, etc.
MIDI Input/Output/Output Latency
When an external MIDI input device is connected, its identifier appears in MIDI Input. As of MuseScore 2.2, when the device is connected for the first time, you also need to select the correct MIDI Output option in order to enable note input and correct audio playback (e.g. in Windows, this might be "MMS<device name>"): then close and reopen the program to confirm the changes.
Versions of MuseScore prior to 2.2 only have the "MIDI Input" option. The correct MIDI output is automatically specified as long as the MIDI input device is connected correctly.
Jack Audio Server
Check these options as required if using the JACK Audio Connection Kit.
Import
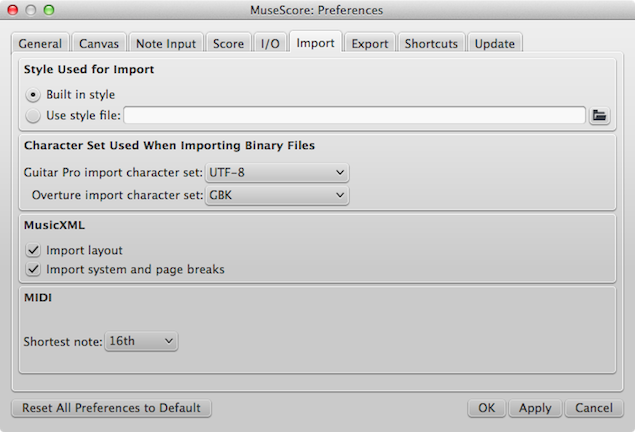
These settings determine how files from other sources are imported:
- Using either the built in MuseScore style or a style you choose
- Guitar Pro and Overture character sets
- MusicXML layout options
- Shortest note in MIDI files
Export
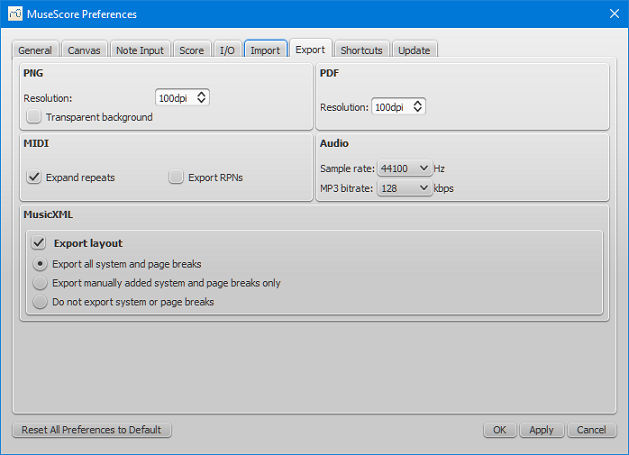
These settings determine how MuseScore files are exported:
- PNG/SVG image resolution (in DPI) and whether to use transparent background
- Whether to expand repeats in exported MIDI files
- Digital audio sample rate
- MP3 bitrate (as of MuseScore 2.1)
- Whether to export the layout and how to export system and page breaks to MusicXML
Shortcuts
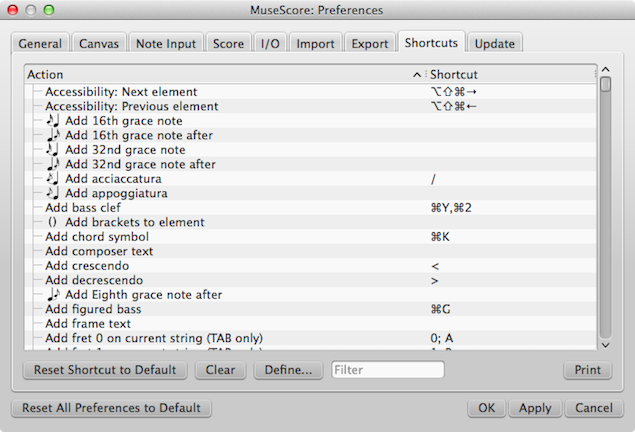
Every action possible with MuseScore is listed, with the associated shortcut if it exists. To define a new shortcut, select an existing entry in the list and click Define... (or just double click the entry), then enter the new shortcut using up to four keys. You can also reset any shortcut in the list to its default value, or clear a shortcut you select. Shortcuts listed in preferences appear next to their associated commands in the menus.
Note: Some shortcuts, including default ones, may not work with some keyboards.
The list of shortcuts can be printed out or exported to other media (pdf etc.) using the Print button in the bottom right of the window.
Update
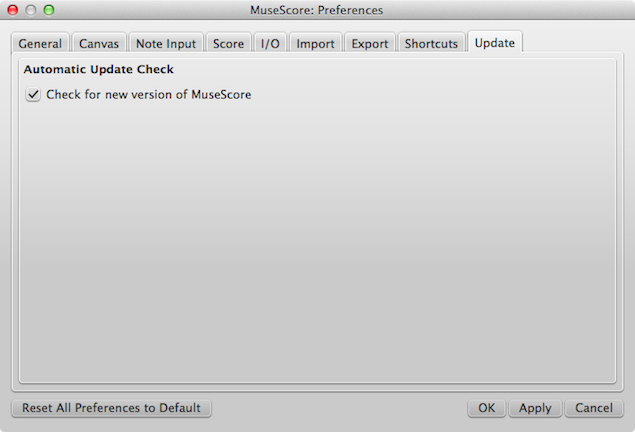
This sets whether MuseScore will check for updates at startup.
Updates may be checked manually in Help→Check for updates.
See also
Recovered files
If MuseScore or your computer should crash, or if power is lost, a pop-up message upon restarting MuseScore will ask if you wish to restore the previous session.
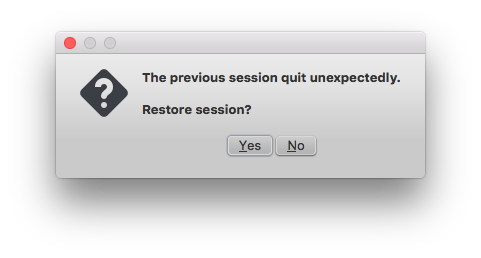
If you click No, any work from your previous session will be lost. If you click Yes, MuseScore will attempt to recover the files that were open.
Behavior of saving after session recovery
When MuseScore recovers files after a crash, it renames them with the full path name added in front of the original file name. This very long name will appear in the tab(s) above the active score window. On some operating systems, when a user saves any of these recovered files, it will be saved in the folder in which the program itself is running. This is not necessarily the same directory in which the scores were saved when they were created. You may not be able to locate the revised file in the usual folder.
To avoid this, do not use "Save" the first time you save a recovered file. Use the "Save As..." menu item before making any revisions to the score, to save each recovered file under either its original name or a new name. This will open a window to allow you to navigate to the correct folder and directory. This is important in order to ensure that the file is saved to the folder in which you expect to find it later.
Finding recovered files
In the event that "Save" is used instead of "Save As..." with a recovered file, you will have to find the files in your computer. The actual location of those files will vary, depending on your operating system, and in which directory MuseScore is installed.
For Windows 7, with a default installation of MuseScore to the x86 program files directory, recovered files are auto-saved to C:\Program Files (x86)\MuseScore 2\bin (actually %ProgramFiles(x86)%\MuseScore 2\bin).
For Windows 10, look in C:\Users\[User Name]\AppData\Local\VirtualStore\Program Files (x86)\MuseScore 2\bin (actually%LOCALAPPDATA%\VirtualStore\%ProgramFiles(x86):~3%\MuseScore 2\bin).
You may need to run a system-wide search in order to find files saved directly after a session recovery. Use keywords from the original file name as well as wildcards, and specify the date modified.
See also
External links
Score properties
The Score Properties dialog contains the document meta tags such as "workTitle," "Composer," "Copyright" etc. To view the dialog:
- Make sure that the applicable score or instrument part is the active tab;
- From the menu, select File → Score Properties (File → Info... in versions earlier than 2.0.3).
Several meta tags are generated automatically when you create a score using the New Score Wizard, and others may be added later. Meta tags can also be incorporated into a header or footer if required—see below.
Edit meta tags
- Make sure that the applicable score or instrument part is the active tab;
- From the menu, select File → Score Properties (File → Info... in versions earlier than 2.0.3);
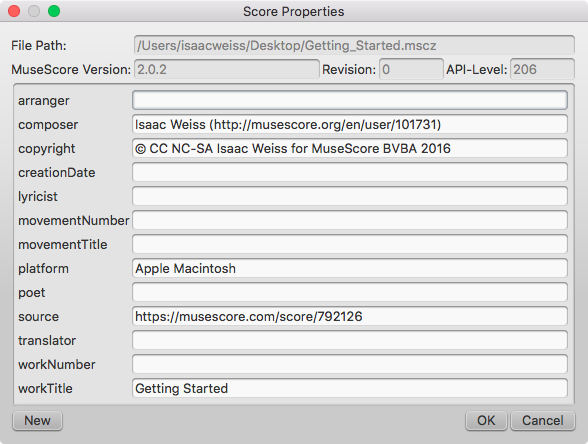
- Edit the text of the various meta tags as required;
- To add another meta tag, click on the New button. Fill in the "New tag name" field and press OK;
Preexisting meta tags
Every score has the following fields available in Score Properties. Some are automatically filled in on score creation, while others will be empty unless specifically changed. The first four items in the following list are not user-modifiable, and cannot be used in the header or footer (they are not really meta tags).
- File Path: The score file's location on your Computer (2.0.3 and later).
- MuseScore Version: The version of MuseScore the score was last saved with.
- Revision: The revision of MuseScore the score was last saved with.
- API-Level: The file format version.
- arranger: (empty)
- composer: As entered in the New Score Wizard (which is also used to fill the composer text in the top vertical frame—be aware that later changes to one are not reflected in the other).
- copyright: As entered in the New Score Wizard. Copyright info appears as seemingly uneditable text at the bottom of every page of a score, but it can be edited or removed by changing the value here.
- creationDate: Date of the score creation. This could be empty, if the score was saved in test mode (see Command line options).
- lyricist: As entered in the New Score Wizard (which is also used to fill the corresponding lyricist text in the top vertical frame—be aware that later changes to one are not reflected in the other).
- movementNumber: (empty)
- movementTitle: (empty)
- originalFormat: This tag exists only if the score got imported and then contains the format the score got imported from (see file formats).
- platform: The platform the score was created on: "Microsoft Windows", "Apple Macintosh", "Linux" or "Unknown". This might be empty if the score was saved in test mode.
- poet: (empty)
- source: May contain a URL if the score was downloaded from or saved to MuseScore.com.
- translator: (empty)
- workNumber: (empty)
- workTitle: As entered in the New Score Wizard (which is also used to fill the corresponding title text in the top vertical frame—be aware that later changes to one are not reflected in the other).
When working on multiple scores that belong to one larger work, the nomenclature is like this: workNumber and workTitle are the number and title of the larger work (e.g. opus 8, “Le quattro stagioni” (The four seasons) by Antonio Vivaldi), movementNumber is the number of the movement you’re working on (e.g. 3 for Autumn) and movementTitle is its title (“L’autunno”). It is customary, when using the New Score Wizard, to create a work with the movementTitle as title (even though it ends up in workTitle then) and, directly after creating the score, fixing up this information in the Score Properties dialogue. This ensures that the title frame of the printed score contains the information you expect but the metadata is also correct.
Every part additionally has the following meta tag, generated and filled on part creation:
- partName: Name of the part as given on part creation (which is also used to fill the corresponding part name text in the top vertical frame—be aware that later changes to one are not reflected in the other).
Header/Footer
To show the content of one or more meta tags in a header or footer for your score/part:
- Make sure that the correct score or instrument part is the active tab;
-
From the menu, select Style → General... → Header, Footer, Numbers;
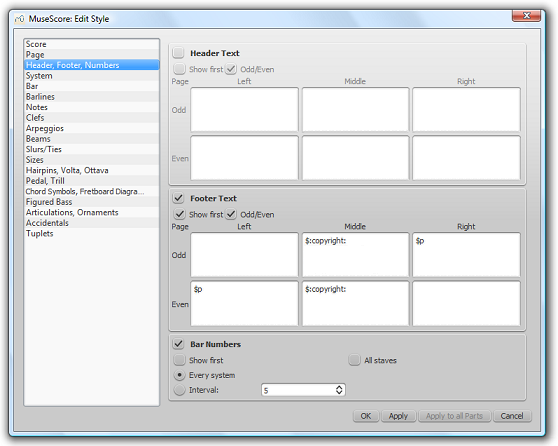
If you hover with your mouse over the Header or Footer text region, a list of macros will appear, showing their meaning, as well as the existing meta tags and their content.
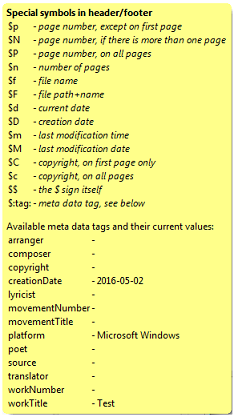
-
Add tags (e.g. $:workTitle:) and macros (e.g. $M) to the appropriate boxes, as required;
- Click Apply to see how the header or footer looks in the score. Make corrections to the dialog if required;
- If an instrument part is in the active tab, click Apply to all parts, if you want to apply these settings to all the score parts;
- Click OK to assign the header or footer and exit the dialog.
See also
Staff properties
The Staff Properties dialog allows you to make changes to the display of a staff, adjust its tuning and transposition, change instrument etc. To open:
- Right-click on a staff and select Staff Properties....
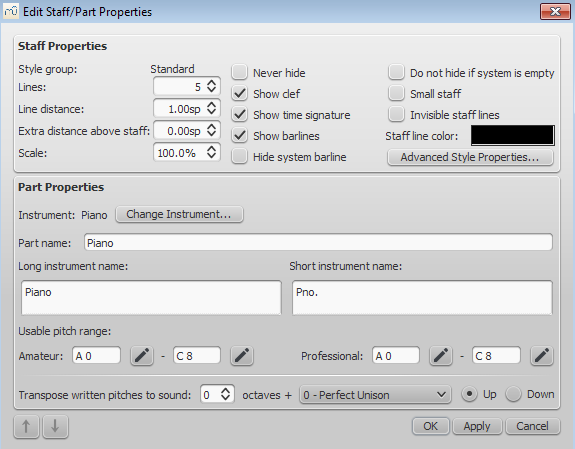
Staff Properties dialog, as of version 2.1.
Staff Types
For practical purposes, there are four different types of staff:
1a. Standard staff I. A pitched staff used for most instruments except fretted, plucked-string ones.
1b. Standard staff II. A pitched staff containing a fretted, plucked-string instrument, with options to set the number of instrument strings and tuning.
2. Tablature staff. A staff containing a fretted, plucked-string instrument, which displays music as a series of fret-marks on strings. Also contains options to set the number of instrument strings and tuning.
3. Percussion staff. A pitched staff for percussion instruments.
It is possible to change one type of staff into another using the Instruments dialog, as long as the original staff is loaded with the right instrument. For example, in order to change a standard staff to tablature, it must contain a plucked-string instrument. Similarly, to change a standard staff to a percussion staff you need to ensure that it has an appropriate percussion instrument loaded and so on.
Most options in the Staff properties dialog are common to all staves, but each type also has one or two specific options of its own.
Staff Properties: all staves
The following Staff Properties options are common to all staves:
Lines
The number of lines making up the staff.
Line Distance
The distance between two staff lines, measured in spaces (abbr.: sp). If you set this to a higher value, the lines are spaced more widely apart; a lower value and they are closer together. It is not recommended to change this value for the standard group, for which the default distance is 1.0 (instead, change the actual size of the sp unit in Page settings); other groups may have different default values (for instance, tablature usually has a line distance of 1.5 sp).
Extra distance above staff
Increases or decreases the distance between the selected staff and the one above in all systems. However, it does not apply to the top staff of a system, which is controlled by the minimum/maximum system distance (see Layout and formatting: Style → General... → Page).
Alternatively, you can alter the "Extra distance above staff" directly from the score page:
1. Press and hold the Shift key.
2. Click on an empty space in a staff and drag it up or down with the mouse.
Note: To alter the spacing above just one staff line in a particular system, see Breaks and spacers.
Scale
Changes the size of the selected staff and all associated elements, as a percentage (to adjust the overall score size, use Scaling from the Layout→Page Settings… menu).
Never Hide
Never hide this staff. This overrules any "Hide empty staves" setting in Layout and Formatting: Style → General... → Score.
Show clef
Whether the staff clef will be shown.
Show time signature
Whether the staff time signature(s) will be shown or not.
Show barlines
Whether the staff barlines will be shown.
Hide system barline
Show/hide barline at left-hand edge of the staff.
Do not hide if system is empty
Never hide this staff, even if the entire system is empty. This overrules any "Hide empty staves" setting in Layout and Formatting: Style → General... → Score.
Small staff
Create a reduced-size staff. You can set the default from the menu in Layout and Formatting: Style → General... → Sizes
Invisible staff lines
Make staff lines invisible.
Staff line color
Use a color picker to change the color of the staff lines.
Part name
The name of the part. This is also displayed in the Mixer and the Instruments dialog (I).
Instrument
The instrument loaded in the Instruments (I) or Select Instrument dialog. The sound associated with this instrument can be changed, if desired, in the Mixer.
Long instrument name
Name displayed to the left of the staff in the first system of the score. The long instrument name may also be edited directly as a text object (as of version 2.1): see Text editing.
Short instrument name
Name displayed to the left of the staff in subsequent systems of the score. The short instrument name may also be edited directly as a text object (as of version 2.1): see Text editing. Editing affects all occurrences in the score.
Usable pitch range
- Amateur: Notes outside this range will be colored olive green/dark yellow in the score.
- Professional: Notes outside this range will be colored red in the score.
To disable out-of-range coloration of notes: From the menu, select Edit→Preferences... (Mac: MuseScore→Preferences...), click on the "Note Input" tab, and uncheck "Color notes outside of usable pitch range."
See also, Coloring of notes outside an instrument's range.
Transpose written pitches (as of version 2.1) / Play transposition
This option ensures that the staves of transposing instruments display music at the correct written pitch. Set the transpose in term of a musical interval (plus octave if required) up or down. For plucked-string instruments such as the guitar, this property can be used to create the effect of applying a capo.
Navigation arrows (as of version 2.1)
Use the ↑ and ↓ buttons, at the bottom left of the Staff Properties window, to navigate to the previous or next staff.
Staff Properties: plucked strings only
Staves of fretted, plucked-string instruments have a few extra options in addition to those listed above,
Number of strings
Displays the number of instrument strings.
Edit String Data…
This button opens a dialog box which allows you to set the number and tuning of strings. See Change string tuning.
Advanced Style Properties
Clicking the Advanced Style Properties... button opens a window giving access to advanced display options for the staff. These will vary depending on the staff type chosen: see the relevant sections below for details.
Change staff type
At the bottom of the Advanced Style Properties dialog there are a number of buttons which allow you to easily change the following:
- The number of lines displayed by a percussion staff.
- The staff type of a plucked-string instrument. For example, you can change from standard staff to tablature and vice versa, or select from a number of tablature options.
- Make a selection from the drop-down list labelled "Template";
- Press < Reset to Template;
- Press OK to accept the changes and exit the dialog (or Cancel to cancel the operation).
Standard and Percussion staff options
Show key signature
Whether the staff key signature will be shown.
Show ledger lines
Whether the staff ledger lines will be shown.
Stemless
If checked, staff notes will have no stem, hook or beam.
Tablature staff options
Upside down
If not checked, the top tablature line will refer to the highest string and the bottom tablature line will refer to the lowest string (most common case). If checked, the top tablature line will refer to the lowest string and the bottom tablature line will refer to the highest line (used in Italian style lute tablatures).
Tablature staff options: Fret Marks
Fret marks are the numbers or letters used to indicate the location of notes on the fingerboard. The following group of properties define the appearance of fret marks:
Font
The font used to draw fret marks. As of version 2.1, 8 fonts are provided supporting all the necessary symbols in 8 different styles (modern Serif, modern Sans, Renaissance, Phalèse, Bonneuil-de Visée, Bonneuil-Gaultier, Dowland, Lute Didactic).
Size
Font size of fret marks in typographic points. Built-in fonts usually look good at a size of 9-10pt.
Vertical offset
MuseScore tries to place symbols in a sensible way and you do not usually need to alter this value (set to 0) for built-in fonts. If the font has symbols not aligned on the base line (or in some other way MuseScore does not expect), this property allows you to move fret-marks up (negative offsets) or down (positive offsets) for better vertical positioning. Values are in sp.
Numbers / Letters
Whether to use numbers (‘1’, ‘2’...) or letters (‘a’, ‘b’...) as fret marks. When letters are used, ‘j’ is skipped and ‘k’ is used for the 9th fret.
On lines / Above lines
Whether marks should be placed on the string lines or above them.
Continuous / Broken
Whether string lines should pass ‘through’ fret marks or should stop at them.
Example of numbers on broken lines:
Example of letters above continuous lines:
Example of 'upside down' tablature (same contents as number example above):
Show back-tied fret marks
If unticked, only the first note in a series of tied notes is displayed. If ticked, all notes in the tied series are displayed.
Show fingerings
From version 2.1, tick to allow the display of fingering symbols applied from a palette.
Tablature staff options: Note Values
This group of properties defines the appearance of the symbols indicating note values.
Font
The font used to draw the value symbols. Currently 5 fonts are provided supporting all the necessary symbols in 5 different styles (modern, Italian tablature, French tablature, French baroque (headless), French baroque). Used only with the Note symbols option.
Size
Font size, in typographic points. Built-in fonts usually look good at a size of 15pt. Used only with the Note symbols option.
Vertical offset
Applies only when Note symbols is selected (see below). Use negative offset values to raise the note value symbols, positive values to lower them.
Shown as:
- None: No note value will be drawn (as in the examples above)
- Note symbols: Symbols in the shape of notes will be drawn above the staff. When this option is selected, symbols are drawn only when the note value changes, without being repeated (by default) for a sequence of notes all of the same value. E.g.
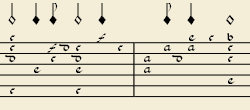
- Stems and beams: Note stems and beams (or hooks) will be drawn. Values are indicated for each note, using the same typographic devices as for a regular staff; all commands of the standard Beam Palette can be applied to these beams too. E.g.
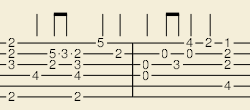
Repeat:
If several notes in sequence have the same duration, you can specify if and where to repeat the same note symbol. i.e.
- Never
- At new system
- At new measure
- Always
Note: This option is only available if "Shown as: Note symbols" is selected (see above).
Stem style:
- Beside staff: Stems are drawn as fixed height lines above/below the staff.
- Through staff: Stems run through the staff to reach the fret marks.
Note: This option is only available when "Shown as: Stems and Beams" is selected (see above).
Stem position:
- Above: Stems and beams are drawn above the staff.
- Below: Stems and beams are drawn below the staff.
Note: This option is only available when "Shown as: Stems and Beams" and "Stem style: Beside staff" is selected (see above).
Half notes:
- None
- As short stems
- As slashed stems
Note: This option is only available when "Shown as: Stems and Beams and "Stem style: Beside staff" is selected (see above).
Show rests
Whether note symbols should be used to indicate also the rests; when used for rests, note symbols are drawn at a slightly lower position. Used only with the Note symbols option.
Preview
Displays a short score in tablature format with all the current parameters applied.
Change instrument
You can change any instrument in a score to a different instrument at any time. The following method updates instrument sound, staff name, and staff transposition all at once.
- Right-click on an empty part of any measure OR on the instrument name and choose Staff Properties...;
- Click on Change Instrument... (under "Part Properties");
- Choose your new instrument and click OK to return to the Staff Properties dialog;
- Click OK again to return to the score.
Not to be confused with Mid-staff instrument change.
External links
Tools
A number of useful commands can be found in the Edit → Tools submenu.
Add / Remove system/line breaks
This tool adds or removes system breaks (Line breaks prior to version 2.2) over all or part of the score:
- Select a range of measures: if no selection is made, the command is applied to the whole score.
-
Chose Edit→Tools→Add/Remove System (Line) Breaks…. The following dialog appears.
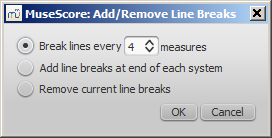
-
Chose one of the following options:
- Break systems/lines every X (select number) measures.
- Add system/line breaks at the end of each system.
- Remove current system/line breaks.
- Press OK.
Explode
The explode command allows you to select a passage of music in a single staff and split (explode) the chords into their constituent notes. The top note of each chord is retained on this "source staff" while lower notes are moved to subsequent staves. Explode only affects notes in voice 1.
Note: If the desired passage also contains notes in other voices apart from voice 1, you should, instead, cut and paste each voice to a separate staff with the help of the selection filter.
To explode a section of the score:
- Make sure all notes to be exploded are in voice 1.
- Ensure that there are enough staves underneath the "source staff" to receive the exploded notes. Create extra staves if necessary in the Instruments dialog.
- Chose one of two options:
- Select a range of measures in the "source staff": this allows all notes to be exploded if there are enough staves available.
- Select a range of measures that includes both the source staff and also extends downwards to include one or more destination staves: This limits the number of exploded notes to the number of selected staves.
- Chose Edit→Tools→Explode.
Notes: (1) MuseScore will discard the lowest note(s) of any chord that contains more notes than the number of staves in the selection. (2) If a given chord has fewer notes than the number of destination staves, then notes will be duplicated as needed so that every staff receives a note. (3) Any existing music in the destination staves is overwritten. (4) If you select a partial measure, the explode command will automatically expand it to a full measure.
Implode
The Implode command works in the opposite way to "explode":
- If several staves are selected, all voice 1 notes in underlying staves are copied to the top staff.
- If just one staff is selected, all notes in voices 1–4 are combined into voice 1.
Note: Implode works best if the rhythms of selected underlying staves are similar to that of the top staff—the latter providing the rhythmic template for the operation.
Apply implode to multiple staves
- Select a range of measures in a staff and extend this selection downwards to include the other staves to be imploded.
- Chose Edit→Tools→Implode.
The voice 1 notes of underlying staves are copied to the top staff in the selection.
Apply implode to a single staff
- Select a range of measures in the desired staff.
- Chose Edit→Tools→Implode.
All selected notes in the staff are now displayed in voice 1.
Fill with slashes
This command fills the selection with slashes, one per beat:
- Select one or more measures;
- From the menu, select Edit→Tools→Fill With Slashes.
If a measure is empty the slashes are added to voice 1, full-sized and centered on the middle line of the staff:

Notes: (1) If there are already notes in a measure in the selection, the command will put the slashes into the first available empty voice. (2) Voice 2 slashes are full-sized and centered on the middle line of the staff; voices 3 slashes appear small and above the staff; voice 4 slashes are small and below the staff. (3) If a measure contains notes in all 4 voices, voice 1 will be overwritten. (4) All slashes are set to not transpose or playback.
Toggle rhythmic slash notation
This command toggles selected notes between normal notes and rhythmic slash notation:
- Select a range of notes or measures (Note: use the selection filter if you need to exclude certain voices);
- From the menu, select Edit→Tools→Toggle Rhythmic Slash Notation.
The selected noteheads are changed to slash noteheads which do not transpose or playback.

Slash-notehead notes in voices one or two are fixed to the middle staff line; those in voices three or four are small ("accent" notation) and fixed above or below the staff:

In percussion staves, notes in voices 3 and 4 are not converted to small slashes but to small notes above or below the staff.

Resequence rehearsal marks
The Resequence Rehearsal Marks command allows you to re-order the numbering/lettering of rehearsal marks if, for any reason, they have got out of sequence. For details see Automatically resequence rehearsal marks.
Copy lyrics to clipboard
This command, available in MuseScore 2.0.3 and above, copies all the lyrics of the score to the clipboard:
- From the menu, select Edit→Tools→Copy Lyrics to Clipboard.