Formatting
This page is an administration page intended for the editing community only. Click this link to go to the handbook front page intended for public viewing.
Layout and formatting
Overview
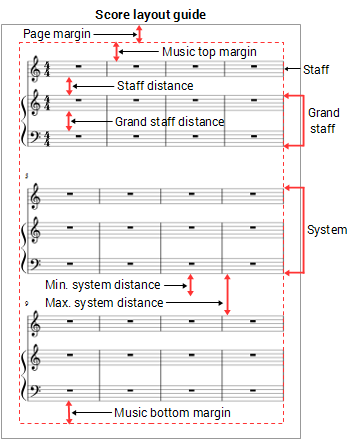
This chapter discusses the settings of score and items on score, how to edit and re-use them, and options and commands under the Format menu. See also the Instruments, staff setup and templates: Change instrument and staff setup chapter.
Spatium (plural: Spatia) / Space / Staff Space / sp.
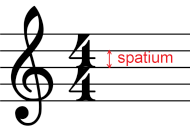
The size of everything on a score, such as staff, note heads, note stems, accidentals, clefs etc., uses a basic unit of measurement called "staff space" or "sp." to maintains correct proportions.
One sp is defined as the standard vertical distance between the midpoints of two lines of a music staff (or one quarter of vertical dimension of a full five-line staff, assuming a hypothetical staff line thickness of 0).
When you create a new score, MuseScore tries to adjust the staff space automatically so that the staves all fit on the page initially.
This usually leads to 1 sp = 1.75 mm, which results in a staff height of around 7 mm (more details explained in "Final absolute staff height" section), which is a good staff height for most solo music, choral music, small ensemble scores, and individual parts. Lead sheets and children's music may benefit from a larger staff size. Large ensemble scores may often require a smaller staff size in order to fit all instruments on the page.
You may need to adjust this value further as you add music, if auto-place results in additional space being added between staves in order to avoid collisions.
Modify the measurement of "staff space" itself in the Format → Page Settings window. See Page settings chapter, the overriding options are also explained there.
Final absolute staff height
Staff line thickness is set in Format→Style...→Measure (see main chapter Measure and horizontal spacing). Its default value is 0.11sp, and the default value of sp is 1.75mm, so the default staff line thickness 0.1925mm. The 'absolute' height of default 5-line stave, measuring from the top edge of the top line to the bottom edge of the bottom line, is 0.5x0.11sp + 4sp + 0.5x0.11sp = 0.5x0.1925mm + 4x1.75mm + 0.5x0.1925mm = 7.1925mm. source: https://musescore.org/en/node/362733
Horizontal and vertical spacing and algorithm
- Vertical spacing: Two options of algorithm, use vertical justification or not. UTo edit, change settings under Format → Style → Score, Page as explained below.
- Horizontal spacing: All measures are stretched out so that all systems (except the last if desired) are filled to the right margin. You cannot change this behavior, but you can add Frames. To edit, change settings under Format → Style → Score, Page, Measure as explained below. See also Measure chapter.
Shown above is an analogy to horizontal spacing in Musescore 3.6.2: it is like being restricted to the "justified" option in a word processor software. UI of Libre Office Writer, not Musescore.
Style
Not to be confused with Font.
Styles in Musescore are profiles that contains settings, rather than being the settings themselves.
Each notation object type (eg Chord Symbol object, Accidental object) has a corresponding style. For example ,
- Style for Accidentals,
- Style for Lyrics,
- Style for Chord Symbols,
- Style for Staff Text.
Some notation objects are regarded as Text object (eg Chord Symbol object, Lyrics object). Each of them has one or more corresponding style. For example,
- Style for text inside Lyrics Even Lines,
- Style for text inside Lyrics Odd Lines,
- Style for text inside Chord Symbols,
- Style for text inside Chord Symbols (Alternative),
- Style for text inside Staff Text.
"Text Style" is the wording displayed inside musescore 3. To avoid confusions such as "Staff Text Style" and "Staff Text Text Style", the handbook uses wording "Style for text inside [item]" whenever necessary.
User can only apply "Text Style" onto Text object on the score. For example, user can edit a lyrics object on a score to use "Style for text inside Chord symbols" rather than the default "Style for text inside Lyrics Odd Lines" and "Style for text inside Lyrics Even Lines". To contrast, it will always use "Style for Lyrics", user cannot apply "Style for Chord symbols" on it.
This chapter explains both of these two. "Text style" is also covered in Text styles and properties chapter.
Item properties; and Global and page settings
Not to be confused with app appearance set in Preferences.
These two are re-used with different methods,
- Properties of each individual object on the score have highest priorities of layout and formatting. Objects do not have any specific properties initially. When properties are assigned in the Inspector, they will always be used.
- Global and page settings, including
- the layout and formatting settings related to whole page,
- which corresponds to the items around the top of the left pane of the Format → Style →Score, Page, Size, System, Measure etc, explained below, and
- settings under Format → Page Settings window. See Page settings chapter;
- Additionally, it includes all the styles (profiles). Settings values in styles have less priority than properties mentioned above, including
- "style for type of object", under Format → Style → [item], and
- "Text Style" or "style for text inside certain type of object", under Format → Style → Text Styles → [item].
- the layout and formatting settings related to whole page,
Every score file has a "Full Score" layout. It also contains one or more "Parts" when user use the Musescore Part feature. Each "Part" and the "Full Score" has its own separate set of settings listed above.
Reusing settings
- To remove item properties, or set a property as global (move to style), see the Inspector chapter.
- To apply "Text style", see Text styles and properties chapter.
- When a new score is created using a template, the Global and page settings of the template's "Full Score" is re-used. See Instruments, staff setup and templates chapter.
- Global and page settings of the currently visible "Part" (but not the "Full Score") can be applied to all other "Parts".
- Global and page settings of the currently visible "Part" or "Full Score" can be saved as a separate .mss file and re-used on another score (its "Full Score" or any "Part"). Reusing on a "Full Score" does not affect Parts.
- Default Global and page settings for new score file and Musescore Part see below.
Reusing Global settings and page settings with .mss file
A style file (file extension .mss) contains Global settings and page settings. User can store them in any folder, Musescore does not automatically check any specific folder. The default folder for easier file management can be set-up in Preferences.
- To save Format → Save Style.
- To load either,
- Right click on any empty space on a score, select "Load Style", or
- Format → Load Style.
Visit https://musescore.org/en/node/355981 for .mss files shared by other musicians.
Setting up the default Global settings and page settings when creating a new score file or a Musescore Part
Under Preferences → Score tab,
- Style: Browse and set the .mss file so that Musescore apply its Global settings and page settings to any new score. NOTE Information present in a template is applied on top of this. See also Instruments, staff setup and templates chapter.
- Style for part: Similar to the above but for new Musescore Part.
Options under the Format menu
This section explains the functions of these buttons are under the Format menu,
- Style: opens the Style window to change layout and formatting of the currently visible "Full Score" or "Part", see details below
- Page settings: opens the Page settings window to adjust the overall dimensions of your score such as page size, page margins, and scaling. See the main chapter Page Settings .
- Add / Remove System Breaks: Set the number of measures per system, see details below
- Change Layout Stretch commands: Increase, decrease or reset the horizontal spacing of notes within selected measures, see details below.
- Breaks and spacers: Apply system, page or section breaks, or add extra space between particular systems or staves. see Breaks and spacers chapter.
- Reset Text style overrides : reset all text styles to the "factory" default settings:
- Reset Beams : reset beams to the mode defined in the local time signatures for the selected section. If no section is selected, beams on the whole score are reset. See also Beams.
- Reset Shapes and Positions : reset the default positions, note stem directions and shapes (slurs, ties etc.) for selected score elements. To apply:
- Select the elements or the region of the score that you wish to reset. Or use Ctrl+A to select the whole score.
- Press Ctrl+R; or, from the menu, select Format→Reset Shapes and positions.
- Load Style / Save Style : To re-use some layout and formatting information of the currently editing "Full Score" or "Part", see overview above and details of these commands below.
Add / Remove System breaks
This tool adds or removes system breaks over all or part of the score:
- Select a range of measures: if no selection is made, the command is applied to the whole score.
- Choose Format→Add/Remove System Breaks…. The following dialog appears.
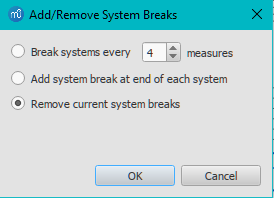
- Choose one of the following options:
- Break systems every X (select number) measures;
- Add system break at end of each system;
- Remove current system breaks;
- Press OK.
Change Layout Stretch
Increase, decrease or reset the horizontal spacing of notes within selected measures.
Increase / Decrease layout stretch
- Select a range of measures. Or use Ctrl+A to select the whole score.
- Choose one of two options:
- To increase stretch:
- Use the shortcut } (right curly bracket) (Mac: Ctrl+Alt+9).
- Or from the menu bar, select Format→Stretch→Increase Layout Stretch.
- To decrease stretch:
- Use the shortcut { (left curly bracket) (Mac: Ctrl+Alt+8).
- Or from the menu bar, select Format→Stretch→Decrease Layout Stretch.
- To increase stretch:
Reset stretch
To reset stretch to the default spacing of 1:
- Select a range of measures. Or use Ctrl+A to select the whole score.
- From the menu, select Format→Stretch→Reset Layout Stretch.
See also Measure Properties: Layout stretch. This allows you to set the stretch more precisely.
Style window
To open this window:
- Select Format → Style,
- Right-click on a space in the document window and select Style…, or
- Use a keyboard shortcut (see Shortcuts).
- To quickly edit a particular setting, right-click on an item on score and select Style….
In the left pane, there are two types of items:
- Score and page details:
- Various styles:
- "style for type of object", under Format → Style → [item], and
- "Text Style" or "style for text inside certain type of object", under Format → Style → Text Styles → [item]. See Text styles and properties
Concepts are explained in the overview.
Changes made are live on the score for preview, click Cancel or Esc to revert and close. Press OK or Return to save and close.
When editing a Musescore Part (but not the "Full score"), press Apply to all parts button to apply the current Global settings and page settings to all Musescore Parts.
Score
To open the Score dialog, select Format→Style…→Score.
Use this dialog to set global settings, such as the music font, display of multimeasure rests, whether or not to hide empty staves, swing playback etc.
- Musical symbols font: used by notes, rest symbols, accidentals etc, see also Fonts .Tick the box to "automatically load style settings based on font."
- Musical text font: used by Segno, Coda, ottavas, dynamics glyphs such as mf etc. see also Fonts
- Display in concert pitch: Tick this option to display the score at concert pitch. If unticked the score is displayed at written pitch.
- Create multimeasure rests: Tick to display multimeasure rests.
- Minimum number of empty measures: The default is 2.
- Minimum width of measure: The default width is 4 sp.
- Enable indentation on first system: This option enables indentation; also for setting the indentation distance (as of 3.6).
- Hide empty staves within systems: This option saves space by hiding those staves in a system which consist of only empty measures. Used for condensed scores.
- Don't hide empty staves in first system: Always display staves in first system even if they consist of empty measures.
- Always show brackets which span to single staff:
- Display note values across measure boundaries: A feature useful for notating early music. See Unbarred notation.
- Hide instrument name if there is only one instrument: You don't usually need to display the instrument name in this case.
- Swing settings allows you to control the degree of swing for the whole score.
- Swing: Choice of OFF (default) / Eight Note / Sixteenth note.
- Select swing ratio: The default is 60%.
If you prefer to set swing on the score page, see Swing.
- Autoplace allows you to control the range and minimum distance used for the vertical alignment.
- System: Elements (like lyrics) are vertical aligned based on the system.
- Measure/Bar: Elements are vertical aligned based on the current measure/bar.
- Segment: Elements are vertical aligned based on the current segment position.
Page
To open the Page dialog, select Format→Style...→Page.
This dialog allows you to adjust the overall layout of your score by changing the spacing of margins, systems, staves, lyrics lines, and frames. You can also control the display of key signatures, time signatures, and clefs.

- Music top margin: The distance between the top staff line of the first staff on the page and the top page margin.
- Music bottom margin: The distance between the bottom staff line of the last staff on the page and the bottom page margin.
- Enable vertical justification of staves (as of 3.6):
- Factor for distance between systems
- Factor for distance above/below bracket
- Factor for distance above/below brace
- Min. system distance: The minimum distance allowed between one system and the next.
- Max. system distance: The maximum distance allowed between one system and the next.
- Min. staff distance: The minimum distance allowed between one staff and the next.
- Max. staff distance: The maximum distance allowed between one staff and the next.
- Max. grand staff distance: The space between staves that share the same instrument—such as the piano, organ, or those of a guitar staff/tab pair.
Note: As of MuseScore 3.6 staves connected by a curly brace are considered a grand staff (BE: great stave). - Max page fill distance
- Disable vertical justification of staves (as of 3.6, the default prior to that):
- Staff distance: The space between staves which are not part of a grand staff (see below).
- Grand staff distance: The space between staves that share the same instrument—such as the piano, organ, or those of a guitar staff/tab pair.
Note: As of MuseScore 3.6 staves connected by a curly brace are considered a grand staff (BE: great stave).
Note: To alter the space above one particular staff see Extra distance above staff (Staff properties). - Min. system distance: The minimum distance allowed between one system and the next.
- Max. system distance: The maximum distance allowed between one system and the next.
- Vertical frame top margin: The default margin height above a vertical frame.
- Vertical frame bottom margin: The default margin height below a vertical frame.
- Last system fill threshold: If the last system is longer than this percentage of the page width, it gets stretched to fill that width.
- Create clef for all systems / Create key signature for all systems / Create courtesy clefs / Create courtesy time signatures / Create courtesy key signatures: control their display, including the courtesy kind.
Sizes
To open the Sizes dialog, select Format→Style...→Sizes.
Sets the proportional size of "small" notes and grace notes, as well as small staves and small clefs. Changing this would be unusual.
Header, Footer
To open the Header, Footer dialog, select Format→Style...→Header, Footer.
This allows you to add header and footer text using meta tags (see Score properties)—such as page numbers, page headers, copyright information etc. For example, you can create different Headers and Footers for even and odd pages, such as putting page numbers on the right for odd-numbered pages and on the left for even-numbered pages.
If you hover with your mouse over the Header or Footer text region, a list of macros will appear, showing their meaning, as well as the existing meta tags and their content.
To create a header or footer for an individual part, that part needs to be the active tab. To create a header or footer for a score with linked parts, make sure the main score is in the active tab.
Measure Numbers
To open the Measure Numbers dialog, select Format→Style...→Measure Numbers.
This allows you to specify whether measure numbers will appear in the score, and, if so, at what intervals.
- Measure numbers: Tick to turn on automatic measure numbers.
- Show first: Tick if you want the first measure to display a number.
- All staves: Tick to display numbers on all staves of a system. Untick if you want the number to appear on the top staff of the system only.
- Every system: Select this option to place measure numbers at the start of each system.
- Interval: To specify that measure numbers should appear at a measure interval shown by the number. For example, an interval of 1 numbers every measure; an interval of 5 numbers every fifth measure.
System
To open the System dialog, select Format→Style...→System.
This dialog allows you to adjust certain properties of all systems.
Brackets:
- System bracket thickness: Set the width of system brackets.
- Brace thickness: Set the width of system braces.
- System bracket distance: Set the distance between system brackets and the start barlines.
- Brace distance: Set the distance between system braces and the start barlines.
See also Brackets.
Dividers:
- Left / Right: Specify whether to show system dividers, what types, and apply global positioning offset values.
Clefs
To open the Clefs dialog, select Format→Style...→Clefs.
Choose the style of the default tablature clef: Standard or Serif.
Accidentals
To open the Accidentals dialog, select Format→Style...→Accidentals.
Allows you to specify how the score displays key signature accidentals at key changes. See Naturals on key signature changes.
Measure
See the main chapter Measure
To open the Measure dialog, select Format→Style...→Measure.
Adjustment of global settings such as the horizontal distance between various items within measures. A major setting affecting layout is Spacing, which affects the number of measures per system. Global Staff line thickness can be changed here.
Barlines
To open the Barlines dialog, select Format→Style...→Barlines.
- Show repeat barline tips ("winged repeats"):
- Barline at start of single staff: Whether to show barlines at the beginning of a staff.
- Barline at start of multiple staff: Whether to show barlines at the beginning of multiple staves.
- Scale barlines to staff size: Affects "small" staves only.
Other properties allow you to set the thickness of "thin," "thick" and double barlines, the distance between double barlines, and the repeat barline to dot distance.
Notes
To open the Notes dialog, select Style→General...→Notes. The dialog can also be opened direct from the score by right-clicking on any note and selecting "Style…"
Here you can adjust the distance and thickness of note-related objects (stems, ledger lines, dots, accidentals). Changing these would be unusual.
Beams
To open the Beams dialog, select Style→General...→Beams.
This allows you to set the overall properties of note beams in the score:
- Beam thickness
- Beam distance: The vertical distance between beams.
- Broken beam minimum length: Affects secondary beams where they do not fully extend from note to note.
Ticking the Flatten all beams option means that all note beams will be horizontal only—not sloped.
Tuplets
To open the Tuplets dialog, select Format→Style...→Tuplets.
Vertical Distance from Notes:
- Maximum slope: Limit the slope of tuplet brackets.
- Vertical distance from stem: Refers to tuplet numbers and brackets.
- Vertical distance from notehead: Refers to tuplet numbers and brackets.
Horizontal distance from notes:
- Distance before stem of first note: Sets default position of start of tuplet bracket when above/below note stems.
- Distance before head of first note: Sets default position of start of tuplet bracket when above/below noteheads.
- Distance after stem of last note: Sets default position of end of tuplet bracket when above/below note stems.
- Distance after head of last note: Sets default position of end of tuplet bracket when above/below noteheads.
Brackets:
- Bracket thickness:
- Bracket hook height; Sets the default length of the vertical hooks at the ends of tuplet brackets
Properties:
- Direction / Number type / Bracket type
Arpeggios
To open the Arpeggios dialog, select Format→Style...→Arpeggios.
Here you can change the distance to note, line thickness, and hook length of the following arpeggio and strum symbols:

Slurs/Ties
To open the Slurs/Ties dialog, select Format→Style...→Slurs/Ties.
- Line thickness at end
- Line thickness middle
- Dotted line thickness
- Minimum tie length
- Autoplace min. distance
Hairpins
To open the Hairpins dialog, select Format→Style...→Hairpins.
Here you can set the default properties of hairpins (crescendo and decresendo lines):
- Placement: Whether to place above or below the staff.
- Position above/below: Set a numerical value in sp. units.
- Height: The width of the mouth of the hairpin.
- Continue height
- Autoplace distance to dynamics
- Line thickness
Volta
To open the Volta dialog, select Format→Style...→Volta.
Here you can set the default properties of voltas:
- Default position: Set X- and Y-offsets.
- Hook height: The length of descending lines at the ends of voltas.
- Line thickness
- Line style: A solid line is the default option, but there are dotted and dashed alternatives.
Ottava
To open the Ottava dialog, select Format→Style...→Ottava.
Here you can set the default properties of ottavas (octave lines):
- Numbers only: If unticked, the ottava also displays "va" or "vb" after the number.
- Position above/below: Set the X- and Y-offsets for the ottava.
- Hook height above/below: The length of the ascending/descending line at the end of the ottava.
- Line thickness
- Line style: A dotted line is the default option, but there are solid, dotted and dashed alternatives.
Pedal
To open the Pedal dialog, select Format→Style...→Pedal.
Here you can set the default properties of pedal lines:
- Placement: Below or above the staff.
- Position above/below: Set the exact default position using offset values.
- Line thickness:
- Line style: solid is the default but there is a range of dashed and dotted options.
Trill
To open the Trill dialog, select Format→Style...→Trill.
Here you can set the default placement of Trill lines:
- Placement: Below or above the staff.
- Position above/below: Set the exact default position using offset values.
Vibrato
To open the Vibrato dialog, select Format→Style...→Vibrato.
Here you can set the default placement of Vibrato lines:
- Placement: Below or above the staff.
- Position above/below: Set the exact default position using offset values.
Bend
To open the Bend dialog, select Format→Style...→Bend.
Here you can set the display properties of Bends. This includes the line thickness, arrow width and font properties.
Text Line
To open the Text Line dialog, select Format→Style...→Text Line.
Here you can set the default placement of text lines:
- Placement: Below or above the staff.
- Position above/below: Set the exact default position using offset values.
Articulations, Ornaments
To open the Articulations, Ornaments dialog, select Format→Style...→Articulations, Ornaments.
This dialog allows you set the default placement distances and size (as a percentage) of articulations and ornaments.
Fermatas
To open the Fermatas dialog, select Format→Style...→Fermatas.
This dialog allows you set the default placement of fermatas.
Staff Text
To open the Staff text dialog, select Format→Style...→Staff Text.
This dialog allows you set the default placement and autoplacement properties of staff text.
Tempo Text
To open the Tempo text dialog, select Format→Style...→Staff Text.
This dialog allows you set the default placement and autoplacement properties of tempo text.
Lyrics
To open the Lyrics dialog, select Format→Style...→Lyrics.
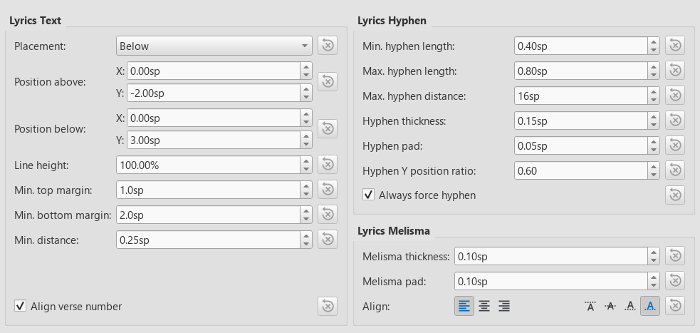
Lyrics Text
- Placement: Default position of lyric lines in relation to the staff; Above or Below.
- Position above / Position below: The X and Y offsets for "Placement."
- Line height: Default distance between lyric lines.
- Min. top margin: Minimum distance between the lyric lines and the parent staff skyline.
- Min. bottom margin: Minimum distance between the lyric lines and the skyline of the next staff.
- Min. distance: Minimum distance between lyrics syllables.
- Align verse number:
Lyrics Dash
- Min. dash length: Minimum length of inter-syllable dashes.
- Max. dash length: Maximum length of inter-syllable dashes.
- Max. dash distance: Maximum distance allowed between dashes. Reducing this value allows more dashes to form between syllables where possible—and vice versa.
- Dash thickness: The (vertical) thickness of the dash.
- Dash pad: The distance between the - and the syllable
- Dash y position ratio: Affects the vertical placement of the dash.
- Always force dash:Tick to ensure that a dash is always visible between syllables.
Lyrics melisma
- Melisma thickness: The (vertical) thickness of the melisma.
- Melisma pad: The distance between the _ and the syllable
- Align:
See also, Melismas.
Dynamics
To open the Dynamics dialog, select Format→Style...→Dynamics.
This dialog allows you set the default placement and autoplacement properties of dynamics.
Rehearsal Marks
To open the Rehearsal Marks dialog, select Format→Style...→Rehearsal Marks.
This dialog allows you set the default placement and autoplacement properties of rehearsal marks.
Figured Bass
To open the Figured Bass dialog, select Format→Style...→Figured Bass.
This allows you to set the default font, style, alignment and position of figured bass.
Chord Symbols
To open the Chord Symbols dialog, select Format→Style...→Chord Symbols.
There is another global setting for Chord Symbols at Text > Chord Symbol in which the Font is set; Format→Style...→Text .
This section allows you to adjust the format and positioning of chord symbols:
- Appearance: Choose a default chord symbol style—Standard, Jazz or Custom.
- Note spelling: Choose the spelling convention for chord symbols and whether to use capital or small letters.
- Positioning:
- Distance to fretboard diagram: The distance (in sp. units) from a chord symbol to a fretboard diagram when both are applied to the same location on a staff. This value overrides the above "Default vertical position" setting. The user can choose to place a chord symbol below a fretboard diagram by entering a negative value.
- Minimum chord spacing: The minimum space to allow between chord symbols.
- Maximum barline distance: Increases the distance between the final chord symbol in a measure and the following barline. You may wish to adjust this value if there is a recurring problem in the score with overlap between the final chord symbol in one measure and the following chord symbol.
- Capo: Capo fret position: Enter the number of the capo position at which you want to display substitute chords, in brackets, for all chord symbols in the score.
Fretboard Diagrams
To open the Fretboard Diagrams dialog, select Format→Style...→Fretboard Diagrams.
This section allows you to adjust the format and positioning of Fretboard diagrams.
- Default vertical position: the distance in sp. units from a newly applied fretboard diagram to a staff. A negative value may be used.
- Scale: Increase or decrease the size of the fretboard diagram in the score.
- Fret offset number font size: Increase or decrease the size of a fret number displayed next to a diagram.
- Position Left/Right: Display fret number to the left or right of the fretboard diagram.
- Barre line thickness: Make barre lines in fretboard diagrams thicker or thinner.
Text Styles
To open the Text Styles dialog, select Format→Style...→Text Styles.
Select a text type on the middle pane and edit its styles, see Text styles and properties.
See also
External links
- Creating Modified Stave Notation in MuseScore (MuseScore Tutorial)
Measure and horizontal spacing
Overview
This chapter explains the Format→Style...→Measure window used for adjustment of global settings such as the horizontal distance between various items within measures, see Layout and formatting. Other measure related global settings such as measure visibility are under the Format→Style...→Score, Page, Sizes, Measure number.
Change properties for individual measure(s) on score with "Measure Properties" window, see Measure operations chapter. To change all measures of a staff on the whole score, change the staff instead, see Staff / Part properties. See Page settings for how to override theses settings with individual systems pages specific options and on an individual object on a score.
See also Measure rests.
MuseScore automatically adjusts the score to maintain the correct spacing between notes and rests according to best music engraving practice. It will also correctly reposition any elements attached to notes or rests, such as fingerings, dynamics, lines etc.
The main setting is Spacing (1=tight)
All settings related to measure width and note spacing are minimum values. Measures are automatically stretched, if necessary, to maintain existing page margins.
Options
-
Minimum measure width: Sets the minimum horizontal length of measures. In measures containing very little content (e.g., a single whole note or whole measure rest), the measure will only shrink as far as this minimum.
-
Spacing (1=tight): set the ratio of space allocated for one note value compared to the next shorter value. The default spacing ratio value of 1.2 means that each note value takes 1.2 times as much space as the next shorter value. So, a half note takes 1.2 times as much space as a quarter note, etc. This setting thus affects not only space between notes but also between the last note and the ending barline. If you need to change this value, you should consider upgrading to Musescore 4. See https://musescore.org/en/node/326965 and https://musescore.org/en/node/299741#comment-982983 . For the space between the beginning of the measure and the first note or rest, see Note left margin (below)
-
Note left margin: Sets the distance from the start barline to the first note.
-
Barline to grace note distance: Sets the distance between a barline and a grace note that occurs before the first actual note in a measure (independently of the "Note left margin" setting).
-
Barline to accidental distance: Sets the distance between a barline and an accidental placed before the first note in a measure (independently of the "Note left margin" setting).
-
Note to barline distance: Sets the distance from the last note to the following barline.
-
Minimum note distance: Specifies the smallest amount of space MuseScore will allow after each note (depending on other factors, more space may be allowed).
-
Clef left margin: Sets the distance between the very beginning of each line and the clef. (This option is rarely needed.)
-
Key signature left margin: Sets the distance between the beginning of the measure and a key signature.
-
Time signature left margin: Sets the distance between the beginning of the measure and a time signature (if there is no key signature in between).
-
Time signature to barline distance: To be added
-
Clef/key right margin: Sets the distance between a mid-staff clef or key signature and the following note or rest.
-
Clef to barline distance: Sets the distance between a barline and a clef change preceding it.
-
Clef to key distance: Sets the distance from the clef to a key signature following it.
-
Clef to time signature distance: Sets the distance from the clef to the time signature following it (if there is no key signature in between).
-
Key to time signature distance: Sets the distance from a key signature to the following time signature.
-
Key to barline distance: To be added..
-
System header distance: Sets the distance from a clef or key signature at the beginning of a system to the first note or rest.
-
System header with time signature distance: Sets the distance from a time signature at the beginning of a system to the first note or rest.
-
Multimeasure rest margin: Sets the distance between a multimeasure rest and the barlines on either side.
-
Staff line thickness: Sets the thickness of the lines of the staff, which allows you to make the staff thicker and darker, if you need greater visibility on your printouts. See detailed calculation in Layout and formatting : Final absolute staff height chapter.
Note: Changes to an individual measure's Stretch (using Format→Stretch → Increase/Decrease Layout Stretch) are calculated after, and proportional to, the global Spacing setting.
See also
- This chapter explains Format→Style...→Measure window. The Layout and formatting chapter explains all other categories under Format→Style....
- Measure operations explains Measure Properties dialog used to set properties of individual measure(s).
- Barlines
Page settings
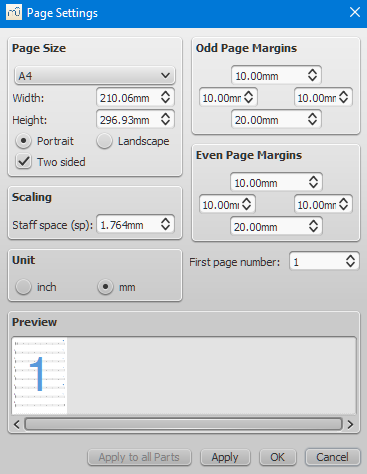
To open the Page settings dialog: from the menu, select Format → Page Settings....
"Page settings" allows you to adjust the overall dimensions of your score such as page size, page margins, and scaling. It contains layout score-wide settings of currently editing "Musescore Part" or "Full Score", see also Musescore Parts chapter.
Other overall size and spacing options:
- Format→Style...→Score, Page, Sizes, System, Measures, for the Measure item see Measure chapter, for others see Layout and formatting chapter.
The individual systems pages specific options:
- See Breaks and spacers chapter
- Stretch commands, see Layout and formatting chapter.
- See Frames chapter
Page size
Here you can select the paper format, either by standard name (e.g., Letter or A4), or by specifying the height and width in either mm or inches (use the radio buttons to choose which unit of measurement to use). The initial default page size depends on your localization—in the United States, Letter size paper is standard.
You can also choose to format your music in Landscape or Portrait orientation using the radio buttons. You can optionally use Two sided layout (i.e., book format, with mirror left and right margins for even and odd pages—see below).
Odd/Even Page Margins
The Even Page Margins and Odd Page Margins settings allow you to define the printable area of your pages. Aside from changing the margins around the music on the page, other settings, such as the positions of headers and footers, are calculated relative to the margins defined here.
If the "Two sided" checkbox under "Page Size" is selected, you can set margins differently for mirroring odd and even pages. Otherwise, only one set of margins can be modified, but will apply to all pages.
To display page margins in your score on screen (though not in print), go to View→Show Page Margins.
Scaling
Staff space (sp) : changes the definition of staff space (sp) itself. See Layout and formatting chapter.
Overriding options for individual object on a score are available:
- Each Text object on a score has a :Follow staff size: checkbox property set in the Inspector, see Text styles and properties chapter.
- Various profiles "style for text inside certain type of object" have :Follow staff size" checkboxes set in Format→Style...→Text Styles, see Layout and formatting chapter.
- Each Image on a score has a "Size in staff space units" checkbox property set in the Inspector.
- [Please add missing options if you find them]
Unit
Select between inches and millimeters for values in this dialog.
First page number
Sets the number of the first page of the particular score. Page numbers below 1 won't get printed—e.g., setting the first page number to -1 would result in the first and second page showing no page number, and page number 1 appearing on the third page.
Apply to all Parts
The Apply to all Parts button is available when modifying a part, rather than the main score (see Part extraction). If you change the page settings of one part and want the rest of the parts to have the same settings, this button will apply the change to all parts in one go.
Breaks and spacers
The Breaks & Spacers palette contains the following non-printing symbols:

The first three symbols are called breaks; the vertical lines are known as spacers.
Breaks
A break can be applied to either a measure or a frame. There are three types:
- System break: Forces the next part of the score to start in a new system.
- Page break: Forces the next part of the score to start on a new page.
- Section break: Forces the next part of the score to start in a new system and starts a new section (see below). It can be combined with a page break if required.
Notes: (1) Break symbols are visible on the screen, but do not appear on printouts. (2) To add (or remove) system breaks over all or part of the score, see Add/Remove System breaks. (3) To split a measure, see Measure operations: Split and join.
Add a break to a measure
Breaks can be added using either (1) a keyboard shortcut; or (2) a break symbol from a palette.
Using a keyboard shortcut
To add a System break or a Page break only:
- Select any one of the following:
- Barline;
- Measure;
- Notehead;
- Text element associated with a staff (e.g. lyric syllable, chord symbol, staff text etc.);
- Range of measures (if you choose this option, a break will be applied before and after the selection);
- Choose one of the following options:
- System break: Press↵ (toggle).
- Page break: Press Ctrl+↵ (Mac: Cmd+↵) (toggle).
Using a palette break symbol
Any break can be added from a workspace palette:
- Select any one of the following:
- Barline;
- Measure;
- Notehead;
- Text element associated with a staff (e.g. lyric syllable, chord symbol, staff text etc.);
- Range of measures (if you choose this option, a break will be applied before and after the selection);
- Click a break symbol in a palette (double-click in versions prior to 3.4). Repeat to toggle off.
- Alternatively, drag any break symbol from a palette onto a measure.
Add a break to a frame
To add a break to a frame, use one of the following options:
- Drag a break from a palette onto a frame.
- Select a frame then click a palette break symbol (double-click in versions prior to 3.4).
Delete breaks
Use one of the following options:
- Select one or more breaks and press Del.
See also: Add / Remove System breaks.
Move a break
Although breaks are not visible on printed output, you can reposition one, if required, by entering edit mode on it and using the keyboard arrow buttons (see Adjust position of text objects).
Section break
A Section break, as the name suggests, is used to create separate sections within a score. Like a system break, it forces the next measure or frame to begin a new system, and can also be used in association with a page break if required. A section break could be used, for example, to divide a piece into separate movements.
Each section can have its own measure numbering independent of the rest of the score. By default, the first measure of a section is numbered "1" (see image below), though like the first measure of the score itself, the number is not displayed unless configured in the measure properties dialog. The same dialog can be used to change the numbering according to your preference.
If you change Time signature or Key signature at the beginning of the new section, there will be no courtesy signature at the end of the previous section. See example below:
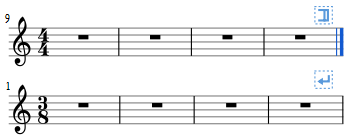
When you play back the score, the program adds a short pause between each section. In addition, the first end repeat barline in a section always sends the playback cursor to the beginning of the section, so a start repeat barline is optional.
The following properties can be adjusted in the Inspector after selecting the section break:
- Pause: Length of pause, in seconds, at end of the section.
- Start new section with long instrument names (checkbox).
- Start new section with measure number one (checkbox).
- Start new section with first system indentation (checkbox, as of 3.6).
Prior to version 3.4, the same properties are accessed by right-clicking the break and selecting Section Break Properties.
Spacers
There are three types of spacers:
- Staff spacer up (Up-pointing arrow): For adding space above a staff. The user sets a minimum height—which may increase (but not decrease) automatically if required by subsequent changes in layout.
- Staff spacer down (Down-pointing arrow): For adding space below a staff. The user sets a minimum height—which may increase (but not decrease) automatically if required by subsequent changes in layout.
- Staff spacer fixed down (Capital letter "I"): For adding a fixed space below the staff. The height set by the user is always adhered to and overrides any automatic layout settings. This spacer can also be used to draw staves closer than autoplacement would normally allow.
Notes: (1) Spacers are designed for local adjustments only. If you wish to adjust the space between staves across the whole score, use the settings in Format → Style... → Page instead. (2) Spacer symbols are visible on the screen, but do not appear on printouts. (3) Spacers cannot be applied to a frame.
Add a spacer
- Either select a measure, then click a palette spacer symbol (double-click in versions prior to 3.4); or, drag a spacer symbol from a palette onto a measure.
- To set the spacer height use one of the following:
- Adjust the "Height" property in the Spacer section of the Inspector.
- Select the spacer and use the ↑↓ keys and/or Ctrl+↑↓ to move the end-handle up and down
- Drag the adjustment handle of the spacer.
Delete a spacer
- Click on the spacer and press the Del key.
See also
Frames
A Frame is a rectangular container for empty space, text or pictures in the score. It can be one of three types:
- Horizontal: Used to create a break in a particular system. Can contain one or more text objects and/or images.
- Vertical: Inserted above a system or appended to the last system. Can contain one or more text objects and/or images.
- Text: Inserted above a system or appended to the last system. Can contain one text object only.
Horizontal frame
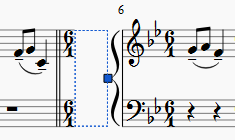
A horizontal frame is used to create a break in a system. For example, you can:
- Create a coda, with an adjustable gap separating it from the rest of the score (as in the example below).
- Create an offset at the beginning of the score, where there is no staff name to perform the same function.
- Create an adjustable right margin at the end of a system.
- Create space for some text or image(s).
- Create a space between a 'historical incipit' and the beginning of the modern edition.
Insert/append horizontal frame
See Create a Frame (below).
Adjust width of horizontal frame
Use one of the following methods:
- Click (double-click prior to version 3.4) the frame and drag the handle to the right or left.
- Select the frame and adjust "Width" in the Inspector.
Add text or image to horizontal frame
-
To add text: Right-click on the frame and select Add → Text.
-
To add an image: Right-click on the frame and select Add → Picture.
Vertical frame
A vertical frame can be inserted above a system or appended to the last system. It can contain one or more text objects and/or images. The height is adjustable and the width equals the system width.
It can be used, for example, to:
- Create an area at the head of a score for Title/Subtitle/Composer/Lyricist text etc. (see below).
- Create a title page (see below).
- Add single- or multi-column lyric text (at the end of a score).
- Create subtitles and other annotations between systems.
Insert/append vertical frame
See Create a Frame (below).
Adjust height of vertical frame
Use one of the following methods:
- Click (double-click prior to version 3.4) the frame and drag the handle up or down.
- Select the frame and adjust "Height" in the Inspector.
Edit vertical frame properties
Selecting the frame allows you to adjust various parameters in the Inspector:
Top Gap: Adjusts distance between frame and element above.
Bottom Gap: Adjusts distance between frame and element below.
Height: Adjusts height of the frame.
Left Margin: Moves left-aligned text objects to the right.
Right Margin: Moves right-aligned text objects to the left.
Top margin: Moves top-aligned text objects downwards (see also Format → Style... → Page).
Bottom Margin: Moves bottom-aligned text objects upwards (see also Format → Style... → Page).
Add text or image to vertical frame
-
To add text: Right-click on the frame, select Add, and choose one of the text options.
-
To add an image: Right-click on the frame and select Add → Picture.
You can create as many objects as you like within a frame. Their positions can be adjusted independently by dragging or, more accurately, by altering the offset values in the Inspector. To format text objects, see Text editing and Text styles and properties.
Insert horizontal frame in vertical frame
- Right-click on the frame and select Add → Insert Horizontal Frame.
The horizontal frame is automatically left-aligned and fills the entire vertical frame. To right-align it:
- Reduce the width of the horizontal frame.
- Deselect the frame then drag it to the right. To restore left-alignment, drag the frame to the left.
"Title" frame
A vertical frame is automatically created at the beginning of a score, showing the title, subtitle, composer, lyricist etc., when you fill in the information fields provided on page 1 of the New Score Wizard.
If the score does not have a vertical frame at the beginning, you can create one as follows:
- From the menu, select Add → Text → Title/Subtitle/Composer/Lyricist;
- Type the desired text;
- Press Esc, or click on an empty space, to exit.
Text frame
A Text frame looks like a vertical frame, but is specialized for text input: one text object is allowed per frame. The height automatically expands to fit the content and there is no height adjustment handle.
A text frame can be used, for example, to:
- Create lyric text at the end of a score.
- Create subtitles and other annotations between systems.
- Create and insert an empty [blank] page anywhere in the score, including at the beginning.
Insert/ append text frame
See Create a Frame (below).
Edit text frame properties
Selecting the frame allows you to adjust various parameters in the Inspector:
Top Gap: Adjusts distance between frame and element above.
Bottom Gap: Adjusts distance between frame and element below.
Height: Not applicable to text frames.
Left Margin: Moves left-aligned text objects to the right.
Right Margin: Moves right-aligned text objects to the left.
Top margin: Moves top-aligned text objects downwards.
Bottom Margin: Moves bottom-aligned text upwards.
Create a frame
Insert a frame into the score
From the menu:
- Select a measure;
- From the menu select Add → Frames → Insert Horizontal/Vertical/Text Frame.
From a measure:
- Right-click on a measure;
- Select Add → Insert Horizontal/Vertical/Text Frame.
From a palette:
See Apply symbols from a palette.
Append a frame to the score
- From the menu select Add → Frames → Append Horizontal/Vertical/Text Frame.
Delete a frame
Use one of the following:
- Select the frame boundary and press Del.
- Select the frame boundary, then right-click on the frame and select Delete.
Apply a break
System, page or section breaks can be applied to frames as well as measures. Use one of two methods:
- Select a frame and click (double-click prior to version 3.4) a palette break symbol (for example, in the Breaks & Spacers palette).
- Drag a break symbol from a palette onto a frame.
See also
- Text Properties: to put a visual frame (border) around text.
- Insert measures: to insert measures before a frame.
External links
Images
Embed Images onto a score as cover art or as symbols that are not found in any Palettes or the Master palette window (check its Symbol category as last resort). MuseScore supports the following formats:
- Scalable Vector Graphics (*.svg): the recommended format, but does not support SVG shading, blurring, clipping or masking technologies, see Musescore Versions Reference and Qt 5.9: Rendering SVG Files
- Bitmap (*.bmp)
- Portable Network Graphics (*.png) supports transparency (alpha channel)
- JPEG (*.jpg and *.jpeg)
- TIFF (*.tif or *.tiff) supports transparency but unpredictable, see discussion.
Does not support the following formats at all:
- Graphics Interchange Format (*.gif)
- WebP (*.webp)
- X PixMap (*.xpm)
Add image
Use one of the following options:
- Drag-and-drop an image file (from outside MuseScore) either into a vertical or horizontal frame, or onto a measure, a note or a rest on the score.
- Right-click on a frame, select Add→Picture, then pick an image from the file selector.
Once imported, it can be added to any palette and reapplied to other scores easily, see added to a palette.
Cut/copy and paste image
- Click on an image in the score.
- Apply any of the standard copy/cut commands.
- Click on a note, rest or frame.
- Apply any of the standard paste commands.
Modify image
To modify the width/height of an image, double-click it and drag any of the handles. If you want to adjust width or height separately, untick "Lock aspect ratio" first in the Inspector. Toggle the "Size in staff space units" checkbox to switch between proportional unit and absolute value, see Layout and formatting.
You can adjust the position of an image by simply dragging it.
See also
External links
- How to create an ossia with image capture (MuseScore HowTo)
- How to create an ossia with another staff (MuseScore HowTo)
Image capture
MuseScore's image capture feature allows you to save a snapshot of any part of the score window. PNG, PDF and SVG formats are supported.
Save a snapshot
- Click on the Toggle image capture button,
 .
. - Press Shift + drag, to create a new selection rectangle.
- Fine tune the rectangle position, if required, by dragging it and/or changing the "Position" values in the "Image Capture" section of the Inspector.
- Fine tune the rectangle area, if required, by dragging the handles, and/or changing the "Size" values in the Inspector.
- Right-click on the selection rectangle to open the Image Capture menu. Select the desired option:
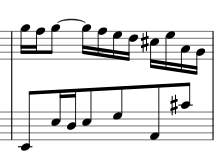
- Save As (Print Mode). This saves an image of the selection area as it would look if printed, e.g.
- Save as (Screenshot Mode). This saves a selection of the actual screen, including any line break symbols, invisible elements etc., e.g.
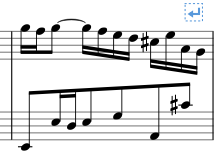
- Save As (Print Mode). This saves an image of the selection area as it would look if printed, e.g.
You can save the image in either PNG (default), SVG or PDF format.
Note: SVG is a vector graphics format rather than being pixel-based (or raster, like BMP or PNG). The advantage of this format is that enlarging the image or zooming in does not cause blurring or unwanted sawtooth effects.
Image capture menu
Right-clicking on the selection rectangle opens the Image Capture menu (Mac: Ctrl + click, or 2-finger-tap):
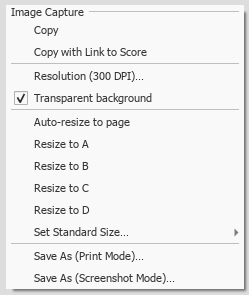
- Copy: Choose this to copy an image before pasting it in the same or another MuseScore file.
- Copy with Link to Score: Choose this to copy an image including a link to the MuseScore file. When pasting this into a program that supports this, you can click on the image to open the MuseScore file.
- Resolution: Set the resolution, and hence the size of the saved or copied image. Try 100 dpi to start with, if you are unsure.
- Transparent background: Turn image transparency on or off.
- Auto re-size to page: Adjusts the selection rectangle to fit the page.
- Resize to A/B/C/D: Choose a customized selection rectangle (as set below).
- Set Standard Size: Resize the selection rectangle, then choose "Set size A/B/C/D" to store it.
See also
External links
- Create an ossia with image capture (MuseScore HowTo)
- How to create an ossia with another staff (MuseScore HowTo)
Align elements
While dragging an element:
- To constrain movement to the horizontal only: Click and hold on the element, press Ctrl, then drag the element left or right.
- To constrain movement to the vertical only: Click and hold on the element, press Shift, then drag the element up or down.
Snap to grid
Snap to grid is a feature which allows you to drag an element in precise steps—useful for exact positioning.

To enable snap to grid, select an element and click one or both of the snap to grid buttons, located to the right of the X (horizontal) and Y (vertical) offset fields in the Inspector. You can then drag the element in steps equal to the grid spacing. The default value is 0.5 sp.
To change the grid spacing:
- Right-click on any of the snap to grid buttons in the Inspector, and select Configure Grid.
- Set values for the horizontal and vertical grid spacing as required. Note that this is a fractional setting.