Synthesizer
Overview
To display the Synthesizer: from the menu, select View→Synthesizer.
The Synthesizer controls MuseScore's sound output and allows you to:
- Load and organize different sound sample libraries to play back the music.
- Apply effects such as reverb and compression.
- Adjust overall tuning.
- Alter the output volume.
- Select Midi Continuous Controllers to use with Single Note Dynamics (versions 3.1 and above).
The Synthesizer window is divided into the following sections/tabs:
- Fluid: A software synthesizer that plays SF2/SF3 SoundFont sample libraries.
- Zerberus: A software synthesizer that plays SFZ format sample libraries.
- Master Effects: Used to apply multi-effects to the score.
- Tuning: Used to adjust overall playback tuning.
- Dynamics (versions 3.1 and above): Used to configure Single Note Dynamics Midi controllers.
Save/Load Synthesizer settings
A set of synthesizer settings includes the order of SoundFonts and SFZ files, effects set-up, master tuning and volume, it is the configuration of the audio engine of one running MuseScore program. Only one set of settings can be in effect (per running MuseScore program).
The buttons at the bottom of the Synthesizer window have the following functions:
| Button | Function |
|---|---|
| Set as Default | Saves all current synthesizer settings as the default settings. These will be automatically applied when you open MuseScore next time. This button works like a save button Save to Default profile : subsequent changes in the current synthesizer settings will not be saved as default until you press this button again. |
| Load Default | Loads the last saved default settings to the Synthesizer. |
| Save to Score | Saves all current synthesizer settings to the current score only. These will not be automatically applied next time you open the score. |
| Load from Score | Loads the settings from the current score to the synthesizer. |
Notes: Changes to synthesizer settings will not be heard in exported audio files unless saved to the score first.
See also Tuning
Fluid (SF2/SF3)

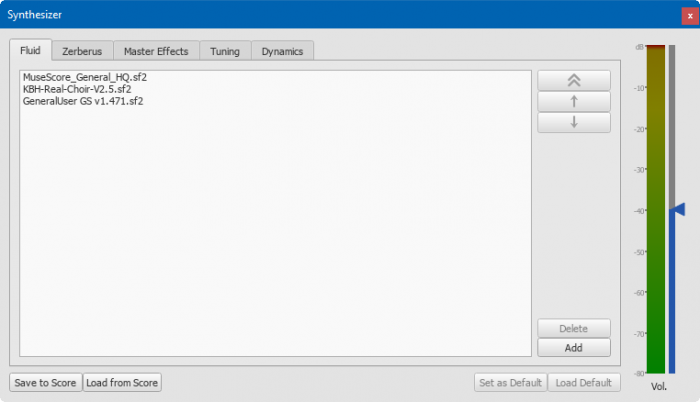
Click on the Fluid tab to access the control panel for SF2/SF3 SoundFont sample libraries. Load, rearrange or delete soundfonts as required. By default, the SoundFont MuseScore_General.sf3 should already be loaded.
Ordering the soundfonts
When adding soundfonts to the Fluid synth tab (above), you should keep in mind the following points:
- The order of soundfonts affects playback.
- If your score is using default instruments, it will only play back the correct sound if the default soundfont is the 1st ordered item.
- New soundfonts are loaded as the 1st ordered item, you may need to rearrange them.
- If you have changed sound settings of an instrument manually in the Sound dropdown list in Mixer, it will only play back the correct sound if all soundfonts have the same order as at the moment you change setting.
- When you close and restart Musescore, change (reset) of soundfont order may happen contrary to what you may expect. Order may not be restored automatically as expect. See settings, use the buttons as required.
To load a soundfont
- Make sure your soundfont is installed in your Soundfonts folder.
- Click on the Add button
- Click on a soundfont in the list.
To reorder the soundfonts
- Click on a soundfont
- Use the up/down arrows (on the right-hand side) to adjust the order.
- Repeat with other soundfonts in the list if required.
- Or use the double up arrow (on the top right-hand side) to move any SoundFont to the top of the list.
To remove a soundfont
- Click on the name of the soundfont
- Click on the Delete button.
Note: Removing a soundfont from the synthesizer does not uninstall it from the Soundfonts folder: it will still be available if you wish to reload it later.
Zerberus (SFZ)
Click on the Zerberus tab to access the control panel for SFZ sound sample libraries. You can add, delete or reorder files in a similar way to the Fluid tab. Note that, as with Fluid, the SFZ files must first be installed in your soundfonts folder before they can be loaded into the synthesizer.
Effects
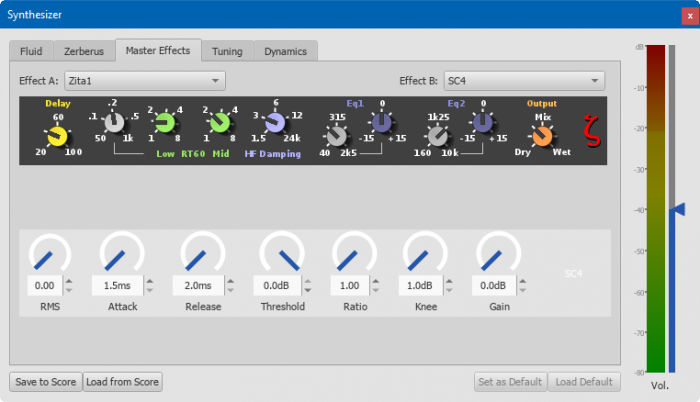
The Master Effects tab of the Synthesizer allows you to add reverb and compression to your score.

Master Effects with Zita1 Reverb and SC4 Compressor.
To turn an effect on or off:
- Select an option from the drop-down list next to Effect A or Effect B (the effects are applied in series, A → B).
To store and load effects configurations, use the buttons at the bottom of the Synthesizer window. See Synthesizer settings (above) for details.
Zita 1 reverb
The Zita 1 stereo reverb module allows you to simulate the ambience of anything from a small room to a large hall. The pre-delay, reverb time and tone of the reverb can be finely tuned using the controls provided:
- Delay: Set a pre-delay for the reverb from 20-100 ms.
- Low RT60 (Low frequency reverb time): Use the grey control to adjust the center frequency (50–1000 Hz) of the low frequency band which you want to affect: the green control adjusts the reverb time (1–8 secs) of this frequency band.
- Mid RT60 (Mid-range reverb time): Adjust the reverb time (1–8 secs) of the mid-range frequency band.
- HF Damping: Adjusts the high frequency component of the reverb. Increasing this value increases the frequency of the cut-off point and makes the reverb appear brighter and longer.
- EQ1: Allows you to cut or boost (-15 to +15) a frequency band (center = 40 Hz - 2 KHz) in the lower part of the spectrum.
- EQ2: Allows you to cut or boost (-15 to +15) a frequency band (center = 160 Hz - 10 KHz) in the higher part of the spectrum.
- Output: Controls the amount of effect applied. "Dry" is no effect. "Wet" indicates 100% reverb. "Mix" is a 50/50 balance of wet/dry signal.
Note: EQ1 and EQ2 affect the tone of the reverb only, not the dry (unprocessed) signal.
To quickly set up an effects patch, set "Output" to "Mix" and adjust the "Mid RT60" control to the desired reverb time. Then fine tune the effect as explained above.
SC4 compressor
The SC4 stereo compressor gives you fine control over the playback's dynamic range, reducing the volume variation between loud and soft sounds. It offers the following controls:
- RMS: Adjusts the balance between RMS (0) and Peak (1) compression. In the former, the compressor responds to averaged-out levels in the signal; in Peak mode, the compressor responds to peak levels.
- Attack: (1.5–400 ms) The length of time it takes for compression to engage fully after the signal exceeds the threshold level.
- Release: (2–800 ms) The time it takes for compression to return to zero after the signal falls below the threshold level.
- Threshold: (in dB) The signal level above which compression starts to take effect. Lowering the threshold increases the amount of signal that is compressed.
- Ratio: The amount of compression applied to the signal above the threshold. The higher the ratio, the greater the compression. Varies between 1:1 and 20:1.
- Knee: Allows you to select a range between "soft knee" and "hard knee". The softer the knee, the more gradual the transition between uncompressed and compressed signal.
- Gain: Compression tends to lower the volume, so use this control to boost the signal as required.
To quickly set-up, try setting RMS = 1, Threshold = -20 db, Ratio = 6. Increase Gain to restore the lost volume. Then fine-tune as explained above.
Tuning
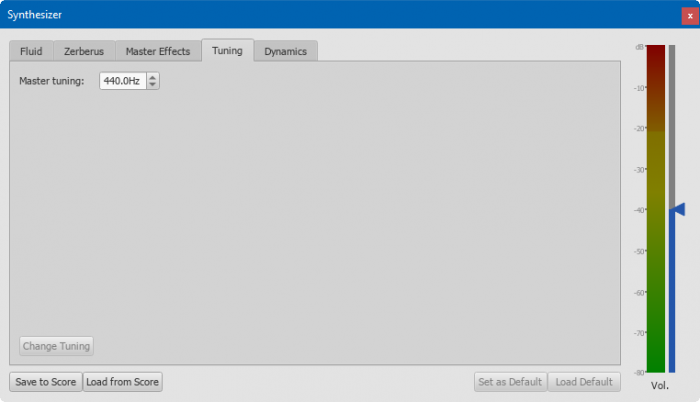
The Tuning tab is where you can adjust the program's master tuning. For Concert Pitch instruments, A4 = 440 Hz by default. To use a custom tuning system, visit Tuning systems, microtonal notation system, and playback.

To change the Master tuning:
- Enter a new value in the Master tuning field, then press Change Tuning.
Notes: (1) This tuning applies to all scores in the current session only. To make this the program default or to store it to a particular score, see Save/Load Synthesizer settings. (2) To apply the new tuning to exported audio files (WAV, MP3, OGG), press Save to Score before exporting.
Dynamics (versions 3.1 and above)

Some dynamics symbols have non-zero "Velocity change" property. When setup properly, it creates an Attack envelope simulation effect on note playback on certain instruments, eg sfz symbol on violins, more info see Dynamics
Musescore also utilize the same audio creation mechanism to simulate a variation of loudness effect on certain instruments eg crescendo on one violin long note, more info see Reguladores
This mechanism utilize the MIDI Continuous Controller / Control Change (MIDI CC) Messages (wikipedia) technology
This tab contains settings for this audio creation mechanism. See also Different meanings of SNDs
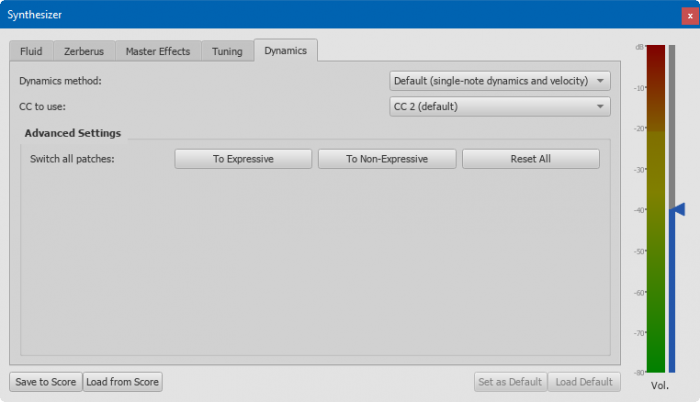
- Dynamics method: Master control
- Default (single-note dynamics and velocity): use MIDI CC to communicate with soundfont if enabled in individual instrument
- Velocity only (no single-note dynamics): ignore individual instrument's setting, use velocity only, do not use any MIDI CC
- CC events only (constant velocity): ignore individual instrument's setting, use MIDI CC only
- CC to use:
- MIDI CC number that Musescore use to communicate with all soundfont. Match this to the SoundFont you loaded. You cannot edit soundfont's attenuation response inside Musescore, see Edit a Soundfont to use MIDI CC mod instead.
- Available options are CC 1, CC 2 (default), CC 4, CC 11.
- This setting is global.
- Because default soundfont response to CC 2, setting this to values other than CC 2 breaks playback for some dynamics symbols if your score is using a default instrument and default soundfont, eg sfz symbol of default violin. Step by step instruction to reset visit How to setup Musescore 3.x for correct playback for all dynamics and hairpins
- Advanced Settings :
- Buttons inside this box are shortcuts that works only if you are using the default soundfont. They switch sound to another version that has a differet volume response method. They work on every instrument channels currently on the score, equivalent to picking Sound in Mixer for each of track controls.
- They do not affect instrument's dynamics symbol and hairpins interpretation setting 'Use single note dynamics' in Staff / Part properties
- They do not affect instruments added afterwards.
- Available options :
- To Expressive : switch to the CC 2 responsive version of sounds
- To Non-Expressive : switch to velocity responsive version of sounds
- Reset All : Reset all channels to default sound version defined in instruments.xml
- For all dynamics (esp. build-in SNDs such as sfz) and hairpins to produce correct audio when you are using default soundfont, you must use the default options.
Volume
The slider on the right of the Synthesizer controls the playback volume: any changes made here last only to the end of the session, unless saved to the score or set as the new default.
See also
External links
- How to setup Musescore 3.x for correct playback for all dynamics and hairpins (MuseScore HowTo)
- Soundfont, MIDI velocity and instruments.xml (Create Musescore 3.x compatable soundfont)