Paletit ja työtilat
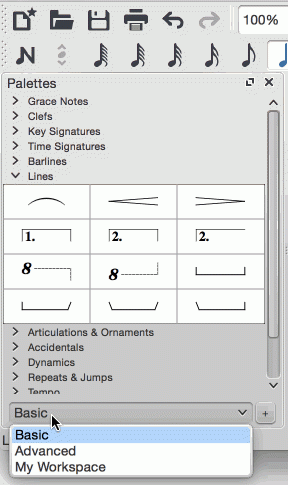
Nuottipohjan vasemmalla puolella on Työtila. Työtilan voit ottaa näkyviin ja piilottaa hyödyntämällä valikkokomentoa Näytä → Paletit tai pikanäppäintä F9 (Mac: fn+F9).
Työtila vuorostaan sisältää lukuisia paletteja. Kukin paletti on kansio, joka sisältää joukon musiikkiin liittyviä symboleita.
Työtilat
MuseScore tarjoaa kaksi esiasetettua työtilaa: Perus (oletusasetus) ja Edistynyt (tila, jossa on enemmän paletteja ja symboleita). Voit vaihdella näiden kahden välillä käyttämällä työtilapaneelin pohjassa sijaitsevaa pudotusvalikkoa. Palettien nimet työtilan sisällä on lueteltu selkeästi paletit-otsikon alla.

Huom: Esiasetettujen työtilojen paletteja tai niiden sisältöä ei voida muokata. Tehdäksesi niin, sinun täytyy ensin luoda mukautettu työtila (alla).
Yksittäinen palettitila
Jos haluat sallia vain yhden paletin avautumisen kerrallaan, klikkaa oikella hiiren painikkeella työtilaa ja merkkaa "Yksittäinen paletti"-laatikko.
Telakointi/telakoinnin irroittaminen
Telakoidaksesi tai irroittaaksesi työtilan, kts. Sivupaneelit.
Mukautettu työtila
Luodaksesi muokattavan työtilan:
- Valitse olemassaoleva työtila. Hyödynnä tarvittaessa työtilan alapuolella sijaitsevaa pudotusvalikkoa.
- Klikkaa + -painiketta, syötä nimi uudelle työtilalle ja paina Tallenna. Uusi työtila on lisätty paneeliin.
Vaihtoehtoisesti voit hyödyntää valikon vaihtoehtoa:
- Valitse Muokkaa → Työtilat ja valitse työtila.
- Valitse Uusi. Täytä työtilan nimi ja klikkaa OK.
Kunnes mukautettu työtila on luotu, voit vapaasti sijoittaa, poistaa, nimetä ja järjestää uudelleen paletit sen sisällä: uusia symboleita voi lisätä ja olemassa olevia poistaa jne. Lisätietoja, kts. Mukautetut paletit ja Palettivalikko (alla).
Paletit
Avaa/sulje paletti
- Klikkaa kerran paletin nimeä tai sen vierellä olevaa nuolen kärkeä.
Käytä palettisymboleja
Palettisymbolin voi asettaa partituuriin käyttämällä jotakin seuraavista tavoista:
- Valitse yksi tai useampi partituurin elementti ja tuplaklikkaa palettisymbolia.
- Raahaa ja pudota symboli haluamaasi partituurin elementtiin viivastossa.
Esimerkiksi tenuto-merkin (—) lisääminen valittuihin nuotteihin:
- Valitse haluamasi nuotit.
- Artikulaatiot & Korukuviot paletista, tuplaklikkaa tenuto-symbolia.
Objekteja voi kopioida, liittää ja monistaa, kunnes ne on lisätty partituuriin—kts. Kopioi ja liitä.
Esiasetetut paletit (Edistynyt työtila)
Toiminnoiltaan monipuolisempi Edistynyt työtila sisältää seuraavat paletit:
- Korusävelet
- Nuottiavaimet
- Sävellajimerkinnät
- Tahtiosoitukset
- Tahtiviivat
- Viivat
- Arpeggiot ja glissandot
- Hengitykset ja tauot
- Hakasulkeet
- Artikulaatiot ja korukuviot
- Etumerkit
- Dynamiikka
- Sormitus
- Nuotinpäät
- Tremolo
- Kertaukset ja hypyt
- Tempo
- Teksti
- Vaihdot ja välistäjät
- Säkkipillin koristekuviot
- Palkin ominaisuudet
- Kehykset ja Tahdit
- Otelautakuvat
Custom palettes
Once you have created a custom workspace (see above), and providing editing is enabled (see Palette menu below), you can customize the palettes within it to your own requirements.
To add an existing score element (such as a line, text, dynamic, fretboard diagram etc.) to a custom palette, press and hold Ctrl+Shift, then drag the symbol onto the palette. Symbols from the Master palette can also be added to a custom palette.
Palette menu
Right-clicking on the name of a palette in a custom workspace brings up a menu with a range of options:
-
Palette Properties...: This allows you to make adjustments to the appearance of the open palette:
- Name
- Cell Size: Width, Height
- Element Offset: Adjusts the vertical offset of all elements in the palette.
- Scale: Makes all palette elements appear larger or smaller.
- Show grid: Tick this box to visually divide the palette into cells, one for each element.
- Show ‘More Elements…’: Tick this box to create a cell which opens the Master Palette.
- Insert New Palette: Creates a new empty palette.
- Move Palette Up / Move Palette Down: Allows you to reorder the palettes.
- Enable Editing: Tick this option if you want to be able to edit a palette.
- Save Palette: Save as an .mpal file.
- Load Palette: Load an .mpal file.
- Delete Palette
Right-clicking on an element within a palette (if editing of the palette is enabled) brings up a menu with the following options:
- Clear: Removes the element from the palette
- Properties...: Opens the Palette Cell Properties dialogue:
- Name: The tooltip that appears when you mouse over the element.
- Content offset (X, Y): Adjust the position of the element in the palette.
- Content scale: Make the element appear larger or smaller in the palette.
- Draw staff: Draws the five lines of a musical staff behind the palette element.
- More Elements: Opens the relevant Master Palette section.
Note: Changing values in "Palette Cell Properties" only affects the appearance of elements in the palette. It does not change their sizes or offsets on the score page.
Master palette
Music symbols not part of the palettes in the Advanced workspace can be found in the Master palette by pressing Z or Shift+F9 (Mac: fn+Shift+F9).
Behavior of applied text and lines
If the symbol you are adding to the score from a palette contains a text element (e.g. staff text, dynamic, fingering, volta etc.), then properties such as font-type, font-size, text color, and alignment will adapt according to the following rules:
-
Text properties which have not been altered by the user will adopt the relevant, prevailing text styles.
-
Custom text-properties—i.e. those changed by the user before saving the symbol to a custom palette—remain as customized.
When adding a line, line properties always remain unchanged (i.e. as set by the user before saving to a custom workspace, or as predefined in the Basic/Advanced workspaces).