Sound and playback
This page is an administration page intended for the editing community only. Click this link to go to the handbook front page intended for public viewing.
Mid-staff instrument changes
To add a new instrument to a score and manage instruments setup, use Instruments dialog instead.
To switch an instrument and change its staffs everywhere on a score, use Staff / Part properties instead.
To switch to another sound sample (switch channel) (e.g. pizz., con sordino) inside an instrument, use Staff Text instead
Change Instrument Text
When a musician is required to double up on a different instrument for a section of a piece, an instruction to switch instruments is generally placed above the staff at the beginning of that section. A return to the primary instrument is handled in the same manner.
MuseScore uses a special class of text called Change Instrument text for this purpose. This allows you to change the instrument for that staff at a chosen point in the score, and have this reflected in playback.
Add change instrument text
- Select the start point for the change by clicking on a note or rest;
- In the Add menu, choose Text, then choose Instrument Change.
- Type any character/text so you don't end up with an empty text element
- Right click on the just typed text and in the context menu choose Select Instrument.
This opens the Change instrument dialog: the top box shows the current instrument, the bottom the list of selectable instruments;
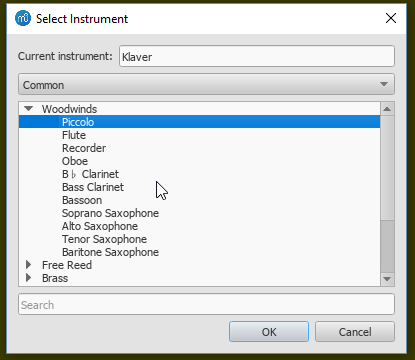
- Choose the instrument, then click OK. Text indicating which instrument the player will use appears in the score.
- Insert a new key signature, if required, at the change, for the staff in question.
Warning: While the "Change Instr." text is also available from the Text Palette, it contains a bug in MuseScore 3.x where transposition for the new instrument might break. Use the Change Instrument Text from the menu instead to prevent this bug.
How Instrument change text affects the score
An instrument in Musescore is a concept including score settings, behaviors (transposition, playable range), sound etc. More info.
Sound setting changes using a Change Instrument text can be observed:
- The sound played on that track in the score will be changed to that of the new instrument from that point onward. The Mixer display mixer changes to add one or more new sub-channels. It is these new sub-channels that can be edited to a new sound.
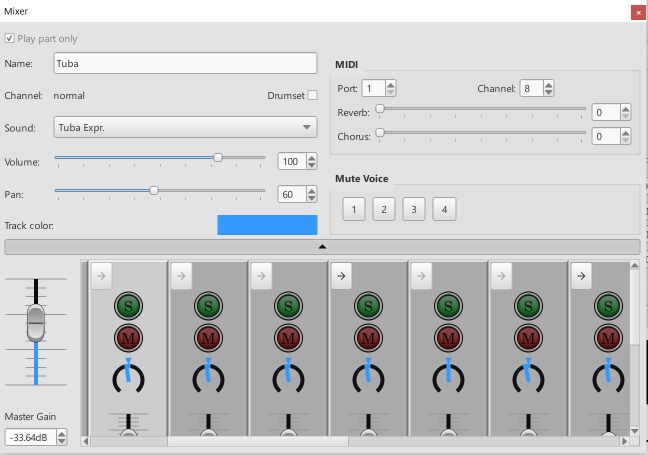
For example, here is a Mixer display showing the "Tuba" track (first track) among many others. Notice that the small arrow at the top of the Tuba track is dimmed. No new instruments have been added to it.
Now, to the Tuba stave in the score, a "Change Instrument" text has been added to the score, inserting an "Oboe". Notice now that the top arrow on the Tuba track in the Mixer menu has darkened.
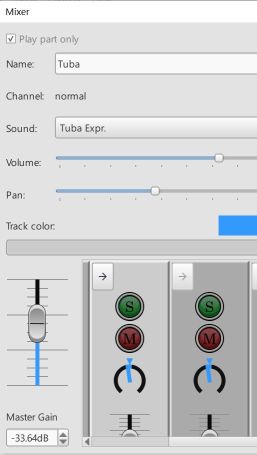
Now, if that arrow in the Mixer menu is clicked, a sub-menu opens, showing the sounds of the Tuba are still there (1st two sub-channels), but a new "Oboe" sub-channel has been added. By clicking on this sub-channel, you can assign a sound to the Oboe from the "Sound" tab on the Mixer menu (see below):
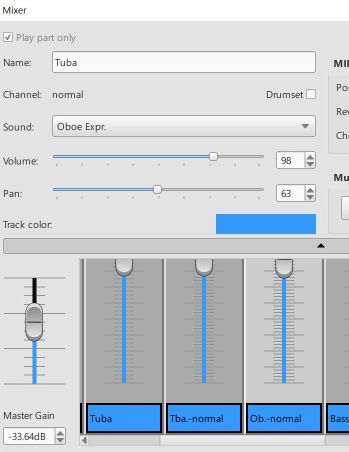
- Subsequent notes are automatically adjusted to indicate the correct written pitch for the new instrument (but the new key signature still needs to be added manually—see below).
To change the track back to its original instrument, just insert a new "Change Instrument" text into the stave after the first one, and name the original instrument. For example, in this example, the Tuba stave has been returned back to Tuba. Notice that in the Mixer menu, a new "Tuba" sub-channel has been added after the "Oboe" sub-channel.
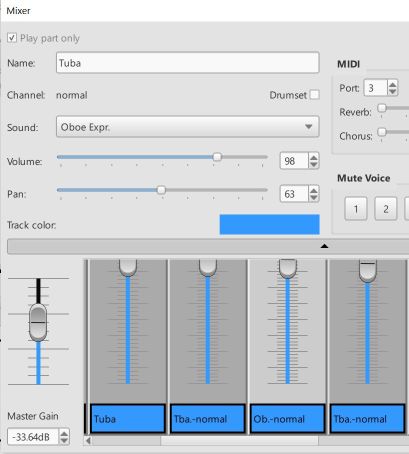
- The new instrument name will be displayed in front of the following systems.
Mixer
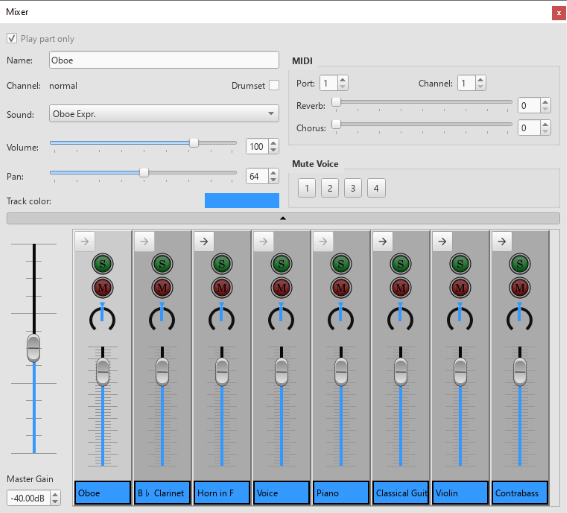
The Mixer contains controls for adjustments of in-app playback (sound, volume and panning), and MIDI out settings. It contains the Details Area on the top and the Control strips Area below. In between the two is a wide button with a tiny triangle. Clicking on it toggles the visibility of the details area. It uses the Preferences > Score > "Show MIDI controls in the Mixer" as default setting.
Opening the Mixer
To display/hide the mixer, use one of the following:
- Press F10 (Mac: Fn+F10).
- From the main menu, select View→Mixer.
Control strips Area
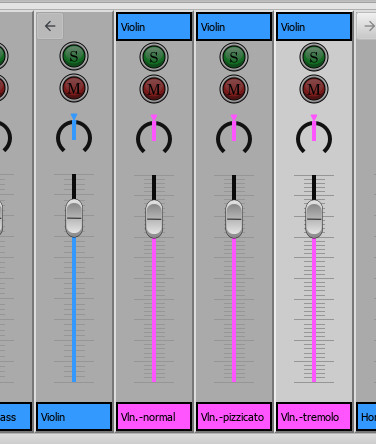
Expanded parent control, showing child controls in pink.
Displays the Master Gain on the left, and columns of controls on the right. It is important to know the difference between channel and sound track (Musescore Voice):
- Every staff on a score belongs to its MuseScore Instrument. For example when a piano is added to a score, the two staffs created, the treble clef staff and the bass clef staff, belong to the same piano instrument.
Each instrument has one or more channel depending on its playback capability inside Musescore. A channel represents a specific type of sound, similar to the concept of playing technique (e.g. a violin which can play in arco, tremolo or pizzicato, legato, vibrato), or articulation sample in commercial sound libraries. Each control strip in the Mixer represents one channel of the score.
When an instrument on a score contains more than one channel. A parent control strip is shown in the Mixer, it has an arrow button on the top left corner. Click the arrow to show or hide all channels. Parent control shadows the first child control, modifying values on parent control modifies all children values. - For each staff (that can contain a clef symbol) in a score, MuseScore creates exactly four sound tracks. They correspond to the four Musescore Voices. To instruct individual sound track (Voice) to use a channel (sound), use a Staff Text as explained below. Contrary to the concept of sound track and mixer in popular DAWs, Musescore 3 Mixer has nothing to do with sound tracks (Voices) except the ability to mute (jump to).
Note: (a) In Musescore 3.6.2, the Mixer does not response to selection on the score screen area, a control in the Mixer must be selected with a mouse click first, before any adjustment is made. (b) It is not possible to add or remove channel inside a instrument on a score inside Musescore. To add or remove a channel, or set default values, a custom instrument must be created utilizing a instruments.xml. The topic is covered in the developers' handbook. (c) Parent control strip is formerly referred to as "part track".
Master Gain
The Master Gain controls the overall output volume. To adjust it, click and drag the slider handle or enter a value in the box underneath.
Channel display arrow
When an instrument on a score contains more than one channel. A parent control strip is shown in the Mixer, it has an arrow button on the top left corner. Click the arrow to show or hide all channels. Parent control shadows the first child control, modifying values on parent control modifies all children values.
Mute and Solo
At the top a green S Solo button and a red M Mute button: click to toggle on and off. If any Solo button is checked, unSolo channels are muted regardless of their Mute status. These modify a channel, not voices.. To mute a voice, jump to Mute Voice
Pan
The dial below the mute button controls panning left and right. You can click and drag. Note that value 64, not 50, is center pan.
Volume
The slider controls the playback volume. This is a final post process output volume. The data size 127 is an arbitrary number not related to MIDI velocity, default 100 value is 90% sound sample volume, more info.
Control strip name
Not to be confused with Long instrument name and Short instrument name in Staff / Part properties.
Display Instrument name or Channel name. Does not affect score visually.
Details Area
The details area displays and provides finer control of the currently selected channel.

Play part only
Playback option to be used with Musescore Parts feature.
Name
Not to be confused with Long instrument name and Short instrument name in Staff / Part properties.
Text for display within Mixer only, also known as Part name in Staff / Part properties. Does not affect score visually. Does not affect sound.
Channel
Channel name cannot be modified inside Musescore, use custom instruments.xml instead, more info
Drumset
Affects the whole instrument:
- notation settings. Must be checked to use Drum notation and Drum input palette.
- interpretation of soundfont data. Check or uncheck this box base on the layout of the sound.
Changing without understanding will mess up your score audio.
Sound
Understand difference of channel and voice first, you may not want to edit this field. Consider these alternatives first:
- To add a new instrument to a score and manage instruments setup, use Instruments dialog instead. You should use Instruments dialog if you are not sure, it is the preferred way to setup a score. Doing this ensures written symbols affect sound correctly eg violin tremolo text symbol, bass guitar pizz symbol.
- To switch an instrument and change its staffs everywhere on a score, use Staff / Part properties instead. Doing this also ensures written symbols affect sound correctly.
- To switch the instrument used by one staff at a chosen point in the score, use 'Change Instrument' Text instead. Use this to instruct your musician to dump an instrument and pick up another mid stream.
- To switch to another sound sample (switch channel) (e.g. pizz.) inside an instrument, jump to Mid-staff sound(channel) change or use a custom Staff Text instead. Similar to keyswitches / articulation-switching in commercial sound libraries. You can do this to each voice separately.
If none of the above options fit, read on to edit sound.
The sound option is the sound data that an instrument channel use for playback. The data reference method depends on the order of soundfonts in the Synthesizer, pay attention to Synthesizer setting before you close and restart Musescore.
Correct audio won't be produced unless you setup Drumset correctly, you must understand the sound's layout.
The drop-down menu lists every sound from SoundFont loaded in the Synthesizer. They are ordered as the order of soundfont files in the Synthesizer: SF2/SF3 by MIDI Bank first, then SFZs. It is not an alphabetical order. To jump to the sound you desire quickly, while the list is open press on your keyboard (once or more) the first letter of the name.
Sound is formerly named Patch.
Volume
Same as volume slider on control strip
Pan
Same as panning slider on control strip
Track (Control strip) color
Color for display in Mixer only, does not affect score visually. Affects whole instrument. To change, click the colored rectangle to pick from the color palette.
MIDI controls
Port and Channel
The output MIDI port and MIDI channel. As of Musescore 3.6.2, MIDI output driver of the program only use 1 port and 16 channels on the operation system.
Reverb and Chorus
The reverb and chorus value sent to MIDI out. Sent to MIDI devices only. Does not affect MuseScore's built in audio playback.
Mute Voice
Mute individual Voice. Each row represents one staff of the instrument. So pressing '2' on the top row will mute the second voice of the first staff of the instrument. This field is different from all others as it affects voice instead of channel.
Mid-staff sound (channel) change (pizz., con sordino, etc.)
Understand the concept of channels. You can also do these instead:
- To add a new instrument to a score and manage instruments setup, use Instruments dialog instead.
- To switch an instrument and change its staffs everywhere on a score, use Staff / Part properties instead.
- To switch the instrument used by one staff at a chosen point in the score, use 'Change Instrument' Text instead.
Some instruments come with multiple channels that you can switch audio playback to and from. For example, the build-in string instrument (violin, viola, cello etc.) has three channels: "arco" (or "normal"), "pizzicato" and "tremolo." The build-in trumpet has two channels "open" (or "normal") and "mute".
To switch channel, add a pre-configured Staff Text or add a plain one and edit it, as explained below. All subsequent notes of affected Voice(s) will switch to play the sound assigned to that channel, unless instructed to do otherwise with another Staff Text object. For example, all notes after a 'pizz.' Staff Text use the "pizzicato" channel, to return to arco (use sound of "normal" channel), a new 'arco' text must be added.
Pre-defined Staff Text
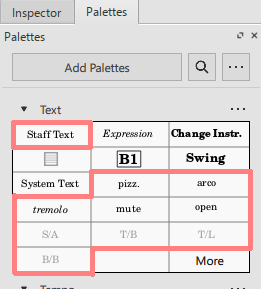
The 5 build-in pre-configured Staff Text in the Text palette (pizz., arco, tremolo, mute, open) instruct all four Voices of a staff to use respective channel. They affect one particular staff, but not the other staffs of the same instrument.
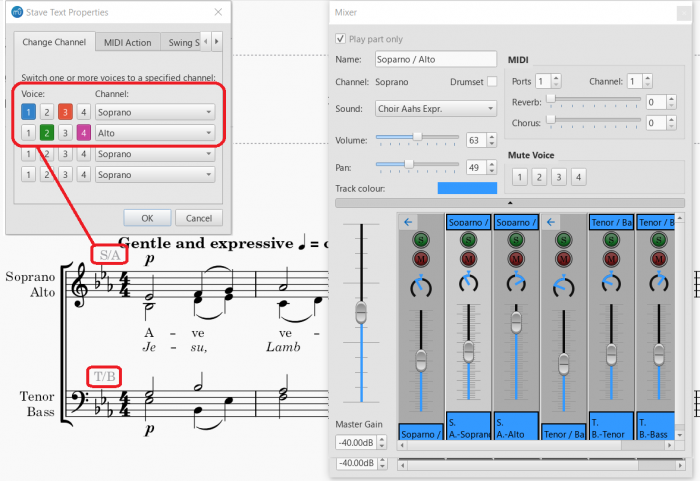
The 4 build-in pre-configured Staff Text in the Text palette (S/A, T/B, T/L, B/B). They only work on:
- any of these Musescore Instruments:
- Men
- Women
- or a score created with any of these templates:
- SATB Closed Score
- SATB Closed Score + Organ
- SATB Closed Score + Piano
- Barbershop Quartet (Men)
- Barbershop Quartet (Women)
They affect one particular staff, but not the other staffs of the same instrument.
- the S/A object: instructs Voice 1 and Voice 3 notes to use the Soprano channel, Voice 2 and Voice 4 notes to use the Alto channel
- the T/B object: instructs Voice 1 and Voice 3 notes to use the Tenor channel, Voice 2 and Voice 4 notes to use the Bass channel
- the T/L object: instructs Voice 1 and Voice 3 notes to use the Tenor channel, Voice 2 and Voice 4 notes to use the Lead channel
- the B/B object: instructs Voice 1 and Voice 3 notes to use the Baritone channel, Voice 2 and Voice 4 notes to use the Bass channel
Custom Staff Text
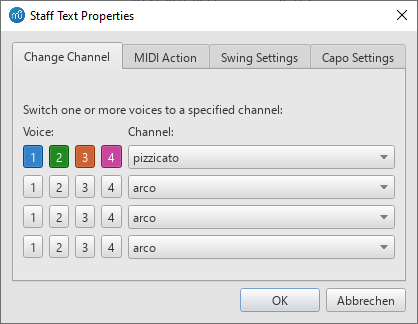
To use a custom Staff Text :
- Select a note;
- From the main menu, choose Add→Text→Staff Text or use the shortcut Ctrl+T;
- Enter the text. it does not affect playback;
- Right-click on the applied staff text and select Staff Text Properties…;
- Open the "Change Channel" tab of the "Staff Text Properties" dialog. Each row represents one instruction.
- Under "Voices:" subheading on the left, select Voice(s) by pressing on buttons. When a Voice button appears dented and colorized, it indicates that it has been selected.
- Under "Channel" subheading" on the right, select the channel that the selected Voice(s) should use from here after.
- A row that has no Voice selected does not affect the score.
See also
External links
- Mute, unmute and solo actions: Setup keyboard shortcut keys.
- Mixer Minimalistic Style: Vertical minimalistic mixer similar to the Track Control Panel in a DAW.
- How to change instrument sound (e.g. pizz., con sordino) midway through score (MuseScore HowTo, same instruction as above)
Piano Roll Editor
Overview
This feature is unstable, may lead to crash and data loss. Backup beforehand. Many PRE adjustments are ignored by Musescore 4 by design.
Using Piano Roll Editor (PRE) on a target staff (a piano grand staff contains two staffs), the user can
- add, remove notes, edit their properties,
- edit note value,
- edit note playback length without altering apparent note value,
- advance or delay notes, and
- offset note playback without altering notated rhythm.
To open PRE,
- Right click on any blank space in a measure, but not on any note, stem, rest etc, or spaces in between staffs.
- Select Piano Roll Editor..., as shown below.
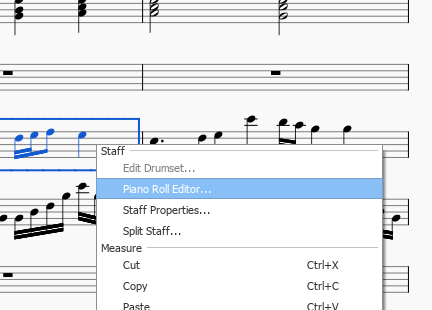
Interface
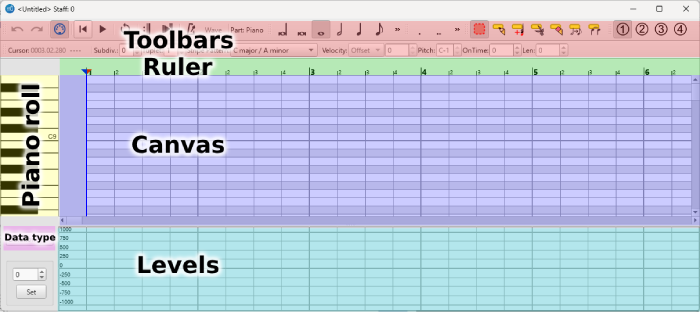
From the top down are,
- Toolbars: Buttons mirror main Score View toolbar counterparts. The Wave button is invalid in Musescore 3.6.2 and 3.7. Items useful in editing are,
- Edit Tool: Click to select Canvas editing mode,

- Select notes
- Insert note
- Append note to chord (removed in 3.7)
- Cut chord
- Erase note
- Change chord length (removed in 3.7)
- Change playback length (added in 3.7)
- Toggle tie
- Voices: as shown below.


- Subdiv and Tuplet input. Defaults 0 (no subdivision) and 1 (no tuplet subdivision) respectively. Edit them to add or remove Canvas grid lines. Crowded grid lines may be temporarily hidden when zoomed out.
- Velocity option and value and Pitch: Selected note's Velocity type and Velocity note properties and pitch. Approximation automatically applied when switching option. The entered value is applies to all selected notes.
- OnTime: Selected notes' playback offset per 1/1000 note length only. Does not affect notated rhythm. Use negative values to nudge forward. Default value 0. Related to Data type selection box : Position option below.
- Len: Selected notes' playback length multiplication per 1/1000 note length only. Does not affect apparent note value. Often used to mimic staccato, non-legato (950), legato (>=1000) etc playback. Max cap of 2000 present in Musescore 3.6.2 is removed in 3.7. Default value varies with Instrument. Related to Data type selection box : Duration (multiplier) option below.
- Edit Tool: Click to select Canvas editing mode,
- Ruler: Measure numbers (bold) and beat numbers. The red arrow indicates the current playback caret (Left click to reposition). The blue arrows indicate loop starting and end positions (middle click and right click to mark respectively). See "Navigating" section.
- Piano roll (left) and Canvas (right): Click any key under Piano roll to demo. Canvas is covered in "Navigating" section.
- Data type selection box, Value input and Set button (left), and Levels / Lanes (right): Use Data type selection box to select the note data to display in Levels. Levels is covered in "Navigating" section. Data types available are,
- Duration: Note playback length addition or subtraction. Value 250 is equvalent to adding length of a crochet (quarter note).
- Duration (multiplier): Note playback length multiplication using a 1/1000 note length unit. Related to Len input above.
- Velocity (relative): note property Velocity when Velocity type is Offset.
- Velocity (absolute): note property Velocity when Velocity type is User.
- Position: Note playback offset. Related to OnTime above.
Navigating
The same time segment is shown under Canvas and Levels with timing shown on Ruler. To rewind or forward displayed segment,
- Shift + mouse wheel on Canvas,
- Re-opening from the main Score view at measure desired,
- Use the scrollbar on Canvas, or
- Drag with middle mouse button on Canvas (Musescore 3.7 Evolution).
Adjust time scale with Ctrl+Shift + mouse wheel on Canvas.
Canvas
(Musescore 3.6.2 only) Each block represents a sounding event,
- which is a non-tremolo note, or
- "a segement of sound" among many produced by a tremolo.
- works as 3.6.2 when Change playback length tool is selected,
- otherwise always shows the note as if tremolo markings are removed.
Note value is indicated by width. Vertical position always corresponds to sounding pitch. Text shown aligned to the left border is the concert pitch / sounding pitch, number on the right is Voice. Red line between two blocks represents a Tie. Selected notes are highlighted in yellow. To pan pitch-wise,
- Mouse wheel,
- Use the scrollbar, or
- Drag with middle mouse button (Musescore 3.7 Evolution).
Adjust pitch range scale with Ctrl + mouse wheel.
Levels
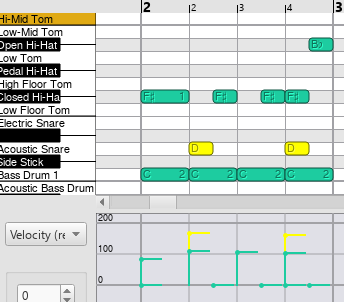
Each dot represents a note, with visual aid lines (one extending down to axis, one extending right briefly). Selected notes are highlighted in yellow. Only selected notes can be edited, which is useful when editing overlapping lines (chord notes).
Repositioning the playback cursor
- Left click on Ruler.
Editing
Selecting and deselecting notes
- Select the Select notes tool.
- Under Canvas,
- Click a block to select.
- Click a blank space to deselect.
- Drag a box to select multiple.
- Ctrl + click to add to the current selection.
- Shift + click to add to or remove from the current selection.
- Ctrl+Shift + click to remove from the current selection.
Adding a note
- Adjust grid under Canvas by editing Subdiv and Tuplet values. All new notes start at a grid line.
- Depending on the result required, either,
(Musescore 3.6.2 only)
- Select the Insert note tool.
- Select note value in Toolbar.
- Select a Toolbar Voices option.
- Click any blank space under Canvas. The new note starts at the nearest grid line to the left. It always overwrite and truncate existing content.
or
- Select the Insert note tool.
- Select a Toolbar Voices option.
- Under Canvas, click and drag to add new note. Click without drag to add new note using the last created note's length. The new note starts at the nearest grid line to the left. It merges into a chord with any existing notes, adding ties where appropiate.
or
(Musescore 3.6.2 and above)
- Select the Select notes tool.
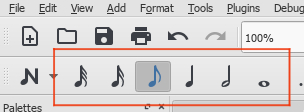
- Select note value on the main Score View toolbar as shown below, but not on PRE Toolbars.
- Select a Toolbar Voices option.
-
Ctrl + click any blank space under Canvas. The new note starts at the nearest grid line to the left. It merges into a chord with existing notes if note values match, overwrites and truncates otherwise. Tuplets are ignored.
or
(Musescore 3.6.2 and above)
- Select the Select notes tool.
- Select a Toolbar Voices option.
- Shift + click any blank space under Canvas. The new note starts at the nearest grid line to the left, merges into a chord with existing notes, or replace an existing rest.
or
(Musescore 3.6.2 and above)
- Select the Select notes tool.
- Select a Toolbar Voices option.
- Ctrl+Shift + click any blank space on the Canvas. Existing notes still sounding but not starting at the nearest grid line to the left is splitted. Tuplets are ignored.
Editing pitch
- Select note(s).
- Either drag and drop the blocks, or ↑ or ↓.
Editing Velocity type and Velocity property
See also note property and Dynamics chapter.
- Select note(s).
-
Either,
or
- Select Data type selection box : Velocity (relative) or Velocity (absolute). Values explained in Interface.
- Click on any yellow item in Levels. Click and drag to edit multiple. Shift + click and drag to assign the same value.
or
- Select Data type selection box : Velocity (relative) or Velocity (absolute). Values explained in Interface.
- Enter a value in Value input.
- Click the Set button to assign the value to all selected notes.
Editing note value
(Musescore 3.6.2 only),
- Select the Change chord length tool.
- Select note value in Toolbar.
- Click blocks under Canvas.
- Select the Select notes tool.
- Resize blocks under Canvas by dragging right border.
Editing note playback length without altering apparent note value
(Musescore 3.6.2),
- Select note(s).
-
Either,
-
Enter a Len value.
or
- Select Data type selection box : Duration or Duration (multiplier). Value explained in "Interface".
- Click on any yellow item in Levels. Click and drag to edit multiple. Shift + click and drag to assign the same value.
or
- Select Data type selection box : Duration or Duration (multiplier). Value explained in "Interface".
- Enter a value in Value input.
- Click the Set button to assign the value to all selected notes.
- Use any of the above methods, or
- Select note(s).
- Select the Change playback length tool.
- Resize blocks under Canvas by dragging left or right border. Dragging left border also advances or delays the note.
Advancing or delaying notes
(Musescore 3.6.2),
- Select note(s).
- Drag and drop to a new horizontal position.
- Use the method above, or
- Select the Select notes tool.
- Resize blocks under Canvas by dragging left border. This changes note length by keeping the same release time.
Offseting note playback without altering notated rhythm
(Musescore 3.6.2),
- Select note(s).
-
Either,
-
Enter a OnTime value.
or
- Select Data type selection box : Position. Values explained in Interface.
- Click on any yellow item in Levels. Click and drag to edit multiple. Shift + click and drag to assign the same value.
or
- Select Data type selection box : Position. Values explained in Interface.
- Enter a value in Value input.
- Click the Set button to assign the value to all selected notes.
- Use any of the above methods, or
- Select note(s).
- Select the Change playback length tool.
- Resize blocks under Canvas by dragging left or right border. Dragging left border also advances or delays the note.
Moving and duplicating notes
- Select note(s).
- Right click, select Cut notes or Copy notes.
- Right click on a blank space, select Paste notes here to duplicate to that time moment.
Not working: Ctrl+C/X/V.
Removing notes
- Select note(s).
- Press Del.
Customization
Edit Preferences Advanced tab "ui/pianoroll/[dark or light]/[item]".
MuseScore 3.7 Evolution update
The fork Musescore 3.7 Evolution contains PRE improvements and changes.
- MuseScore 3.7 - Piano Roll Editor Updates video by dev Mark McKay / blackears
- https://github.com/Jojo-Schmitz/MuseScore/pull/287
- Known bugs and feature suggestions https://github.com/orgs/musescore/discussions/16925
See also
- TAB Ring plugin by yonah_ag
Play mode
Playback toolbar
Basic playback functions are accessed from the Play toolbar located above the document window:
From left to right, the icons are:
- Toggle 'Midi input':
- Rewind to start position: Playback returns to the beginning of the score, or to the start of the loop (if one is set).
- Start or stop playback: See Start/stop playback.
- Toggle loop playback: See Loop playback.
- Play repeats: Turn off if you want playback to ignore repeats.
- Pan score during playback: Turn off if you want the score to remain stationary.
- Play metronome: Toggles metronome ON and OFF.
Playback commands
Start/stop playback
To start playback:
- Click on a note, rest or the blank part of a measure to establish the starting point. Note: If no selection is made, playback returns to the place it left off; or, if no previous playback, to the start of the score.
- Press the Play button; or press Space.
During playback you can jump to a specific note or rest in the score by simply clicking on it.
To stop playback:
- Press the Play button; or press Space.
During playback
Once playback has started, the following commands are available:
- Go back to previous chord: ←
- Advance to next chord: →
- Go back to start of previous measure: Ctrl+← (Mac: Cmd+←)
- Advance to start of next measure: Ctrl+→ (Mac: Cmd+→)
- Rewind to start of score: Home (Mac: Cmd+Home); or press the Rewind button (playback toolbar).
During playback you can still use keyboard shortcuts to open and close panels, such as Play, Synthesizer, Mixer etc.
Loop playback
- Playback should be off, and the "Loop playback button" on.
- Select the desired region of the score for loop playback.
- Press the playback button.
Playback will now cycle within the region marked by the blue flags.
- Use the "Loop playback" button to toggle the loop on or off.
See also: Play Panel (below).
Play panel
To open the Play Panel use one of the following options:
- Press F11 (Mac: Fn+F11).
-
From the menu bar, select View → Play Panel.
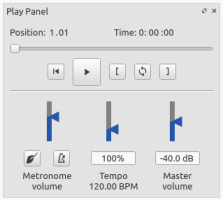
The Play Panel allows you to make temporary changes to tempo and volume, to loop playback between specified points etc.
- Loop playback: Select a start note and click on the Loop in button; select an end note and click on the Loop out button. Press Play to hear the loop. The controls also work during playback.
- Rewind, Play: Playback controls.
- Metronome: Toggle metronome playback ON or OFF. Note about beat subdivision: the metronome adds 'beat subdivision ticks' for sufficiently slow tempo of the piece (see Tempo), but they are not added when the % Tempo is slowed down in the playback panel (it is necessary to edit the piece's tempo to achieve them).
- Count in: (Conductor icon) Adds a count-in when you start playback at the start of a measure. Extra beats are added if you start mid-measure. Toggles ON and OFF.
- Tempo: Make temporary change to tempo. See Tempo : Changing monitoring playback tempo in Play Panel chapter.
- Volume: Make temporary change to volume (resets when program is reopened). Note: To change the default playback volume of the score, see Synthesizer.
Playback: Chord symbols / Nashville numbers
Overview
Musescore, as of 3.5, understands and creates playback for chord symbols and Nashville numbers, but not roman numerals. This chapter discusses the playback settings available. They also affect functionalities other than playback including:
- Audio and MIDI files exported, see the Export chapter, and
- how Musescore lays out notes when the command "Realize Chord Symbols" is used, see Chord symbols: Realize Chord Symbols.
Available settings
The playback behavior of each chord symbol and Nashville number on a score is determined by two levels, see also Layout and formatting chapter.
- Level 1: Properties of each individual object. By default, objects do not have any specific properties. When properties are assigned in the Inspector, they will always be used. To assigned properties to selected object(s):
- Select object(s). To select multiple objects, use Shift+click, or Right-click → Select all similar elements in selected range, see Selection modes chapter.
- Make changes in the Inspector.
- Level 2: The "Style for Chord symbols" (style profile). Every object use it. Its Play option is enabled by default only in score created with MuseScore 3.5 and later. The values inside can be edited in two ways.
- Edited directly in Format → Style… → Chord Symbols window (see Layout and formatting chapter); or
- Assigned with the values of a selected object, by clicking the Inspector : Set as style (bold S) button to the right of Voicing (see Inspector chapter).
On top of settings explained, all these objects attached to one particular instrument (any of its staff(s)) use that instrument's specialized harmony channel. Its control strip is only visible inside Mixer when there is at least one such object. The control strip may be hidden under a parent control strip, in that case click the arrow on the top left corner to show all child strips, see Mixer chapter. Ways to change sound (virtual instrument) used and the volume / muting / soloing are covered in their respective sections.
Every score file has a "Full Score" layout. It also contains "Parts" when the Musescore Part feature is utilized to generate different versions of the same score. Each "Part" and the "Full Score" has their own separate complete set of settings explained above.
Additionally, there are adjustable specific playback settings of Musescore software for these objects. See "Changing settings of Musescore software" section.
Enabling / disabling playback completely
Use combination of the following settings to toggle playback.
- Toggle selected object(s)' Inspector : Chord Symbol : Play property, see overview.
- (requires Musescore 3.5.1 and later) Toggle Play setting of "Style for Chord symbols", see overview.
- Mute/unmute instrument harmony channel(s). See "Changing the volume, muting or soloing a harmony channel" section.
- Change settings of Musescore software. See "Changing settings of Musescore software" section.
Interpretation and voicing settings
- Interpretation
- Literal
- Jazz: Adds color tones (e.g. the major 9th) but may also omit certain notes—this depends on both the chord itself and the context (the next chord in particular)
- Voicing. All voicings include a bass note, 2 octaves below the root note of the chord.
- Auto
- Root only : Just the bass note
- Close : Arranges the notes within the span of an octave
- Drop 2 : Lowers the second highest note of the chord by one octave
- Six Note
- Four Note : 3rd, 5th, 7th and 9th intervals
- Three Note
- Duration
- Until next chord symbol
- Until measure end
- Chord/rest duration
Shown below are different settings used on a CM7 (Cmaj7) chord, and notes demonstrating the resultant playback. The "Close" and "Auto" create identical result. It is not necessarily so for other chords, so it is advisable to use "Close" explicitly when it is the case.

Changing the sound of a harmony channel
Harmony channel use "Grand Piano" sound by default regardless of instrument, except where a score created in Musescore 3.5.1 and later using the Guitar solo template, the "Nylon String Guitar" sound is used by default.
To change the sound:
- Open the Mixer (shortcut: F10, Mac: Fn+F10)
- Inside the Control strips Area, locate the instrument's control strip.
- Click the "Channel display arrow" (the arrow button on the top left corner) to show all child strips.
- Locate the strip that shows in its Name property "harmony" or "Chord syms." (may be truncated).
- Change Sound property.
Note: The exeception that Sound settings of an instrument are shared among Musescore Parts.
Changing the volume, muting or soloing a harmony channel
- Open the Mixer (shortcut: F10, Mac: Fn+F10)
- Inside the Control strips Area, locate the instrument's control strip.
- Click the "Channel display arrow" (the arrow button on the top left corner) to show all child strips.
- Locate the strip that shows in its Name property "harmony" or "Chord syms." (may be truncated).
- Adjust the volume, mute or solo.
Note: In a score file containing multiple Musescore Parts, separate adjustments are needed in each individual Part for the same instrument, as harmony channel volume and mute settings are saved in the Part, but not shared among them.
Changing settings of Musescore software
Requires Musescore 3.5.1 and later
To change the playback function of Musescore software on chord symbols and Nashville numbers, when playing back a score:
- Open Edit (Mac: MuseScore) → Preferences… → Advanced tab.
- Edit options:
score/harmony/play/disableNew: Only affects scores created with Musescore 3.5 and later. The default status is unchecked (playback function enabled). Check it to disable the playback function of MuseScore software.score/harmony/play/disableCompatibility: Only affects scores created with Musescore 3.4.2 and earlier. default is checked (playback function disabled). Uncheck it to enable the playback function of MuseScore software.
To change playback of a chord symbol or Nashville number when it is first added onto a score:
- Open Edit (Mac: MuseScore) → Preferences… → Note input tab.
- Check/Uncheck the Play chord symbol when editing option.
Swing
MuseScore's swing feature allows you to change the playback of your score from a straight to a swing rhythm. Swing can be applied globally or only to a section of the score, and is fully variable.
Apply swing to a score section
To apply swing to all staves in a system:
- Click on the note where you want swing to start;
-
Click Swing in the Text palette (double-click in versions prior to 3.4);
This inserts a System Text object which affects all staves in the system with a default swing percentage of 60%. -
Edit the Swing text as required;
-
If you need to vary swing from the default setting, right-click the Swing text and select System text properties... Click on the "Swing Settings" tab and adjust note duration and "Swing ratio" as required.
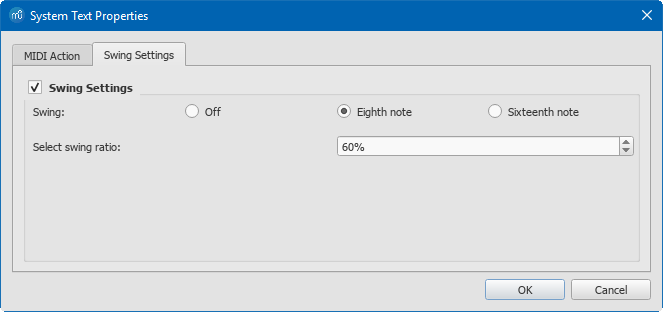
To apply swing only to specific staves in a system:
- Click on the note where you want swing to start;
- Add Staff text;
- Edit the appearance of the text as required;
- Right-click on the text, select Staff Text Properties..., and click on the "Swing settings" tab. Modify as required;
- Repeat steps 1–4 for other staves if needed.
Swing text can be edited and formatted just like any other text object.
Triplet in tempo marking
Often this notation is used to indicate swing:

MuseScore does not have a way to include a triplet in text as a tempo marking, but there is an easy workaround:
- Add Swing text as described above and make it invisible (shortcut V, or untick "Visible" in the Inspector);
- Add an appropriate Image of the required tempo marking to the score. These can be downloaded from the bottom of the "How To" page: How to create a visual swing marking.
- Resize and reposition the image as required.
Return to straight rhythm
If you want playback to return to straight time after a swing section, use one of the following options:
From version 3.4:
- Add Straight text from the "More" field of the Workspace's text palette to the first note or rest of the "straight" section (see above).
Prior to version 3.4:
- Add Swing text to the first note or rest of the "straight" section (see above).
- Edit the text to indicate a return to straight time: e.g. "Straight."
- Right-click on the text and select System Text Properties…. Click on the "Swing Settings" tab and set "Swing to "Off."
Apply swing globally
If you wish to apply swing to the whole score, you can do so from the menu:
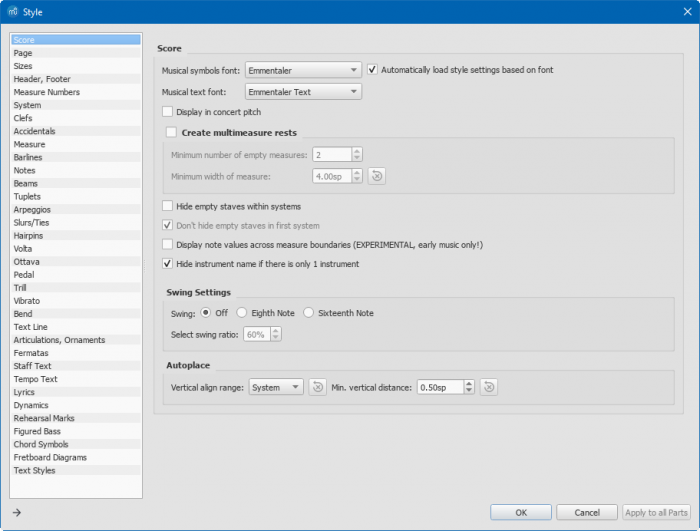
- Select Format → Style... → Score.
-
In the "Swing Settings" section, set the desired note value and "swing ratio."
External links
- How to create a visual swing marking (MuseScore HowTo)
- Swing (jazz performance style) (Wikipedia)
Tempo
This page provides information on tempo markings, fermata symbols, their playback details, changing monitoring playback tempo and adding metronome tick sound. To add markings such as ♬ = ♪ 𝅘𝅥𝅯 see Swing chapter.
Tempo marking
Overview
The musical terminology tempo means the speed or pace of a composition. The following Tempo Text can change playback tempo inside Musescore,
- Metronome marks: Consists of a note, an equals sign, and a whole number. For example (crotchet)
♩ = 80 - Verbal tempo indications: Andante, Allegro etc.
- Metric modulations:
♩ = ♪(crotchet = quaver)
Musescore's synthesizer paces based on two settings,
- The real, written tempo of score. It is only determined by tempo markings on the score. Section breaks and barlines do not reset anything. If no tempo marking is present on a score, it plays as if
♩ = 120is used (120 crotchets or quarter notes in one minute), and - The control slider that change pace temporarily, intended for monitoring.
Musicians use tempo markings to help indicate the value of one beat, but Musescore does not - beat information is obtained from Time signatures only, and is referred to in other functions such as navigation, metronome tick sound etc.
Inspector's Tempo field uses a special unit "BPM". "BPM" is the amount of quarter notes would have been within one minute in decimal number. It is not related to the musical beat. It is not the whole number used in metronome marks conventionally, or on the score. This unit is also used in Play panel.
Playback of Metronome marks and Metric modulations follows written numerical content (by default, can be overridden) but ignores accompanying text. Musescore does not understand the content of Verbal tempo indications, they have pre-defined tempo settings that are editable.
Adding tempo marking
All markings are found in the Tempo palette. New tempo markings are positioned at the top of system (a layout term. See the Layout and formatting and the Text type chapters).
To add a Metronome mark, Verbal tempo indication, or Metric modulation, either
- Select a note/rest and click a palette item (double-click in Musescore version 3.3.4 and before),
- Drag a palette item onto a note/rest,
- Click Add → Text → Tempo marking, or
- Use plugins such as Tap tempo.
To add a Metronome mark that use a suitable note value that matches the beat information from the time signature,
- Select a note/rest and press the keyboard shortcut Alt+Shift+T.
Changing appearance
Playback can be configured to follow written content of Metronome mark and Metric modulation, provided that the note symbol and augmentation dot are special characters. The augmentation dot is not a full stop or period. The equal sign and numbers are plain characters. Formatting options are covered in the "Properties and global settings" section.
Adding plain characters
- Select an object.
- Enter edit mode (double click)
- Type text.
Adding special characters
- Select an object.
- Enter edit mode (double click).
- Use Special characters window: Common symbols tab, one way to open the window is F2
Changing playback
To assign a manual overriding tempo setting,
- Select object(s).
- Uncheck Inspector → "Tempo text" : Follow text.
- Enter a value in Tempo, this value use the special BPM unit, which is not related to musical beat. See Overview.
Repeating tempo markings on other staves
Tempo markings anchor and thus are displayed like System Text. To duplicate markings onto multiple staves, see Staff Text and System Text: Repeating System Text on other staves chapter.
Properties and global settings
Selected tempo markings(s) on a score can be edited with Inspector,
Under the "Text" section,
- Fontface: Affects plain characters. Ignored by special characters, which always use fontface selected under Format → Style → Score : Musical text font.
- Remove Custom Formatting: Very rarely used. Removes <sym> internal codings and makes special characters inside incompatible with the "Musical text" global styling functionality. See the Fonts chapter.
- See also the Text basics chapter.
Under the "Tempo text" section,
- Follow text: Toggle Musescore's metronome marking interpretation function.
- Tempo: Manual overriding tempo used when Follow text is unchecked.
- Style: "Text Style" profile applied. See the Text styles and properties chapter.
- Placement: Position, above or below staff.
Global settings are covered in the Layout and formatting chapter.
Creating ritardando and accelerando
Musescore does not understand and does not create playback for any tempo expression text, including ritardando ("rit.") and accelerando ("accel."), and thus cannot create correct playback for these.
To create ritardando ("rit.") and accelerando ("accel.") marking and proper playback:
- Add multiple tempo markings for playback. Make tempo markings invisible as required, visibility does not affect playback. Use the TempoChanges plugin to automate this process.
- Add Staff/System Text for printing and reading.
In the example illustrated below, the tempo was originally 110 crotchets per minute. At the ritardando, the value decreases by 10 on the first note of each measure. Each tempo change is made invisible by unchecking the Visible checkbox in the Inspector (Keyboard Shortcut V), so that only the ritardando shows on the printed score:

Changing monitoring playback tempo in Play Panel
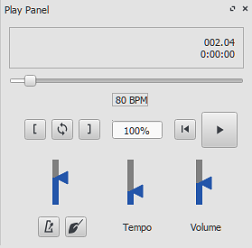
Use Play Panel to change playback tempo temporarily:
- Display the play panel: View→Play Panel or F11 (Mac: Fn+F11):
- Move the tempo slider up or down as required. Double-click the tempo slider to reset it. BPM is a special unit used by Musescore, which is not related to musical beat. See overview.
Fermata
Fermata are available in the Articulations and Ornaments palette.
In playback on a score with multiple instruments, if a note or rest of one instrument is extended with a fermata symbol, every notes sounding the same moment as that note will continue to sound until the extended note ends. Fermatas applied to barlines has no effect
Inspector properties
Select a Fermata symbol, edit its property in Fermata in the Inspector:
Placement: Above or below note
Time stretch: Multiplication of normal time duration to play back the current element. Value 1.00 is meaningless as it means no time extension.
Metronome
Musescore can automatically add metronome ticks sound to playback if desired, use the Playback toolbar or Play Panel, see the Play mode chapter.
How many ticks are added onto each measure is determined by the time signature and tempo. It does not depend on the note value (duration) used on metronome markings (both crotchet ♩ = 60 and quaver ♪ = 120 markings create identical result).
There are two tick sound clips, strong ticks and weak ticks. Which one is added is determined by the beat and written tempo (not affected by the adjustment settings on the Play Panel, but see comments on a related feature request #304412). Beat is dictated by the time signature only, but not affected by the beaming style, or the note value (duration) used on metronome markings.
- For simple meters, the top number of the time signature is the number of beats in each measure. 2 = duple, 3 = triple, 4 = quadruple. Strong ticks are created on each beat. No weak ticks are created.
- For compound meters (6/8, 9/8, etc), the top number of the time signature divided by three, is the number of beats in each measure. 6 = duple, 9 = triple, 12 = quadruple. Strong ticks are created on each beat. Weak ticks (two weaks following one strong) are created only if it is below 60 beats per minute. For example, onto measure using 6/8, both dotted crotchet
♩ . = 59and quaver♪ = 179markings create the result of two strong ticks and four weak ticks in each measure.
These ticks are not added to any exported audio files. If you want to include these ticks to exported audio, try these:
- Add a percussion staff, fill the first measure with the desired rhythm and the rest with measure repeats, then hide that staff, source,
- Metronome SoundFont (CC0) provided by mirabilos,
- Add metronome part plugin by sal.vador.
See also
External links
Äänifontit ja SFZ-tiedostot
MuseScore 4.0;n Sound and playback tuki:
- SoundFont (.sf2/.sf3): tuettu suoraan, ei tarvitse enää napsauttaa latausta syntetisaattorissa. Asetus instrumenttikohtaisesti mikserissä. Esiasetusta/pankkia ei voi valita suoraan mikserissä (vielä). Katso SoundFonts.
- SFZ (.sfz): tuettu epäsuorasti kolmannen osapuolen VST:n kautta. Katso SoundFonts.
- VST, VSTi: tuettu VST3, jotkin VST:t are reported eivät toimi kunnolla. Katso Working with VSTi
- MuseSounds: ilmaiset korkealaatuiset omat äänet MuseGroupilta, asennettavissa MuseHubin kautta.
Seuraava kuvailee MuseScore 3:a:
Vie MIDI- tai äänitiedosto käymällä kohteessa Open/Save/Export/Print.
Siirry kuratoituun luetteloon ilmaisista ladattavista äänifonteista, voit lisätä luetteloon.
Yleiskatsaus
Synthesizer luo äänentoiston virtuaalisilla instrumenteilla, MuseScore tukee virtuaalisia instrumentteja kahdessa muodossa:
- SoundFont (.sf2/.sf3): Yksittäinen tiedosto, joka sisältää yhden tai useamman virtuaalisen instrumentin.
- SFZ (.sfz): Joukko ääni- ja määritelmätiedostoja, jotka sisältävät yhden tai useamman virtuaalisen instrumentin.
Äänifontit
MuseScore tulee MuseScore_General.sf3:n kanssa, se sisältää yli 128 instrumenttia, äänitehosteita ja erilaisia rumpu-/lyömäsoittimia, sen ohjelma/esiasetusnumerointi noudattaa GM (General MIDI) -käytäntöä.
Asenna äänifontti
Kun olet löytänyt ja purkanut SoundFontin (katso →alla), avaa se kaksoisnapsauttamalla sitä. Useimmissa tapauksissa äänifontti-tiedostotyyppi on jo liitetty MuseScoreen, ja MuseScore käynnistyy ja näkyviin tulee valintaikkuna, jossa kysytään, haluatko asentaa äänifontin. Joskus äänifontti-tiedostotyyppiin liitetään jokin muu sovellus kuin MuseScore; jos näin on, sinun on napsautettava hiiren kakkospainikkeella tai Ctrl-napsautettava tiedostoa, jotta näkyviin tulee valikko, josta voit avata tiedoston MuseScoressa. Kummassakin tapauksessa, kun näyttöön tulee valintaikkuna, jossa kysytään, haluatko asentaa SoundFontin, napsauta "Kyllä" asettaaksesi kopion SoundFont-tiedostosta MuseScoren SoundFonts-hakemistoon. Tätä hakemistoa voi tarkastella tai muuttaa MuseScoren asetuksista, mutta oletussijainti on:
- Windows:
%HOMEPATH%\Documents\MuseScore3\Soundfonts - macOS ja Linux:
~/Documents/MuseScore3/Soundfonts
Toisin kuin käyttäjän lisäämät SoundFonts, MuseScorella asennettu alkuperäinen SoundFont oletusarvo sijaitsee vain tähän tarkoitukseen tarkoitetussa järjestelmähakemistossa, jota ei pidä muuttaa . Tämä hakemisto ja sen oletusarvoinen SoundFont-tiedosto on:
- Windows x86 (32-bit) / MuseScore x86:
%ProgramFiles%\MuseScore 3\sound\MuseScore_General.sf3 - Windows x64 (64-bit) / MuseScore x86:
%ProgramFiles(x86)%\MuseScore 3\sound\MuseScore_General.sf3 - Windows x64 (64-bit) / MuseScore x86_64:
%ProgramFiles%\MuseScore 3\sound\MuseScore_General.sf3 - macOS:
/Applications/MuseScore 3.app/Contents/Resources/sound/MuseScore_General.sf3 - Linux (Ubuntu):
/usr/share/mscore-xxx/sounds/MuseScore_General.sf3(withxxxbeing the MuseScore version)
Kun se on asennettu, määritä Musescore ja käytä partituurissa
Poista asennus
Voit poistaa äänifontin asennuksen avaamalla kansio, johon sen tiedosto on asennettu, ja poistamalla sen.
SFZ
SFZ on kokoelma tiedostoja ja hakemistoja, SFZ-tiedosto ja joukko todellisia äänitiedostoja WAV- tai FLAC-muodossa. SFZ-tiedosto on tekstitiedosto, joka pohjimmiltaan kuvaa mikä äänitiedosto sijaitsee missä ja mihin soittimeen käytetään. ja säveletäisyys.
Asenna SFZ
Kun olet ladannut SFZ:n (katso →alla), sinun on purettava manuaalisesti kaikki tiedostot, jotka kuuluvat SFZ:hen (SFZ-tiedosto(t) ja kaikki alihakemistot ja muut tiedostot) yllä olevaan hakemistoon. Jätä alihakemistot ja niiden sisältö ennalleen. Huomaa kuitenkin, että joskus kansiossa oleva SFZ-tiedosto saattaa etsiä todellisia WAV-äänitiedostoja itse SFZ-alihakemistosta, yleensä kansiosta, jonka nimi on "Libs". Jos lataamassasi SFZ-zip-tiedostossa on Libs-kansio, siirrä se SFZ-päähakemistoon.
Kun se on asennettu, määritä Musescore ja käytä partituurissa
Poista asennus
Voit poistaa SFZ:n asennuksen avaamalla kansio, johon sen tiedostot on asennettu (katso yllä) ja poistamalla ne kaikki.
Määritä Musescore käyttämään mukautettua äänifonttia tai SFZ:tä
Kun äänifontti on asennettu järjestelmääsi , se on myös ladattava Synthesizer.
Käytä partituurissa mukautettua ääntä
Valitse ja lisää instrumentti joka käyttää samanlaista viivastotyyliä kuin sinun äänesi, ja muuta sen ääntä mikserissä.
Voit käyttää mukautettua ääntä helpommin luomalla mukautetun instrumentin Valitse instrumentit.xml -valikosta. Tämä linkki tarjoaa myös tietoa siitä, miten äänifontti voidaan tehdä yhteensopivammaksi MuseScore 3:n kanssa, kuten äänenvaihtotekstin (esim. pizz.) lisääminen, MIDI CC -vasteen lisääminen jne.
Luettelo ladattavista äänifonteista
GM-äänifontit
Seuraavat äänikirjastot noudattavat Musescoren käyttämää GM (General MIDI) -ohjelma/esiasetusnumerointistandardia. Jos poistat sisäänrakennetun äänifontin Synthesizer Fluid-välilehdeltä ja asetat uuden ensimmäiseksi tilatuksi tuotteeksi , viivastot luovat oikean toiston ilman lisäsäätöjä ja poimimista mikserissä.
- GeneralUser GS (29.8 MB uncompressed)
Courtesy of S. Christian Collins - Magic Sound Font, version 2.0 (67.8 MB uncompressed)
- Arachno SoundFont, version 1.0 (148 MB uncompressed)
Courtesy of Maxime Abbey - MuseScore 1 came with TimGM6mb (5.7 MB uncompressed)
License: GNU GPL, version 2
Courtesy of Tim Brechbill - MuseScore 2 (up to version 2.1) came with
FluidR3Mono_GM.sf3(13.8 MB). - MuseScore 2 (as of version 2.2) and 3 come with
MuseScore_General.sf3(35.9 MB) (SF2 version(208 MB)) and are being updated from time to time (see the Changelog).
License: released under the MIT license
Courtesy of S. Christian Collins
MuseScore 3 on top offers an HQ version of that soundfont as an extension - Timbres of Heaven, version 4.0 (429 MB uncompressed) - alternative download location
Courtesy of Don Allen - Soundfonts4U (12 MB up to 1 GB, depending on which package you choose)
Collection of beautifully sounding acoustic guitars as well as pianos, basses, strings, harps and many more.
Orchestral soundfonts
- Sonatina Symphonic Orchestra (503 MB uncompressed)
Downloads: SoundFont | SFZ format
License: Creative Commons Sampling Plus 1.0 - Aegean Symphonic Orchestra
Courtesy of Ziya Mete Demircan (352 MB uncompressed)
Piano soundfonts
SF2 Pianos
- Acoustic grand piano, release 2016-08-04
Description: Yamaha Disklavier Pro Grand Piano, sf2 format, 36 MB compressed, 113 MB uncompressed, 121 samples, 5 velocity layers
More information: https://freepats.zenvoid.org/ including other soundfonts.
License: Creative Commons Attribution 3.0
Courtesy of Roberto Gordo Saez - Salamander C5 Light
Courtesy of Ziya Mete Demircan (24.5 MB uncompressed)
SFZ Pianos
- Salamander Grand Piano
Downloads: version 2 | version 3
Description: Yamaha C5, 48kHz, 24bit, 16 velocity layers, between 80 MB and 1.9 GB uncompressed
License: Creative Commons Attribution 3.0
Courtesy of Alexander Holm - Detuned Piano (244 MB uncompressed)
License: Creative Commons Attribution-ShareAlike 3.0 - Plucked Piano Strings
Description: 44.1kHz, 16bit, stereo, 168 MB uncompressed
License: Creative Commons Attribution-ShareAlike 3.0 - The City Piano
Description: Baldwin Baby Grand, 4 velocity layers, 696 MB uncompressed
License: Public domain
Courtesy of Big Cat Instruments - Kawai Upright Piano, release 2017-01-28
Description: 68 samples, 44KHz, 24bit, stereo, 2 velocity layers, 58 MB uncompressed
License: GNU General Public License version 3 or later, with a special exception
Courtesy of Gonzalo and Roberto
Unzipping downloaded soundfonts
Since soundfonts are large, they are often zipped (compressed) into a variety of formats, including .zip, .sfArk, and .tar.gz. You need to unzip (decompress) these files before they can be used.
-
ZIP is standard compression format supported by most operating systems.
-
sfArk is a compression format designed especially for compressing SoundFont files. To decompress it, use Polyphone (cross-platform software); or this online service: https://cloudconvert.com/sfark-to-sf2
-
.tar.gz is a popular compression format for Linux. Windows users can use 7-Zip; Mac users can use The Unarchiver, or macOS' built-in Archive Utility. Note that if using 7-Zip, you will need to apply decompression twice—once for GZip and once for TAR.
Troubleshooting
If the toolbar play panel is greyed out, or not visible, follow the instructions below to get your sound working again:
- Right-click on the menu bar and make sure there is a check mark next to the Playback Controls menu item. If this step does not solve your problem, go to Step 2.
- If the play panel disappears after changing the SoundFont, go to Edit → Preferences... → I/O tab and click OK without making any changes. After restarting MuseScore, the play panel should reappear.
If you are setting up a SoundFont for the first time, please use one of the recommended SoundFonts listed above.
If playback stutters, then your computer may not be able to handle the SoundFont being used. The following advice may help:
- Reduce the amount of RAM (memory) used by MuseScore by using a smaller SoundFont. See the list above for suggestions.
- Increase the amount of RAM available for MuseScore by quitting all applications except MuseScore. If you still have problems and a large SoundFont is important to you, consider more RAM for your computer.
Drum notation and Unpitched layout sound requires MIDI Bank number set to 128
See also
External links
- How to change the SoundFont or add another (MuseScore HowTo)
- The SFZ Format (for details about the sfz specification)
- Soundfont, MIDI velocity and instruments.xml (A guide on how to create and edit a soundfont and its MIDI CC response)
Dynamics
Dynamics of a piece is the variation in loudness and timbre between notes or phrases. This chapter covers Dynamics Text that can change note playback loudness inside the program. Hairpin and Articulations (eg Accent >, Marcato ^) score objects also affect dynamics. Overriding setting can be assigned to note directly.
Adding a dynamic to the score
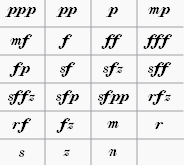
Dynamics symbols can be found in Dynamics palette. Additional symbols are available in the Master Palette (Shift+F9). To apply a dynamic to the score, either,
- Select a note and click a dynamic symbol in a palette (double-click in versions prior to 3.4),
- Drag a dynamic symbol from a palette onto a note, or
- Set up and use keyboard shortcuts with the Dynamics actions plugin.
NOTE:
- Applying new symbol does not replace exisiting score item.
- Placing multiple symbols on voices at the same time position does not create desired playback, because the minimal area of effect (Dynamic Range property) is staff, not voice. Try utilizing multiple Instruments.
Creating a custom dynamic
Editing text
Does not affect playback.
Double-click a score item to edit text content. See also the Text editing chapter.
Professional glyphs for engraving
Musescore is shipped with professional glyphs eg the florin sign (the curvy hooked f, ƒ), which is different from an italic plain character f. Add them in Text editing mode using the special characters palette, or one of the following shortcuts ( MacOS use Cmd in place of Ctrl ),
- Piano p: Ctrl+Shift+P
- Forte f: Ctrl+Shift+F
- Mezzo m: Ctrl+Shift+M
- Rinforzando r: Ctrl+Shift+R
- Sforzando s: Ctrl+Shift+S
- Niente n: Ctrl+Shift+N
- Z z: Ctrl+Shift+Z
Properties and global settings
Selected score items can be edited with Inspector,
Under the "Text" section,
- Fontface: Ignored by glyphs. All default symbols under Dynamics palette use glyphs. Glyphs use fontface selected under Format → Style → Score : Musical text font. See the Fonts chapter.
- Remove Custom Formatting: Very rarely used. Removes <sym> internal codings and makes glyphs inside incompatible with the "Musical text" global styling functionality. See the Fonts chapter.
- See also the Text basics chapter.
Under the "Dynamic" section,
- Dynamic range: Area of effect of the symbol:
- System: every instrument in the score.
- Part: one instrument (all of its staffs), default.
- Staff: one staff (eg one hand in piano) regardless of voices. As of MuseScore 3.6.2, this option is incompatible with the Staff / Part properties: single note dynamics playback mechanism, see forum discussion.
- Velocity: 0 to 127. Use a higher number to make notes sound louder, use lower number to make notes sound softer. For more info, see Loudness of a note.
- Velocity change: -127 to 127. The change in Velocity from the dynamic's parent note to the following one. It is ignored by some instruments. For more information, see SND.
- Change speed: Slow, Normal, Fast. The speed of the change indicated by Velocity change, in real time. This is unaffected by the current Tempo. The default value is Normal.
- Style: "Text Style" profile applied. See the Text styles and properties chapter.
- Placement: Position on score, above or below staff. Press X to flip.
Global settings are covered in the Layout and formatting chapter.
Reusing custom symbol
To save and reuse a custom symbol, see Add an existing score element to a palette.
Loudness of a note
IMPORTANT: When a dynamics symbol is added to the score, it affects playback from the parent note onward until the next dynamic symbol. Final barlines or rests do not reset the loudness to default.
The Synthesizer creates audio for each note based on its assigned MIDI velocity value, ranging from 0 (softest) to 127 (loudest). The possible range of actual loudness is determined by the soundfont creator. A dynamics symbol uses its Velocity property (table of default values) to assign a basic MIDI velocity to the current note and all following notes til another symbol is encountered. Hairpin and Articulations (eg Accent >, Marcato ^) score objects may modify MIDI velocity then. User can also assign velocity to notes directly in the Inspector.
Not specifing any dynamics symbols in a score is similar to using a mf (mezzoforte) through out. This is because Musescore assigns MIDI velocity 80 to notes that are not affected by any dynamics symbol, which is equal to the default Velocity of mf.
There is no interface to adjust individual voice volume. However, the Voice Velocity plugin can batch adjust existing note's Velocity properties based on their voice. Notes added after plugin execution will not be automatically adjusted, the user need to run the plugin again.
The following sliders adjust volume broadly but have nothing to do with MIDI velocity,
- changing the volume of instrument (or channel / playing technique) in Mixer, and
- changing the overall volume of whole score, with slider in the Play Panel or the Synthesizer.
Lastly, using reverb effect in Synthesizer may boost volume.
Single Note Dynamics (SND)
(After Musescore 3.1)
A dynamic symbol with a non-zero Velocity change property can simulate Attack envelope effect (wikipedia) if the Instrument, Synthesizer and Soundfont is setup correctly, such symbol is called Single Note Dynamics (SND), SND also has several different meanings due to continuous software development. SNDs also use Change speed property.
sfz (sforzando) and fp (fortepiano) are designed to work on certain instruments only; e.g. sfz symbol's effect on the violin does not exist on piano.
For more information, see How to setup Musescore for correct playback for all dynamics and hairpins.
See Also
- Text types
- Fonts
- Hairpin
- Articulations
- How to setup Musescore 3.x for correct playback for all dynamics and hairpins
External links
Capo playback
MuseScore allows you to transpose the playback of a staff, without affecting the music notation. This simulates the effect of a capo (Wikipedia) on the instrument.
Add capo to a single staff
- Add staff text to the note/rest from which you want capo playback to start;
- Click on "Properties" in the "Staff Text" section of the Inspector, or right-click on the staff text and select Staff Text Properties...; then click on the Capo Settings tab;
- Check the "Capo Settings" checkbox, and set Capo fret to the fret number you wish to apply the capo at (each fret increases the pitch by a semitone);
- Click Ok to apply your changes;
- Edit the wording of the text as desired.
Add capo to linked staff/tablature
- Same method as above, but in step 1, add the staff text to the music staff only.
Add capo to unlinked staff/tablature
- Same method as above, but apply the staff text to both staff and tablature.
Note: Capo playback will apply from the note that the staff text is attached to, until either the next staff text with "Capo Settings" enabled, or until the end of the score.
Remove capo
To remove capo playback from a staff, returning the instrument to its normal tuning:
- Add staff text with a "Capo fret" setting of "No capo".