Teksti
MuseScoressa on käytettävissä paljon erilaisia tekstejä, kuten viivaston teksti, dynamiikka, tempo, sormitus, sanoitukset ym. Lisäksi tekstiä voi löytää viivoihin yhdistyneenä,—kuten maalit, oktaavinsiirrot, kitaran barreviivat jne.
This chapter covers some of the different classes of text available in MuseScore, and shows you how to format them. Other specific types of text are covered in other chapters:
- Tempo (→Sound and playback)
- Dynamiikka—p, mf, etc. (→Sound and playback)
- Swing (→Sound and playback)
- Mid-staff Instrument changes (→Sound and playback)
- Kertaukset ja hypyt —DC, Fine, Coda, etc. (→Notation)
- Figured bass (→Advanced topics)
- Frame text—in vertical, horizontal or text frames (→Formatting)
- Headers and footers —different from standard text objects (→Formatting)
- Lines (→Notation)
Tekstin perusteet
Add text
To add a text-based element to the score, use one of the following general methods:
- Keyboard shortcut: For example, press Ctrl+Tto enter Staff text , Ctrl+L to enter Lyrics, and so on.
- Menu command: Add→Text allows you to chose from a range of text-based elements.
- Workspace: Select a note and double-click an icon in one of the palettes; or, alternatively, drag a symbol from a palette onto the staff. e.g. Swing text, Tempo text etc.
Notes: (1) The exact method depends on the type of text you are adding (see Text). (2) For general-purpose text boxes attached to staves, see Staff and system text.
Format text
Every text-based element in the score has three levels of formatting:
- Text style: This is the highest level of formatting and applies to all text elements in the score of a particular type. For details, see Text style.
- Text properties: This applies to the style of one specific text object only. For details, see Text properties.
- Character formatting; The style applied to individual text characters during editing. For details, see Text editing.
Adjust position of text objects
To position a text object, use any of the following methods:
- Drag the object.
- Select the object and adjust the horizontal or vertical offset values in the Inspector.
- Select the object and apply any of the following keyboard shortcuts:
- ←: Move text left 0.1 staff space.
- →: Move text right 0.1 staff space.
- ↑: Move text up 0.1 staff space.
- ↓: Move text down 0.1 staff space.
- Ctrl+← (Mac: ⌘+←): Move text left one staff space.
- Ctrl+→ (Mac: ⌘+→): Move text right one staff space.
- Ctrl+↑ (Mac: ⌘+↑): Move text up one staff space.
- Ctrl+↓ (Mac: ⌘+↓): Moves text down one staff space.
Text anchors
When you apply a text element to the score, its anchor position will depend on the type:
- Title, Subtitle, Composer, Poet: Anchored to a frame.
- Fingering: Anchored to note heads.
- Lyrics: Anchored to a time position (a note/chord, but not a rest).
- Chord symbol: Anchored to a time position.
- Staff text: Anchored to a time position.
- System text: Anchored to a time position.
Tekstin muokkaaminen
Enter/exit text edit mode
To enter Text edit mode use one of the following methods:
- Double click on a text element.
- Right-click on a text element and select Edit element.
- Click on a text element and press Ctrl+E (Mac: Cmd+E).

In this mode you can apply formatting to individual characters, including options such as Bold, Italic, font, font size, subscript and superscript. These are accessed from the Text toolbar below the document window:
To exit Text edit mode use one of the following:
- Press Esc.
- Click on a part of the score outside the edit window.
Keyboard shortcuts
In Text edit mode, the following keyboard shortcuts are available:
- Ctrl+B (Mac: ⌘+B) toggles bold face.
- Ctrl+I (Mac: ⌘+I) toggles italic.
- Ctrl+U (Mac: ⌘+U) toggles underline.
- Home End ← → ↑ ↓ moves cursor.
- Backspace (Mac: Delete) remove character to the left of the cursor.
- Delete (Mac: → Delete or fn+Delete) remove character to the right of the cursor.
- Return start new line.
- F2 (Mac: fn+F2) Insert special characters (see below).
Symbols and special characters
You can use the Special Characters window to insert quarter notes, fractions, and many other kinds of special symbols or characters into your text. A few symbols can also be accessed by shortcut (see below).
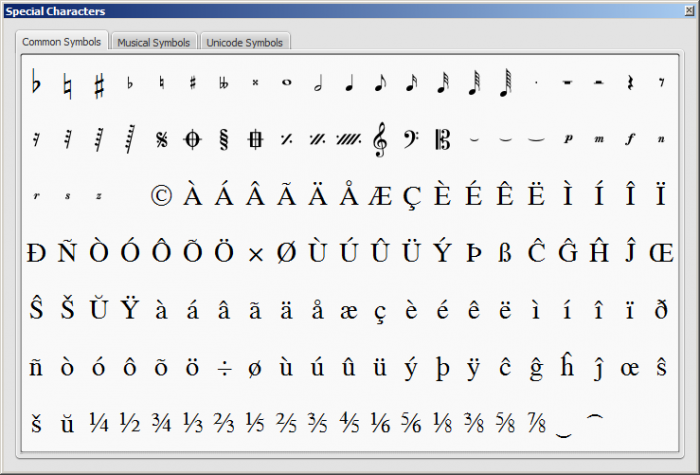
To open Special Characters, use any of the following methods:
- Click on the
 icon in the text toolbar (below the score window).
 - Press F2 (Mac: fn+F2).
Note: (1) This only works in Text edit mode; (2) The Special Characters dialog should not be confused with the menu item of the same name in the macOS version of MuseScore.
The dialog is divided into 3 tabs: Common symbols, musical symbols and unicode symbols. The musical and unicode tabs are further subdivided into alphabetically-arranged categories.
Double-clicking an item in the Special Characters dialog immediately adds it to the text where the cursor is positioned. Multiple items can be applied without closing the dialog box, and the user can even continue to type normally, delete characters, enter numerical character codes etc., with it open.
Special character shortcuts
In Text edit mode the following keyboard shortcuts can be used to access certain special characters:
Ctrl+Shift+B: Flat.
Ctrl+Shift+F: Forte.
Ctrl+Shift+H: Natural.
Ctrl+Shift+M: Mezzo.
Ctrl+Shift+N: Niente.
Ctrl+Shift+R: Rinforzando.
Ctrl+Shift+S: Sforzando.
Ctrl+Shift+Z: Z.
See also
Tekstin tyylit ja ominaisuudet
Text styles and text properties
Every piece of text has a basic style. Title text, for example, is centered and uses a large font size; Composer text is smaller and aligned to the right within the top vertical frame.
To edit text styles, use any of the following methods:
- From the menu bar, select Style → Text...
- Right-click on a text object and select Text Style...
Note: Changes to a text style will affect all text that uses that style within a score.
To edit a text property (which has the same parameters as the text style):
- Right-click on a text object and select Text Properties....
Unlike changes to a text style, changes to text properties only apply to the single specific piece of text you right-clicked on. The text style for the rest of the score remains unchanged, and other text using the same style is unaffected.
During text editing you can make changes that depart from the basic style and may also differ from the specific text properties of a given piece of text. You can revert changes made through text editing (such as font size and italics) with the reset text to style option.
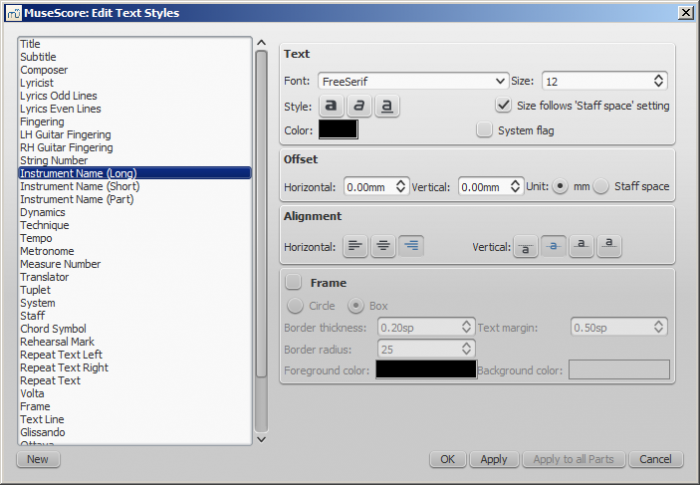
The available options are divided into categories:
- Text
- Font: name of the font such as "Times New Roman" or "Arial"
- Size: size of the font in points
- Style: style of the font, italic, bold, underline
- Color: click on the color demonstrated to change
- Size follows "Staff space" setting: whether size follows the distance between two lines in a 5-lines standard staff
- System flag: text applies to all staves of a system.
- Offset
- Horizontal
- Vertical
- Offset Unit: in mm or Staff space units
- Alignment
- Horizontal: left, right, center
- Vertical: align top edge of text to reference point, center text vertical to reference point, center text vertical to text baseline or align bottom edge of text to reference point
-
Frame
- Frame: add a frame around the text
- Frame Type: Circle or Box
- Border thickness: thickness of the line of the frame in space units
- Border radius: for box frame, radius of rounded corner
- Text margin : inner frame margin in space units
- Foreground color: of the frame border
- Background color: of the background within the frame.
Note: Opacity is set by the parameter "Alpha channel" in the colors dialog: a value between 0, transparent, and 255, opaque.
Text types
- Title, Subtitle, Composer, Poet: anchored to page
- Fingering: Fingerings are anchored to note heads.
- Lyrics: Lyrics are anchored to a time position (a note/chord, but not a rest).
- Chord symbol: Chord symbols are anchored to a time position.
- System text: Applies to all staves in a system. Anchored to a time position.
- Staff text: Applies to a single staff in a system. Anchored to a time position.
The distinction between system text and staff text matters for part extraction in ensemble scores. System text will extract to all parts. Staff text will only extract to the part to which it is anchored. For details, see Text.
Create a new text style
- From the menu bar, select Style → Text...; or right-click on a text object and select Text Style...;
- Click on New ;
- Set a name;
- Set all properties as desired.
This text style will be saved along with the score. It will not be available in other scores, unless you explicitly save the style sheet and load it with another score.
Apply options
You can apply to either the score or part you are seeing, if you hit Apply and then OK.
If you are in one of the parts of your score, you also have the option to use the Apply to all parts button before OK, so you don't have to manipulate all parts individually.
Reset text to style
If you have made changes to an individual piece of text and you want to return it to the defined text style for the score, or if you changed the style with an old version of MuseScore and you want the style to correspond to the default text style in MuseScore 2, you can use the Reset Text to Style option.
Select the text you want to reset to style and click on Reset Text to Style in the Inspector. If you need all text from a given style to be "reset", right-click on one, then from the context menu choose Select → All Similar Elements first.
Save and load text styles
Text styles (together with all other styles in a document) can be saved as a style file and loaded into other MuseScore files. See Save and load style.
See also
Staff and system text
For general-purpose text, use Staff Text or System Text. The difference between these two types of text is whether you want it to apply to a single staff, or the whole system. This matters when extracting parts: staff text will only appear in a part that contains the specific instrument the text is attached to, while system text will appear in all parts. Additionally, if you choose to hide empty staves, any staff text belonging to an empty staff will also be hidden. System text is never hidden by the "hide empty staves" feature.
Staff text
Staff text is general purpose text associated with a particular staff at a particular location in the score. To create staff text, choose a location by selecting a note or rest and then use the menu option Add → Text → Staff Text, or use the shortcut Ctrl+T (Mac: ⌘+T). A small text box appears and you can immediately start typing. You can exit the text box at any time (even without typing anything) by pressing Esc.
Staff text can, for example, be used to apply indications such as "Solo" or "Pizzicato" to one staff in a score. Depending on what the instructions of the staff text are, MIDI playback of that staff at the text location can be altered to match the instructions by right-clicking on the staff text and selecting Staff Text Properties…. See Mid-staff sound change.
System text
System text is used when you wish to apply text indications to a whole system rather than just to one staff line. This makes a difference when extracting parts, or if you choose to hide empty staves. To create system text, chose a location by selecting a note or rest and then use the menu option Add → Text → System Text, or use the shortcut Ctrl+Shift+T (Mac: ⌘+Shift+T). A small text box appears and you can immediately start typing. You can exit the text box at any time (even without typing anything) by pressing Esc.
See also
External links
Sointumerkintä
Aloittaaksesi Sointumerkkien lisäämisen partituuriisi, valitse ensin nuotti tai tauko ja paina Ctrl+K (Mac: ⌘+K). Tämä asemoi kursorin viivaston yläpuolelle, minkä jälkeen viivasto on valmis tietojen syöttöön.
Sijoita sointumerkki
Sointumerkintöjä voidaan syöttää ja muokata aivan kuten normaalia tekstiä. Korotukset (♯) ja alennukset (♭) syötetään seuraavanlaisesti:
- korotus: #.
- Alennus: b.
- Kaksoiskorotus: x tai ##.
- Kaksoisalennus: bb.
Note: When you exit the chord symbol, the characters you have typed will automatically assume the correct format : a "#" or "b" will turn into a proper sharp (♯) or flat (♭) and so on. Do not try to use actual flat and sharp signs as MuseScore will not understand those properly.

After you have finished entering a chord symbol you can either:
- Exit by pressing Esc.
- Move the cursor forward or backwards to continue note entry (see commands below).
Keyboard Commands
The following commands are available for chord symbol entry:
- Space move Cursor to next note, rest, or beat
- Shift+Space move cursor to previous note, rest, or beat
- Ctrl+Space (Mac: ⌘+Space) add a space to the chord name
- ; move cursor to next beat
- : move cursor to previous beat
- Tab move cursor to next measure
- Shift+Tab move cursor to previous measure
- Ctrl plus number (1 - 9) move Cursor by duration corresponding to number (e.g.; half note for 6)
- Esc exit.
Edit a chord symbol
An existing chord symbol can be edited just like ordinary text. See Text editing.
Chord symbol syntax
MuseScore understands most of the abbreviations used in chord symbols:
- major: M, Ma, Maj, ma, maj, Δ (type t or ˆ for the triangle)
- minor: m, mi, min, -
- diminished: dim, ° (entered with lowercase letter o, shows as ° if using the the Jazz style, as o otherwise)
- half-diminished: ø (type 0, zero)
- augmented: aug, +
Note that for half-diminished chords, you can of course also enter abbreviations like mi7b5 and they will be rendered that way instead of using the ø.
You can also use extensions and alterations like b9 or #5, sus, alt, and no3. You can indicate inversions and slash chords using notations like C7/E. You can use parentheses and commas within chord symbols, and you can also enclose an entire chord symbol in parentheses.
Chord symbol text
The appearance of chord symbol text can be adjusted in the Text Styles window (right click on any chord symbol and select Text Style…).
Chord symbol style
Formatting options for chord symbols are available in Style → General... → Chord Symbols, Fretboard Diagrams. Adjustable properties are listed under the following headings:
Style
MuseScore supports two primary styles of chords symbols: Standard and Jazz. You can select between these using the radio buttons.
In the Standard style, chords are rendered simply, with the font determined by your chord symbol text style.

In the Jazz style, the MuseJazz font is used for a handwritten look, and superscript and other formatting techniques are used as well.

The Jazz style is selected by default if you use any of the Jazz templates.
The third radio button is mostly for compatibility with older scores. You can also use it to specify your own custom chord descriptions files. These can be created by copying one of the standard files and reading the documentation within them on their structure. However, this is for advanced users only, and there is no guarantee these files will be supported in the future.
Note spelling
By default, MuseScore uses letter names for chord symbols. For users in regions where other note naming schemes are used, MuseScore provides the following controls:
- Standard: A, B♭, B, C, C♯,...
- German: A, B♭, H, C, C♯,...
- Full German: A, B, H, C, Cis,...
- Solfeggio: Do, Do♯, Re♭, Re,...
- French: Do, Do♯, Ré♭, Ré,...
In addition, there are options to control capitalization. By default, MuseScore automatically capitalizes all note names as shown above, whether you originally enter those using capital or lower case letters. However, you can also choose other automatic capitalization options:
- Lower case minor chords: c, cm, cm7,...
- Lower case bass notes: C/e,...
- All caps note names: DO, RE, MI,...
You can also turn off the automatic capitalization completely, in which case note names are simply rendered the way you type them.
Positioning
- Default vertical position: The height at which the chord symbol is applied above the staff (negative values can be used)
- Distance to fretboard diagram: If a fretboard diagram is present, this value is the height at which the chord symbol is applied above the diagram (negative values can be used).
- Minimum chord spacing: The space to leave between chord symbols.
- Maximum barline distance: Changes the size of the gap between the last chord symbol in the measure and the following barline. You only need to adjust this value if there is a continuous problem in the score with overlap between the last symbol in one measure and the first symbol in the next.
Note: In addition to the settings described here, the default position of applied chord symbols is also determined by settings in the Text Styles dialog. The effect is cumulative.
Capo
Enter the number of the capo position at which you want to display substitute chords, in brackets, after all chord symbols in the score.
Sormitus
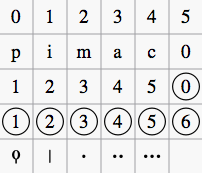
Fingering symbols for various instruments are found in the Fingering palette in the Advanced workspace.
-
Keyboard music employs the numbers 1–5 to represent fingers of the left or right hand. There is also a fingering positioner plugin to help you optimize the layout of piano or keyboard fingerings.
-
Guitar music uses the numbers 0–4 to represent left-hand fingering (T is occasionally used for the thumb). Right-hand fingering is indicated by the letters p, i, m, a, c. Circled numbers represent instrument strings.
-
The last five symbols in the palette are used for lute fingering in historical music. Note: To enable display of fingering in tablature, right-click on the TAB, select Staff Properties...→Advanced style properties, and tick "Show Fingerings".
Add fingering to a single note
Use any of the following methods:
- Select a note and double click one of the fingering symbols in a Palette.
- Drag and drop a fingering symbol from a palette onto a note
When fingering is added to a note, the focus immediately shifts to the symbol, so you can adjust it right away.
Add fingering to several notes
- Select the desired notes;
- Double-click a fingering symbol in a palette.
Adjust position of fingering
Single fingering
To change the position of one symbol, use any of the following methods:
- For fine adjustments (0.1 sp) use the arrow keys; For larger adjustments (1 sp) use Ctrl+Arrow.
- Change horizontal and vertical offsets in the Inspector.
- Drag the symbol using your mouse.
Multiple fingering
To change the position of multiple symbols:
- Select the desired fingering symbols;
- Adjust using the horizontal and vertical offset fields in the Inspector.
Note: You can also use the fingering positioner plugin mentioned above to optimize the layout of piano fingerings.
To restore a symbol to its default position, select it and press Ctrl+R.
Edit fingering text
Fingering is a form of text symbol and can be edited and styled like any other. Right-clicking on the symbol gives you a range of options.
Sanoitukset
Lisää sanoitukset partituuriin
Liittääksesi sanat partituurin nuotteihin:
- Valitse nuotit, joihin aiot liittää sanat.
- Napauta yksittäistä säveltä, josta haluat sanoituksen alkavan.
- Kirjoita Ctrl+L (Mac: ⌘+L); tai valitse päävalikosta Luo→Teksti→Sanoitus. Kirjoita sitten tavu ensimmäiseen nuottiin.
- Käytä seuraavia vaihtoehtoja jatkaaksesi sanojen lisäämistä:
- Kirjoita Välilyönti (tai Ctrl+→) sanan loppuun, jotta pääset seuraavaan nuottiin.
- Lisää väliviiva - tavun loppuun päästääksesi seuraavaan nuottiin. Tavut ovat liitetty toisiinsa viivalla.
- Paina Shift+Välilyönti (tai Ctrl+←) siirtyäksesi edelliseen tavuun.
- Paina ↵ siirtyäksesi alaspäin seuraavaan sanastoriviin (Huomautus: älä käytä Enter-painiketta numeronäppäimistön kautta!)
- Paina Ylänuoli-näppäintä palataksesi ylempänä olevaan sanastoriviin.
- Paina Esc-näppäintä lopettaaksesi sanojen syötön.
- To type a second or further lyric line repeat steps 2 and 3 above, or double-click the first syllable, hit ↵ and type the syllable for the first note, then continue at step 4
Example
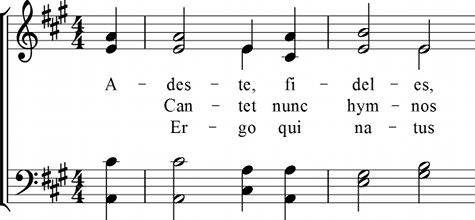
Melisma
A melisma is a syllable or word that extends over two or more notes. It is indicated by an underline extending from the base of a syllable to the last note of the melisma. The underline is created by positioning the cursor at the end of a syllable and pressing Shift+_: once for each note in the melisma. See the image below:
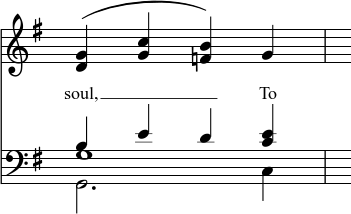
The above lyric was created in the following manner:
- Type the letters, soul,.
- At the end of the word, press Shift+___.
- Type the letters To, then press Esc.
For non-last syllables to extend, just use additional dashes -, only one of them will show, and the syllable will right-align to the first note, similar to last syllables that got notated with a melisma, see above.
Elision / Synalepha / Lyric Slur
Two syllables under a note can be joined with an elision character, also known as a "lyric slur" or "synalepha".

In the text toolbar, click on the keyboard icon  , or hit F2 to open the Text Symbols palette. The synalepha is the 4th from the end (U+203F ‿ "undertie"). The synalepha will be evenly centered separating the syllables with two spaces and by inserting it after the first. For the "e͜ A" example shown above:
- Type e
- Insert the synalepha using the F2 palette
- Type Ctrl+Space (Mac: ⌥+Space)
- Type A
Not all fonts include the synalepha character. To find out which fonts on your computer support the synalepha, see "fontlist" (look for any font that shows a tie between "e" and "A" instead of a blank rectangle). The alignment of the character also varies between fonts.
Special characters
Lyrics can be edited as normal text with the exception of a few characters: If you want to add a space, hyphen, or underscore to a single syllable, use the following shortcuts:
-
Ctrl+Space (Mac: ⌥+Space) enters a space ( ) into the lyrics text.
-
Ctrl+- (Mac: ⌥+-) or AltGr+- enters a hyphen ("-") into the lyrics text.
-
Ctrl+↵ (Mac: ⌥+Return) or Enter (from the numeric keypad) enters a line feed into the lyrics text.
Adjusting individual lyric lines
The top margin and line height of all lyric lines can be adjusted globally from the menu, Style→General...→Page.
However, the horizontal (and vertical) offset of individual lyric lines can be finely adjusted by right-clicking on a word in the desired line, and using the various selection options available to select all the words that you wish to change. Then adjust using the offset option in the Inspector.
For example, to change the horizontal position of the lyrics in one staff only of one particular system: right click on a word in that line, choose Select→More..., then tick the boxes labelled "Same Staff" and "Same System". Now use "horizontal offset" in the Inspector to fine tune the line position.
To select lyrics for a range of notes, first select the range of notes (click first note, shift+click last), then right click a lyric and choose Select / All Similar Elements in Range Selection. Now use the Inspector to adjust the lyrics.
Copy lyrics to clipboard
In MuseScore 2.0.3 and above, select Edit→Tools→Copy Lyrics to Clipboard.
Paste lyrics from clipboard
To copy and paste lyrics from a text file into a score:
- Enter the notes in the score to which the lyrics will be attached.
- Set up your lyrics in a text file, with appropriate spaces, hyphens, line-breaks etc.
- Copy the lyrics from the text-file.
- Select the start note in MuseScore, and press Ctrl+L (Mac: Cmd+L) (step 3 under Enter lyrics in a score).
- Repeatedly applying paste will enter successive words of the lyrics. You may need to enter melismas and make other corrections as you go along.
See also
External links
Harjoitusmerkit
Rehearsal marks can be used in one or more ways:
- To identify specific points in a score to facilitate rehearsing.
- As bookmarks in the score to which you can instantly navigate—using the Find/Search command.
- To mark the various sections in the score.
Typically, a rehearsal mark consists of one or more letters or numbers, or a combination of both. Marks appear in sequence in the score—e.g. A, B, C…, or 1, 2, 3… etc.; or they may contain the number of the measure they are attached to (usually larger than plain measure numbers, often boldface and/or enclosed in boxes).
Rehearsal marks can be added to the score (i) automatically—which ensures that they are named in sequence—or (ii) manually, allowing you to name them as you wish.
Add a rehearsal mark
Manual Placement
The simplest way to add a rehearsal mark is to click on a note (or rest) at the start of a rehearsal section and use the keyboard shortcut Ctrl+M (Mac: Cmd+M), or use the menu command Add → Text → Rehearsal Mark: then enter the desired text yourself.
Automatic placement
Alternatively, select a note, open the Text palette, and double-click the [B1] rehearsal mark icon: the correct letter or number is entered automatically, according to the following rules:
-
The first automatic rehearsal mark you create is labelled "A," the second "B," the third "C," and so on. If you want to establish a different format (lower case, number or measure-number), change the first rehearsal mark accordingly before adding the second one. Subsequently-added rehearsal marks follow the format of the previously-added mark.
-
If you add a (palette) rehearsal mark between two existing alphabetical marks, a "1" is appended to the name of the new mark: so a mark added between letters "C" and "D" becomes "C1," and so on. Similarly, if you add a new rehearsal mark between two existing numerical marks, an "A" is appended: so a mark added between numbers "3" and "4" becomes "3A" and so on. Afterward, you can automatically resequence the rehearsal marks, if required (see →below).
-
To create a series based on measure number, the first rehearsal mark should be altered, before creating a second one, so that it reads the same as the number of the measure it is attached to. (If the number of the rehearsal mark is different from the actual measure number, subsequent marks will assume a numerical order.)
Automatically resequence rehearsal marks
MuseScore allows the user to automatically re-order a series of rehearsal marks if they have got out of sequence for any reason. Use the following method:
- Before making a selection, you can, if desired, establish a new format for the rehearsal marks (lower/upper case, number, or measure number) by manually altering the first mark in the range accordingly.
- Select the range of measures you wish to apply the Resequence command to (if there is no selection then the program assumes you wish to resequence all measures).
- Select Edit → Tools → Resequence Rehearsal Marks.
MuseScore automatically detects the sequence based on the first rehearsal mark in the selection—all rehearsal marks in the selection are then altered accordingly. The following sequences are possible:
- A, B, C etc.
- a, b, c etc.
- Numerical: 1, 2, 3 etc.
- Numerical: according to measure numbers. This requires the number of the first mark in the series to be equal to the number of the measure it is attached to.
Search for a rehearsal mark
To navigate to a specific rehearsal mark, press Ctrl+F (Mac: Cmd+F) to open the Find bar, then enter the name of the rehearsal mark. The first character of a rehearsal mark must be a letter for it to be found: subsequent characters can be letters or numbers. As of version 2.1 all rehearsal marks can be searched for by typing an "r" followed by the rehearsal mark.
Note: If the text entered in the Find bar consists only of numbers, the program assumes you are searching for a measure number. See Viewing and Navigation: Find.
Text style
Rehearsal marks are a variety of system text. They will appear on every part and on the score. Multi-measure rests are automatically broken before and after rehearsal marks.
By default, rehearsal marks are bold, in large font size, and enclosed in frames with rounded corners. All aspects of their appearance can be changed globally via the rehearsal mark Text style.
See also
External links
- Rehearsal Letter (Wikipedia article)