Perusteet
Edellinen luku "Aloittaminen" opastaa sinut läpi asennuksen ja uuden partituurin luomisen. Luku "Perusteet" esittää MuseScoren yleiskatsauksen ja kuvaa partituurin käsittelyn yleiset toimintatavat.
Muokkaustila
Muokkaustilassa voit suorittaa laajan valikoiman muokkaustoimintoja yksilöllisissä parituurin elementeissä, kuten:
- säätää kaarien, viivojen, tahtiviivojen ym. pituutta ja muotoa.
- lisätä, poistaa ja muotoilla tekstiä tekstikappaleissa.
- säätää useimman partituurielementin asentoa (muttei tekstin).
Mene/poistu muokkaustilasta
Päästääksesi Muokkaustilaan, käytä mitä tahansa seuraavia menetelmiä:
- Tuplaklikkaa elementtiä.
- Klikkaa oikealla hiiren näppäimellä elementtiä, ja valitse valikosta Muokkaa elementtiä.
- Klikkaa elementtiä ja paina Ctrl+E (Mac: Cmd+E).
Poistuaksesi Muokkaustilasta, tee mitä tahansa seuraavista:
- Paina Esc.
- Klikkaa tyhjää aluetta asiakirjan ikkunasta.
Teksti
Tekstin muokkaustilaan, katso Tekstin muokkaaminen.
Viivat
Viivoja—kuten yhdyskaarta, sidekaarta, kiiloja, maaleja jne.—reunustaa neliömäiset säätöpainikkeet eli "kahvat" Muokkaustilassa: valittaessa nämä muuttuvat siniseksi. Esimerkiksi sidekaari näyttää tältä:

Loppupäiden kahvoja käytetään viivan pituuden säätämiseen. Keskimmäisiä kahvoja käytetään viivan pystyasennon säätämiseen. Side- ja yhdyskaarien tapauksessa on myös kolme muuta kahvaa kaarevuuden säätämiseksi (katso kuva yllä).
Jotta voit muuttaa kahvan paikkaa, klikkaa sitä ja käytä pikanäppäintä (kts. alla). Voit vaihtoehtoisesti raahata kahvaa hiirellä.
Jokainen äärikahva on liitetty pistekatkoviivalla ankkuriin viivastossa. Loppu- ja alkupään ankkurit ilmaisevat partituurin alueen rajat viivan valvonnan alaisena. Oletuksena äärikahva on sijoitettu pystysuoraan ankkurinsa ylle.
- Siirtääksesi sekä loppukahvaa että siihen kiinnitettyä ankkuria: Klikkaa kahvaa ja käytä Shift+→ tai Shift+←.
- Siirtääksesi loppukahvaa liikuttamatta sen ankkuria: Klikkaa kahvaa ja käytä joko vasenta/oikeaa nuolinäppäintä tai vastaavanlaista Ctrl (Mac: ⌘) komentoa. Katso pikanäppäimet alla.
Nuotit
Nuottien tasoittaminen
Joskus on tarpeen siirtää nuottia oikealle tai vasemmalle, jotta saadaan vältettyä yhteentörmäys toiseen elementtiin tai ohitettua automaattinen nuotinpäiden jakaminen, kuten:
- Mene Muokkaustilaan halutussa nuotissa;
- Paina nuolinäppäintä suuntaan (vasempaan tai oikeaan), johon haluat työntää nuottia (tai käytä Ctrl+← or Ctrl+→ suuremmille säädöille);
- Paina Esc key. Tämä sallii nuotin varren uudelleenkirjoittamisen.
Voit vaihtoehtoisesti valita nuotinpään ja muuttaa "Vaakasuuntaista poikkeamaa" ("Soinnun" alla) kohdassa Tarkastaja.
Säädä nuotin varren pituutta
- Mene Muokkaustilaan halutussa nuotissa;
- Hyödynnä pikanäppäimiä (alla) laajentaaksesi tai lyhentääksesi vartta;
- Poistu muokkaustilasta.
Huom: liikuttaaksesi uudelleen nuotin vartta, sinun pitää valita se ja säätää "Vaakasuuntaista poikkeamaa" Tarkastajassa.
Pikanäppäimet
In Edit mode the following keyboard commands can be used to change the position of either (1) a score element (e.g. ornament, accidental etc.) or (2) an adjustment handle (e.g. slur, line etc.):
- ←: Move left 0.1 staff space.
- →: Move right 0.1 staff space
- ↑: Move up 0.1 staff space
- ↓: Move down 0.1 staff space
- Ctrl+← (Mac: ⌘+←): Move left one staff space
- Ctrl+→ (Mac: ⌘+→): Move right one staff space
- Ctrl+↑ (Mac: ⌘+↑): Move up one staff space
- Ctrl+↓ (Mac: ⌘+↓): Moves down one staff space
- Alt+←: Move left 0.01 staff space
- Alt+→: Move right 0.01 staff space
- Alt+↑: Move up 0.01 staff space
- Alt+↓: Move down 0.01 staff space
The following commands only apply to adjustment handles:
- Shift+←: Move end handle's anchor left by one note/rest.
- Shift+→: Move end handle's anchor right by one note/rest.
- Tab: Go to next handle.
See also
Paletit ja työtilat
Nuottipohjan vasemmalla puolella on Työtila. Työtilan voit ottaa näkyviin ja piilottaa hyödyntämällä valikkokomentoa Näytä → Paletit tai pikanäppäintä F9 (Mac: fn+F9).
Työtila vuorostaan sisältää lukuisia paletteja. Kukin paletti on kansio, joka sisältää joukon musiikkiin liittyviä symboleita.
Työtilat
MuseScore tarjoaa kaksi esiasetettua työtilaa: Perus (oletusasetus) ja Edistynyt (tila, jossa on enemmän paletteja ja symboleita). Voit vaihdella näiden kahden välillä käyttämällä työtilapaneelin pohjassa sijaitsevaa pudotusvalikkoa. Palettien nimet työtilan sisällä on lueteltu selkeästi paletit-otsikon alla.
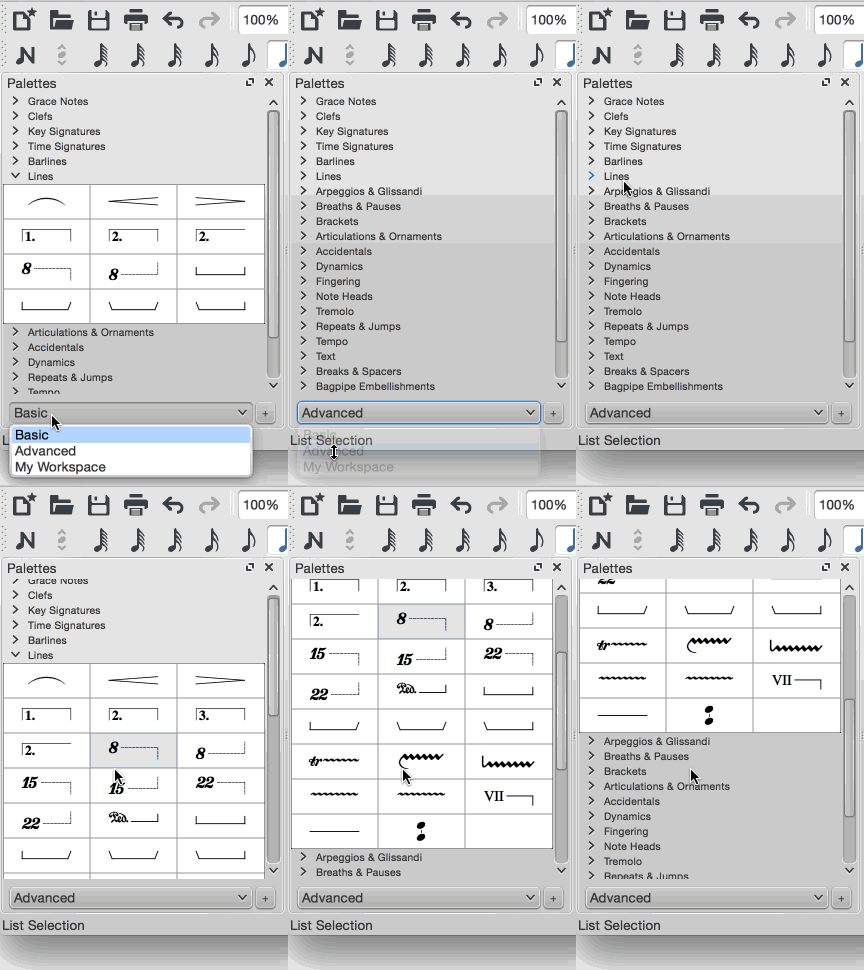
Huom: Esiasetettujen työtilojen paletteja tai niiden sisältöä ei voida muokata. Tehdäksesi niin, sinun täytyy ensin luoda mukautettu työtila (alla).
Yksittäinen palettitila
Jos haluat sallia vain yhden paletin avautumisen kerrallaan, klikkaa oikella hiiren painikkeella työtilaa ja merkkaa "Yksittäinen paletti"-laatikko.
Telakointi/telakoinnin irroittaminen
Telakoidaksesi tai irroittaaksesi työtilan, kts. Sivupaneelit.
Mukautettu työtila
Luodaksesi muokattavan työtilan:
- Valitse olemassaoleva työtila. Hyödynnä tarvittaessa työtilan alapuolella sijaitsevaa pudotusvalikkoa.
- Klikkaa + -painiketta, syötä nimi uudelle työtilalle ja paina Tallenna. Uusi työtila on lisätty paneeliin.
Vaihtoehtoisesti voit hyödyntää valikon vaihtoehtoa:
- Valitse Muokkaa → Työtilat ja valitse työtila.
- Valitse Uusi. Täytä työtilan nimi ja klikkaa OK.
Kunnes mukautettu työtila on luotu, voit vapaasti sijoittaa, poistaa, nimetä ja järjestää uudelleen paletit sen sisällä: uusia symboleita voi lisätä ja olemassa olevia poistaa jne. Lisätietoja, kts. Mukautetut paletit ja Palettivalikko (alla).
Paletit
Avaa/sulje paletti
- Klikkaa kerran paletin nimeä tai sen vierellä olevaa nuolen kärkeä.
Käytä palettisymboleja
Palettisymbolin voi asettaa partituuriin käyttämällä jotakin seuraavista tavoista:
- Valitse yksi tai useampi partituurin elementti ja tuplaklikkaa palettisymbolia.
- Raahaa ja pudota symboli haluamaasi partituurin elementtiin viivastossa.
Esimerkiksi tenuto-merkin (—) lisääminen valittuihin nuotteihin:
- Valitse haluamasi nuotit.
- Artikulaatiot & Korukuviot paletista, tuplaklikkaa tenuto-symbolia.
Objekteja voi kopioida, liittää ja monistaa, kunnes ne on lisätty partituuriin—kts. Kopioi ja liitä.
Esiasetetut paletit (Edistynyt työtila)
Toiminnoiltaan monipuolisempi Edistynyt työtila sisältää seuraavat paletit:
- Korusävelet
- Nuottiavaimet
- Sävellajimerkinnät
- Tahtiosoitukset
- Tahtiviivat
- Viivat
- Arpeggiot ja glissandot
- Hengitykset ja tauot
- Hakasulkeet
- Artikulaatiot ja korukuviot
- Etumerkit
- Dynamiikka
- Sormitus
- Nuotinpäät
- Tremolo
- Kertaukset ja hypyt
- Tempo
- Teksti
- Vaihdot ja välistäjät
- Säkkipillin koristekuviot
- Palkin ominaisuudet
- Kehykset ja Tahdit
- Otelautakuvat
Custom palettes
Once you have created a custom workspace (see above), and providing editing is enabled (see Palette menu below), you can customize the palettes within it to your own requirements.
To add an existing score element (such as a line, text, dynamic, fretboard diagram etc.) to a custom palette, press and hold Ctrl+Shift, then drag the symbol onto the palette. Symbols from the Master palette can also be added to a custom palette.
Palette menu
Right-clicking on the name of a palette in a custom workspace brings up a menu with a range of options:
-
Palette Properties...: This allows you to make adjustments to the appearance of the open palette:
- Name
- Cell Size: Width, Height
- Element Offset: Adjusts the vertical offset of all elements in the palette.
- Scale: Makes all palette elements appear larger or smaller.
- Show grid: Tick this box to visually divide the palette into cells, one for each element.
- Show ‘More Elements…’: Tick this box to create a cell which opens the Master Palette.
- Insert New Palette: Creates a new empty palette.
- Move Palette Up / Move Palette Down: Allows you to reorder the palettes.
- Enable Editing: Tick this option if you want to be able to edit a palette.
- Save Palette: Save as an .mpal file.
- Load Palette: Load an .mpal file.
- Delete Palette
Right-clicking on an element within a palette (if editing of the palette is enabled) brings up a menu with the following options:
- Clear: Removes the element from the palette
- Properties...: Opens the Palette Cell Properties dialogue:
- Name: The tooltip that appears when you mouse over the element.
- Content offset (X, Y): Adjust the position of the element in the palette.
- Content scale: Make the element appear larger or smaller in the palette.
- Draw staff: Draws the five lines of a musical staff behind the palette element.
- More Elements: Opens the relevant Master Palette section.
Note: Changing values in "Palette Cell Properties" only affects the appearance of elements in the palette. It does not change their sizes or offsets on the score page.
Master palette
Music symbols not part of the palettes in the Advanced workspace can be found in the Master palette by pressing Z or Shift+F9 (Mac: fn+Shift+F9).
Behavior of applied text and lines
If the symbol you are adding to the score from a palette contains a text element (e.g. staff text, dynamic, fingering, volta etc.), then properties such as font-type, font-size, text color, and alignment will adapt according to the following rules:
-
Text properties which have not been altered by the user will adopt the relevant, prevailing text styles.
-
Custom text-properties—i.e. those changed by the user before saving the symbol to a custom palette—remain as customized.
When adding a line, line properties always remain unchanged (i.e. as set by the user before saving to a custom workspace, or as predefined in the Basic/Advanced workspaces).
See also
Tarkastaja ja kappaleen ominaisuudet
Most score elements have properties that can be edited in one of two ways:
-
Click on any element, and many of its properties can be viewed and changed from the Inspector panel on the right-hand side of your screen.
-
Right-click on an element and select an option with the word Properties in it. This option opens a dialog with advanced properties, only available for certain types of elements.
Inspector
The Inspector is shown by default on the right of your screen. It can be displayed or hidden from the menu: select View and check/uncheck Inspector, or use the shortcut F8 (Mac: fn+F8).
In the Inspector, the properties of any selected object are displayed and can be edited. This applies to virtually every single element in the score window—notes, text, barlines, articulations etc. Multiple elements can also be selected and edited simultaneously, as long as they are of the same type. However, if the selected objects are of different types, then the Inspector restricts you to editing color and visibility only.
The Inspector panel can be un-docked to become a floating panel by clicking the double-chevron symbol or double-clicking the top bar of the panel.

To re-attach the panel double-click on the top bar again. See also: Side panels.
Inspector categories
When you select one or more elements of a specific type, the properties which can be edited are conveniently divided into categories in the Inspector. Categories can be identified by their bold, centered lettering. For example, if you select a barline, you will see the following displayed at the top of the Inspector:
For details about how to adjust the properties of various score elements, refer to the relevant sections in the handbook. However, a few general points will be covered here:
Element
All score elements, except frames, display this category in the Inspector when selected. The various options are as follows:
-
Visible: Uncheck this box to make selected elements invisible: alternatively, use the shortcut V (toggle). Invisible elements do not appear in the music when printed out or exported as a PDF or image. If you still want them to remain on display in the document window, make sure that the "Show Invisible" option is selected in View → Show Invisible. Invisible elements will then be colored light gray.
-
Color: Click on the rectangle to open a "Color Select" dialog. Adjust the color and opacity of selected elements.
-
Horizontal offset / Vertical offset: Allows you to position selected elements exactly (in terms of space units). A positive number moves the elements right or down; a negative number moves the elements left or up. Snap to grid buttons are also provided.
Element Group
This category is displayed only when you have selected a mixture of different types of elements, and allows editing of color and visibility only.
Segment
This category is used to increase or decrease the space before/after an element in a music staff. Adjusting leading/trailing space here also affects any associated lyric syllables.
Chord
This category is displayed only if notes are selected. Any change to a notehead property under Chord affects the whole chord (i.e. all the notes in one voice) at that location—and not just the selected note. If you want to make changes to the position of just one note in a chord, then use the Element category (above).
Note
This category allows you to make changes to selected notes (but for note position—see Element). It contains the following properties:
- Small: Make notehead smaller (you can specify the relative size of all small notes from the menu: Style → General… → Sizes…).
- Head group: See Notehead groups.
- Head type: See Notehead types.
- Mirror head: Position notehead to the left or right of the stem (default is "Auto").
- Tuning: Adjust tuning of note to the nearest cent.
- Play: Unticking this box silences the note.
- Velocity type: Sets the MIDI velocity of notes directly. Chose one of two options:
- Offset: Make the value shown in "Velocity" relative to the previous dynamic marking.
- User: Make the value shown in "Velocity" absolute (i.e. the MIDI velocity is unaffected by dynamic markings).
- Velocity: Set the MIDI velocity according to the option displayed in "Velocity type."
- Fix to line: When ticked, the note is fixed to the top line of the standard 5-line staff.
- Line: A positive number moves the "fixed" note down; a negative number moves it upwards.
Select
This category appears differently according to the selection you have made:
- If you select a notehead, the "Select" category displays buttons which allow you to easily switch the selection to the stem, beam, hook, duration dot (or dots) or tuplet number associated with the notehead (see image below).

- If you select a range of measures, the "Select" category allows you to select either all notes, grace notes (from version 2.1) or rests.
Beam
This section is displayed in the Inspector when you select one or more note beams, and allows you to make fine adjustments to beam position and angle, and also change the spacing of beamed notes. See Adjust beam with the inspector.
Clef
This section appears when you select a clef: the tick box allows you to turn on/off the display of a preceding courtesy clef.

Properties dialogs
Properties of some objects are accessed by right-clicking on the object and choosing a "Properties" option from the context menu: these are in addition to the object's properties displayed in the Inspector.
(Note: Properties should not be confused with Styles. Changes to properties only affect the single element selected; all style controls apply to the entire score.)
Articulation properties
Right-click on an articulation and select Articulation Properties... See Articulations and ornaments.
Fretboard diagram properties
Right-click on a fretboard diagram and select Fretboard Diagram Properties... Allows you to create custom fretboard diagrams. See Edit fretboard diagram.
Line properties
Right-click on a line and select Line Properties... There are settings for the beginning, end, or continuation of the line. You can add or remove text, adjust the text's placement, and set the length and angle of optional hooks. Click the ... button to access text properties for text included in the line. See Custom lines and line properties.
Measure properties
Right-click on an empty part of the measure and select Measure Properties... Adjust visibility, bar duration, repeats, stretch and numbering. See Measure properties.
Staff properties
Right-click either an empty part of a measure or the name of an instrument and select Staff Properties... This dialog allows you to adjust attributes of both the single staff and the instrument it is a part of. See Staff properties.
Text properties
Right click on a text-based element and select Text Properties... See Text styles and properties. If the element is a line with text in it, see → above.
Time signature properties
Right-click on a time signature and select Time Signature Properties... Used to adjust appearance of time sig. and beam properties of notes. See Time signatures.
See also
| Liite | Koko |
|---|---|
| Note inspector.jpg | 67.14 KB |
| Staffproperties.jpg | 91.41 KB |
| Buttonstaffproperties.jpg | 1.03 KB |
| Staffproperties2ndaccess.jpg | 22.51 KB |
| View_en.png | 25.03 KB |
| Note inspector.png | 133.85 KB |
| Measure Properties 1.png | 53.21 KB |
| notes.png | 2.65 KB |
| inspector_select.png | 3.25 KB |
| Barline inspector.png | 10.85 KB |
| Measure Properties 2.png | 60.54 KB |
| inspector-top-bar.jpg | 3.08 KB |
| Previous_Next_Buttons.png | 7.36 KB |
| Staff_Properties_en.png | 30.14 KB |
| clef_inspector.png | 2.09 KB |
Tahtioperaatiot
Huom: Varmistaaksesi, että sijoitetut tai liitetyt tahdit näkyvät oikein, monitahtiset tauot pitäisi olla poissa päältä (paina M).
Valitse
Yksittäinen tahti
- valitaksesi yksittäisen tahdin, klikkaa tyhjää tilaa tahdin sisäpuolella.
Tahtien valikoima
- To select a continuous range of measures, see Shift + click selection and Shift selection.
Sijoita
Sijoita tyhjä tahti partituuriin
Käytä jotakin seuraavista vaihtoehdoista:
- Valitse tahti, sitten paina Ins (no shortcut on Mac).
- Select a measure then chose from the menu: Add→Measures→Insert Measure.
Sijoita useita tahteja
Käytä jotakin seuraavista vaihtoehdoista:
- Select a measure, then press Ctrl+Ins (no shortcut on Mac); fill in the "Number of measures to insert" field and press OK.
- Select a measure then chose from the menu: Add→Measures→Insert Measures...; fill in the "Number of measures to insert" field and press OK.
Lisää
Lisää tyhjä tahti partituurin loppuun
Käytä jotakin seuraavista vaihtoehdoista:
- Paina Ctrl+B (Mac: ⌘+B).
- Valitse valikosta: Add→Tahdit→Lisää tahti loppuun.
Lisää monta tahtia partituurin loppuun
Käytä jotakin seuraavista vaihtoehdoista:
- Paina Alt+Shift+B (Mac: Option+Shift+B); täytä kenttä "Lisättävien tahtien määrä" ja paina OK.
- Valitse valikosta: Luo→Tahdit→Lisää tahteja loppuun...; täytä kenttä "Lisättävien tahtien määrä" ja paina OK.
Poista
Poista yksittäinen tahti
- Klikkaa tahtia;
- Paina Ctrl+Del (Mac: Cmd+Del); tai valitse valikosta Muokkaa→Tahdit→Poista valitut tahdit.
Delete a range of measures
- Select the range of measures to delete (see above);
- Press Ctrl+Del (Mac: Cmd+Del); or from the menu, select Edit→Measures→Delete Selected Measures.
Notes: (1) In multi-staff scores, measure deletion also removes all corresponding measures in the other staves of the system; (2) If you wish to delete only the measure contents (and not the measure itself), use the Del command instead at step "2."
Properties
To edit the properties of a measure, right-click an empty part of the measure and select Measure Properties...:
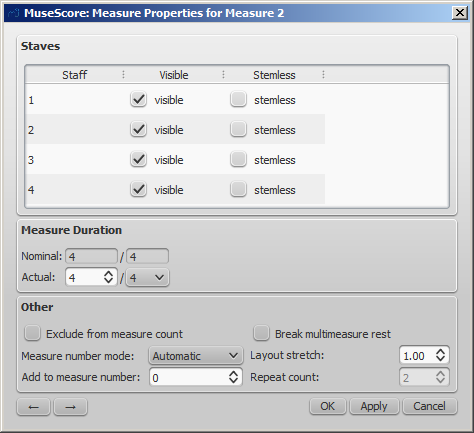
You can use the  buttons, at the bottom left of the dialog, to navigate to the previous or next measure.
Staves
- The visible property allows you to show/hide the notes and staff lines for the current measure.
- The stemless property allows you to show/hide all note stems for the current measure. Notes that normally have a stem such as half notes (minims) and quarter notes (crotchets) only show the note head when marked as stemless.
Measure duration
This feature allows you to adjust the time signature of a single measure regardless of the time signature indicated in the score. You can use it to create a pickup measure (also known as anacrusis or upbeat), cadenza, ad lib section etc.

- Nominal is the apparent time signature and cannot be edited.
- Actual can be set to anything you like regardless of the nominal time signature.
Example: In the image below, the quarter note pickup measure has a nominal time signature of 4/4, but an actual time sig. of 1/4. The measures in the middle are in normal 4/4 time. The complementary measure at the end of the staff, with a dotted half note, has an actual time sig. of 3/4.

Other
Exclude from measure count
Use "Exclude from measure count" for "irregular" measures, i.e. ones that should not get counted in the measure numbering. Normally, a pickup measure is marked as "Exclude from measure count".
Add to measure number
You can also use the "Add to measure number" option to influence the measure numbering. You can enter positive or negative numbers here. Please note that this affects all subsequent measures. A value of "-1" has the same effect as marking a measure to be excluded from measure count.
Layout stretch
You can increase or decrease horizontal space between score elements (notes, rests, etc.) with this option. This provides a more precise control over the exact same measure spacing property as the menu commands or keyboard shortcuts for Increase/Decrease Stretch ({ and }), which are accessed outside of the Measure Properties dialog while a measure is selected.
Play Count (as of version 2.1) / Repeat count (prior to version 2.1)
If the measure contains an end repeat barline, you can define how often it is played.
Break multi-measure rests
This property will separate a multi-measure rest at the start of the selected measure. This option should be checked before you turn on the "Create multi-measure rests" option in Style→General..., in the "Score" tab.
Multi-measure rests are automatically broken at important breaks, such as rehearsal marks, time signature changes, double barlines, irregular measures, etc. The default for scores is off, for parts is on.
Numbering
MuseScore automatically numbers the first measure of each System (except for the first system, actually except for a measure with the number 1), but more numbering options are possible. From the main menu, choose Style→General..., in the left pane, choose the "Header, Footer, Numbers" tab. At the bottom of the right pane is the "Measure Numbers" ("Bar Numbers") section.
Mark the checkbox next to the "Measure Numbers" ("Bar Numbers") to turn on automatic measure numbers.
Mark "Show first" if you want the first measure numbered.
Mark "All staves" if you want numbers on all staves. Otherwise, only the top staff of each system shows measure numbers.
Choose to show numbers on "Every system" which numbers the first measure of each line, or show numbers by "Interval" and specify the size of the interval. For example, an interval of 1 numbers every measure; an interval of 5 numbers every fifth measure.
Split and join
You may want have to have a longer or shorter measure without changing the time signature. You can change a measure's duration in Measure Properties, but there is now a new option to split or join measures. (Beams may be automatically modified.)
Join measures
- Select the measures you want to join;
- From the menu bar, select Edit→Measure→Join Selected Measures.
Note: If you select measures on only one staff in a score with multiple staves, the same measures will be joined in each staff of the system.
For example, the image below shows the result of applying the Join command to four measures in the top staff:
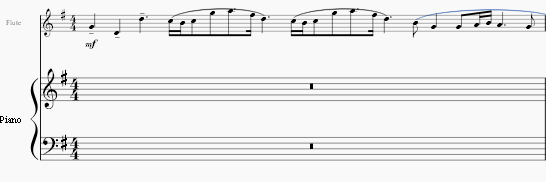
Split a measure
- Select a note (or chord);
- From the menu bar, select Edit→Measure→Split Measure Before Selected Note.
Note: If you select only one note from one staff, each staff of the system will be split at the same place.
External links
Stemmaäänet
Ääni on musiikillinen säe tai osa, jolla voi olla muista äänistä riippumatta oma rytmi samalla nuottiviivastolla. Ääniä kutsutaan joskus muissa nuotinnosohjelmissa "tasoiksi" (layer).
Jokaisella nuottiviivastolla voi olla enintään neljä ääntä. Moniäänisessä tahdissa tavallisesti ääni 1 esittää ylästemmoja ja ääni 2 alastemmoja.

Note: The feature called "Voices" should not be confused with "vocal staves," which can be added from the Instruments dialog (accessed by pressing I). When creating a closed SATB score, use Voices 1 and 2 for Soprano and Alto parts on the top staff, and use Voices 1 and 2 on the bottom staff for Tenor and Bass parts—do not use Voices 3 and 4 for Tenor and Bass.
When to use voices
- If you need stems pointing in opposite directions within a chord, on a single staff.
- If you need notes of different durations within a single staff, played simultaneously.
How to enter notes in different voices
The following instructions show you how to notate a passage of music in two voices:
-
Enter voice 1 notes first: Make sure you are in note input mode : the Voice 1 button becomes highlighted in blue in the toolbar. Enter the notes in the top voice first. When inputting, some notes may have down-stems, but these will flip automatically when the second voice is added.
The following excerpt shows a treble staff with just the voice 1 notes entered:

-
Move cursor back to start of section: When you have finished entering a section of voice 1 notes, press the ← key repeatedly to move the cursor, note-by-note, back to the first note of the section; or alternatively use Ctrl+← (Mac:Cmd+←) to move the cursor back one measure at a time. Or else you can simply exit note input mode (press Esc) and click directly on the first note.
-
Enter voice 2 notes: Make sure you are in note-input mode and that the voice 1 note at the beginning of the section is selected. Click on the "Voice 2" button
 (on the right of the toolbar), or use the shortcut Ctrl+Alt+2 (Mac: Cmd+Option+2). Enter all the lower voice notes (down-stem).
The following image shows the above example after the addition of voice 2 notes:

Deleting and hiding rests
While the rests of voices 2, 3, and 4 can be deleted, rests in voice 1 are permanent. However, they can be hidden, if required, by making them invisible. To hide a rest, select it and press V; or uncheck the "Visible" checkbox in the Inspector (see also Visibility options).
Exchange voices of notes
To swap the notes between any two voices:
- Select a range of measures;
- From the Menu bar, select Edit → Voices;
- Exchange any two voices from the list.
Notes: (a) The selection can encompass content of any voice, but only two will be processed at once. (b) If you select a partial measure the operation will still apply to the whole measure.
Move notes to another voice (without swapping)
You can also move notes from one voice to another (without note-swapping):
- Ensure you are not in note input mode.
- Select one or more noteheads (in any voice).
- Click on the destination voice in the Note Input toolbar or use the shortcut Ctrl+Alt+1–4 (Mac: Cmd+Option+1-4).
Note: For a successful move, the following conditions should be met:
- The chord(s) in the destination voice must be the same duration as the note(s) to be moved there.
- There is enough rest duration in the destination voice to accommodate the new notes.
- The note(s) cannot be connected by a tie.
See also
External links
Kopioi ja liitä
MuseScore tukee standardia kopiointi-, leikkaus-, liitä- ja (versio 2.1) vaihda leikepöydältä -komentoja. Näitä komentoja voidaan soveltaa:
- sävelalueille: esim. partituurin osan kertaukseen tai siirtää musiikkiote iskulla tai tahdilla.
- muihin partituurin elementteihin: esim. artikulaatiot, viivaston teksti, dynamiikat, sormitus jne.
Huom: Viivoja ei voida kopioida, mutta niitä voidaan jäljentää (kts. alla).
Kopioi-/liitä-/vaihda-/ komentoihin pääsee käsiksi kolmella eri tavalla:
- muokkausvalikosta (dokumentti-ikkunan yläpuolella).
- painamalla osoitinlaitteen kakkospainikkeella elementtiin tai elementteihin, mikä tuo esille toimintovalikon.
- käyttämällä yhtä tai useampaa yleistä pikanäppäintä.
Yhteenveto toiminnoista
| Toiminto | Näppäimet (Win) | Näppäimet (Mac) | Pikavalikko | Päävalikko |
|---|---|---|---|---|
| Leikkaa | Ctrl+X | Cmd+X | Leikkaa | Muokkaa → Leikkaa |
| Kopioi | Ctrl+C | Cmd+C | Kopioi | Muokkaa → Kopioi |
| Liitä | Ctrl+V | Cmd+V | Liitä | Muokkaa → Liitä |
| Vaihda leikepöydältä | Ctrl+Shift+X | Cmd+Shift+X | Vaihda leikepöydältä | Muokkaa → Vaihda leikepöydältä |
Huom: Ennen kuin suoritat kopioinnin, leikkaamisen, liittämisen tai vaihdon loppuun, sinun täytyy olla normaalitilassa. Paina Esc-näppäintä to poistuaksesi normaalitilaan.
Nuotit
Voit leikata, kopioida, liittää tai vaihtaa nuotteja seuraavasti:
Kopioi tai leikkaa
kopiomalla/leikkaamalla yksittäisen soinnun
- Paina ja pidä Shift-näppäintä pohjassa ja klikkaa soinnussa olevaa säveltä.
- käytä kopiointi- tai liitä- vaihtoehtoa (kts. luettelo yllä).
kopiomalla/leikkaamalla sarjan sointuja
- Klikkaa ensimmäiseen nuottiin tai tahtiin, jonka haluat valita.
- Käytä näppäinyhdistelmää Shift+Click viimeiseen nuottiin tai tahtiin, jonka haluat valita. Valitsemaasi aluetta korostaa sininen suorakulmio.
- Käytä kopionti- tai liitä- vaihtoehtoa. (kts. luettelo yllä).
Liittäminen
- Klikkaa nuottia tai tahtia, josta haluat liittämäsi valinnan alkavan.
- Käytä kopionti- tai liitä- vaihtoehtoa. (kts. luettelo yllä).
Vaihda leikepöydältä
Saatavilla versiosta 2.1 ja eteenpäin, vaihda leikepöydältä -toiminto yhdistää kaksi komentoa yhdeksi: (1) Ensiksi se korvaa valitun osan partituurista leikepöydän sisältöön, aivan kuten liitä-komentokin; (2) Toiseksi, se siirtää ylikirjoitetun partituurin osan takaisin leikepöydälle, aivan kuten kopiontikomentokin.
Toimintoa voidaan käyttää esimerkiksi kahden samanpituisen partituurin osan, A:n ja B:n , vaihtamiseen:
- Valitse valinta A, sitten käytä leikkaustoimintoa;
- Poista valinta (painamalla Esc-näppäintä tai klikkaamalla dokumentti-ikkunan tyhjää aluetta);
- Paina Shift ja klikkaa nuottia valinnan B alusta tai jos B alkaa tahdin alusta, voit yksinkertaisesti myös valita tahdin;
- Käytä Vaihda leikepöydältä- toimintoa (kts. luettelo yllä).
- Valinta B on nyt leikepöydällä. Liitä se takaisin askeleen "1" tyhjäksi jättämään partituurin alueeseen.
Kopioi vain yksittäisen sävelen sävelkorkeus
On mahdollista kopioida vain nuotin sävelkorkeus (ilman muita ominaisuuksia) klikkaamalla nuotinpäätä ja soveltamalla tavallista kopiomista ja liittämistä tai kopioimista ja leikepöydältä vaihtamista. Kohdenuotin sävelkorkeus muuttuu samaksi kuin kopioidun nuotin, mutta aika-arvo pysyy ennallaan.
Muut elementit
Muita partituurin elemettejä (kuten viivaston teksti, dynamiikka, sormitus, sointukaaviot jne.) voi leikata, kopioida ja liittää yksitellen. Artikulaatiot (sforzato, staccato jne.), taas sallivat monivalinnan.
Huom: Leikepöydältä vaihto -komento on tarkoitettu käytettäväksi vain musiikin osiin eikä muihin partituurin elementteihin.
Kopioi tai leikkaa
Liitä
- Klikkaa nuottia, johon haluat valitsemasi alueen alkavan.
- Käytä yhtä Liitä -vaihtoehdoista (kts. taulukko yllä).
Artikulaatioiden tapauksessa, liittäminen tapahtuu kohdenuotteihin tarkalleen samassa (jatkuvassa tai ajoittaisessa) järjestyksessä kuin ne olivat alkuperäisessäkin valinnassa.
Pikakertaus
Kopioidaksesi ja liittääksesi nuotin, tahdin tai kohdan nopeasti:
- Valitse sointu, tahti tai kohta kuten kuvattu yllä.
- Paina R .
MuseScore kopioi ja liittää valitun nuotinnoksen pisteeseen välittömästi viimeisen nuotin jälkeen valinnassa. Kaikki olemassa oleva musiikki kohdealueessa korvataan.
Jäljennä
Kopioidaksesi ja liittääksesi tekstielementin, viivan tai muun objektin välittömästi:
- Pidä pohjassa Ctrl+Vaihtonäppäin (Mac: Cmd+Shift), klikkaa elementtiä ja raahaa mihin partituurin kohtaan tahansa.
- Vapauta hiiren painike ja valittu elementti on jäljennetty uuteen sijaintiin.
Valintasuodin
Valintasuodin sallii sinun valita tarkalleen , mitkä äänet ja elementit haluat sisällyttää valintaasi.
- Näyttääksesi valintasuotimen, paina F6 (Mac: fn+F6); tai valitse valikosta Näytä→Valintasuodin.
Valintasuodin näkyy oletuksena Palettien alla. Vaihtaaksesi näkymän sijainnin, katso Tarkastelu ja navigointi: sivupaneelit.
Eesimerkiksi: Oletetaan, että haluat kopioida tahtien 1 ja 2 kulun seuraavasti (katso kuva) tahteihin 3 ja 4:
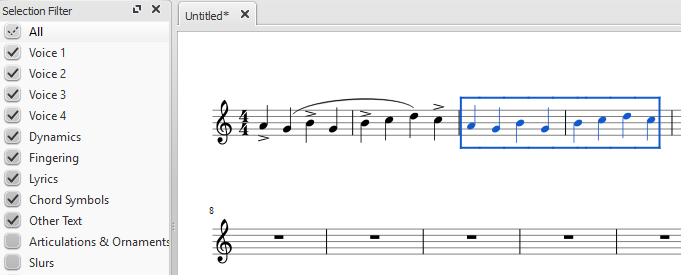
- Varmista, että Valintasuodin näkyy (kts. yllä);
- Poista ruksi kohdasta "Artikulaatiot & korukuviot" ja "Kaaret";
- Kopioi ja liitä halutut tahdit (tässä esimerkissä, tahdit 1-2 tahteihin 3-4).
Huom: Valintasuodin toimii myös vaihda leikepöydältä -komennon kanssa.
Katso myös
Jos haluat muuttaa nuotteja niin, että et muuta niiden rytmiä, saat yhdistää transponoinnin tai sävelkorkeuden muuttamisen kopiointiin ja liittämiseen.
Ulkoiset linkit
Tarkastelu ja navigointi
Tämä kappale tarkastelee vaihtoehtoja, jotka ovat saatavilla Näytä valikosta, ja Suurennus ja Sivunäkymä/Jatkuva näkymä valikoissa (jotka sijaitsee työkalupalkissa partituurin yläpuolella). Se myös esittää yksityiskohtaisesti eri navigaatiokomentoja ja -toimintoja.
Näytä-valikko
Näytä sivupalkit/paneelit
- Aloituskeskus: F4
- Paletit: F9
- Pääpaletti: Shift+F9
- Tarkastaja: F8
- Toistopaneeli: F11
- Navigaattori: F12
- Mikseri: F10
- Syntetisaattori
- Valintasuodin: F6
- Pianokoskettimisto: P
Lähennä/loitonna
On olemassa monta tapaa lähentää tai loitontaa partituuria:
-
Pikanäppäin:
- Lähennä: Ctrl++ (Mac: Cmd ++)
- Loitonna: Ctrl +- (Mac: Cmd +-).
-
Näytä-valikko:
- Lähennä: Näytä→Suurenna
- Loitonna: Näytä→Pienennä.
-
Hiiri
- Lähennä: Rullaa hiiren rullaa ylöspäin samalla, kun painat pohjassa näppäintä Ctrl (Mac: Cmd)
- Loitonna: Rullaa hiiren rullaa alaspäin samalla, kun painat pohjassa näppäintä Ctrl (Mac: Cmd).
-
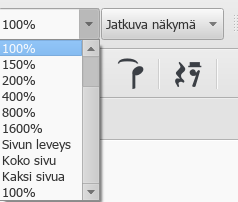
Pudotusvalikko: Säätääksesi täsmällisen zoomin, käytä hyväksi pudotusvalikkoa vakiotyökalupalkissa asettaaksesi partituurin suurennoksen (25–1600 %) tai näytä se käyttämällä vaihtoehtoja "Sivun leveys", "Koko sivu", tai "Kaksi sivua".
-
Palautaaksesi 100% zoomin: Hyödynnä pikanäppäintä Ctrl+0 (Mac: Cmd+0).
Työkalupalkit (display)
As of MuseScore 2.1, this menu option allows you to hide or display the toolbars above the document window: File Operations, Playback Controls, Concert Pitch, Image Capture, Note Input (see Toolbars below).
Show Status bar
The Status bar, at the bottom of the screen, gives information about selected score elements. Tick/untick this option to display or hide.
Split display
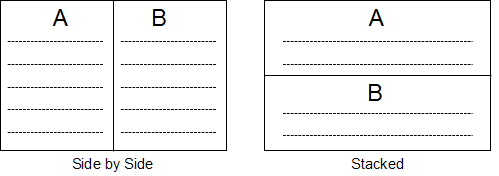
It is possible to split the document display so as to view two documents at once, or to view two different parts of the same document. Tabs allow you to choose which document to display in each view. You can drag the barrier separating the two scores to adjust the amount of space in the window devoted to each:
- Documents Side by Side: Divides the window vertically into two score views.
- Documents Stacked: Divides the window horizontally into two score views, one above the other.
Visibility options
This section allows you to display or hide various non-printing elements:
- Show Invisible: View/hide elements that have been made invisible for printing and export. If this option is ticked, invisible elements are shown in the score window as light gray.
- Show Unprintable: View/hide breaks and spacer symbols.
- Show Frames: View/hide the dotted outlines of frames.
- Show Page Margins: View/hide Page Margins.
Full screen
Full Screen mode expands MuseScore to fill your screen so more content is visible.
Page/Continuous View
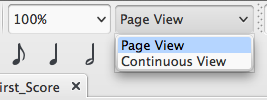
You can switch between two different views of the score using the drop-down list in the toolbar area:
Page View
In Page View, the score is formatted as it will appear when printed or exported as a PDF or image file: i.e. page by page, with margins. Line and page breaks are automatically applied—where possible—so that the score fits within the space available. You are free to override the automatic layout by adding your own line, page or system breaks.
Continuous View
In Continuous View, the score is shown as one unbroken system. Even if the starting point is not in view, measure numbers, instrument names, clefs, time and key signatures will always be displayed on the left of the window.

Note: Because the layout is simpler, MuseScore may perform faster in Continuous View than Page View.
Työkalupalkit
Työkalupalkkialue sijaitsee Päävalikon ja dokumentti-ikkunan välissä. Se sisältää symboleja, jotka sallivat sinun suorittaa erinäisiä toimintoja. Se voidaan jakaa seuraaviin työkaluriviin:
- Tiedostotoiminnot: Uusi partituuri, Lataa partituuri, Tallenna, Tulosta, Kumoa, Tee uudelleen.
- Zoom/Sivunäkymä.
- Toistosäätimet: Ota käyttöön MIDI, Hyppää alkuun, Toista/Pysäytä, Silmukkatoisto, Soita kertaukset, Metronomi.
- Soiva sävelkorkeus: Näyttää partituurin kirjoitettuna tai soivana äänialana.
- Kuvakaappaus: Sallii sinun ottaa tilannekuvan tietystä kohtaa partituuria.
- Nuotinsyöttö: Nuotinsyöttötila, Kesto, Yhdyskaari, Tauko, Tilapäiset etumerkit, Käännä varren suunta, Ääni (1, 2, 3, 4).
To choose which toolbars to display, right-click on an empty space in the toolbar area (or on the title bar of the Inspector) and, from the menu, check or uncheck the required options. This menu also allows you to view or hide the Piano keyboard, Selection sidebar, Palettes, the Inspector, and (if already displayed) the "Drum Tools" (i.e. Drum input palette).
These display options can also be accessed in the View menu, and, as of 2.1, in View→Toolbars.
Side panels
The workspaces, Inspector and Selection filter are conveniently displayed as side panels to the left and right of the score window. To undock a side panel use one of the following methods:
- Drag the panel;
- Click on the double chevron at the top of the panel;
- Double click in the title area at the top of the panel.
To dock a panel use one of the following procedures:
- Drag the panel to the top/bottom of an existing side panel and it will stack vertically above/below that panel.
- Drag the panel to the middle of an existing side panel and it will overlay that panel. Both panels can then be accessed by tabs.
Alternatively, double-clicking the title bar of the panel will restore it to its previously docked position.
Navigation
There are various commands available to help you navigate through the score. These are listed under Keyboard shortcuts: Navigation.
Navigator
The Navigator is an optional panel which allows you to navigate a long score more easily, or go to specific pages. To view/hide, go to the View→Navigator, or use the shortcut F12 (Mac: fn+F12). It appears at the bottom of the document window if scrolling pages horizontally, or on the right-hand side of the document window if scrolling pages vertically (see Preferences: Canvas).

The blue box represents the area of the score that is currently visible in the main window. You can drag either the blue box or the scroll bar, or click on an area to immediately go to it.
Find
The Find function allows you to speedily navigate to a specific measure, rehearsal mark or page number in the score:
- Press Ctrl+F (Mac: Cmd+F), or select Edit→Find. This opens the Find (or Go to) bar at the bottom of the workspace.
- Use one of the following options:
- To go to a measure, enter the measure number (counting every measure starting with 1, irrespective of pickup measures, section breaks or manual changes to measure number offsets).
- To go to a rehearsal mark, enter its name (the first character must be a letter for it to be "found", but subsequent text can be letters or numbers; the search is case insensitive).
- To go to a numerical rehearsal mark (esp. one that does not match the measure number), enter the number using the format rXX (where XX is the rehearsal mark. To find a rehearsal mark that starts with "R" use rrXX. To find a rehearsal mark that starts with "P" and continues with a number, use rpXX). This works starting with version 2.1.
- To go to a page, enter the page number using the format pXX (where XX is the page number; this also means that prior to version 2.1 you won't find a rehearsal mark that starts with "P" and continues with a number).
See also
Valintatilat
Objects in the score—such as notes, measures, articulations etc.—can be selected in several ways: (1) one at a time, (2) as a continuous range, or (3) as a list.
Select a single object
Most score objects can be selected by simply clicking on them in "normal" (i.e. not note-input) mode.
Select a single note
- Make sure you are not in note input mode;
- Click on a note.
Note: Selecting a single note then copying and pasting it, will only copy and paste the pitch—not duration or other properties (such as stemless). To copy the entire note, including all properties, you need to hold down Shift—as for chord selection (below).
Select a chord
- Make sure you are not in note input mode;
- Press and hold Shift, then click on a note in the chord.
Select a single measure
- Click on a blank space within the measure.
Note: To select a range of consecutive measures, see Shift selection and Shift + click selection (below).
Select a continuous range of objects
There are several ways to select a continuous range of notes, chords or measures:
1. Shift selection
- Make sure you are not in note entry mode;
- Select the first note, chord, rest or measure in the range. You can extend the selection up or down to adjacent staves, if needed, using Shift+↑ or ↓;
- Then choose one of the following options:
- To advance the selection one chord at a time to the right: Press Shift+→.
- To advance the selection one chord at a time to the left: Press Shift+←.
- To advance the selection one measure at a time to the right: Press Shift+Ctrl+→ (Mac: Shift+Cmd+→).
- To advance the selection one measure at a time to the left: Press Shift+Ctrl+← (Mac: Shift+Cmd+←).
- To advance the selection to the beginning of the line: Press Shift+Home (Mac: Shift+Fn+←).
- To advance the selection to the end of the line: Press Shift+End (Mac: Shift+Fn+→).
- To extend the selection to the beginning of the score: Press Shift+Ctrl+Home (Mac: Shift+Cmd+Fn+←).
- To extend the selection to the end of the score: Press Shift+Ctrl+End (Mac: Shift+Cmd+Fn+→).
2. Shift + click selection
To select a range of notes or rests:
- Make sure you are not in note entry mode;
- Click on the first note or rest in the range;
- Press and hold Shift, then click on the last desired note or rest.
Note: The final selected element can be in the same staff or in staffs above or below the initial note/rest. All selected elements will be enclosed in a blue rectangle, including associated lines and articulations (but not voltas). You can repeat the operation to extend the selected range as required.
Select a range of measures
- Click on a blank space in the first desired measure;
- Hold down Shift, then click on a space in the last measure of the desired range.
Note: As with selecting notes, the range can be extended vertically as well as horizontally.
3. Drag selection
This method can be used to select notes or rests, or, independently, to select non-note symbols such as staccato dots, lyrics etc.:
- Press and hold Shift, then drag the cursor across the desired range.
4. Select All
This method selects the whole musical score including notes, rests and associated elements. Use one of the following options:
- Press Ctrl+A (Mac: Cmd+A).
- From the menu bar, select Edit → Select All.
5. Select section
This method is used to select a section—a region of the score starting and/or ending with a section break:
- Click on an empty space in a measure in the section;
- From the menu bar, select Edit → Select Section.
Note: See Copy and paste: Selection filter to disable certain types of elements from being selected in a range selection.
Select a list of objects
To select a list (or discontinuous range) of score elements:
- Click on the first element;
- Hold down Ctrl (Mac: Cmd) and successively click on the desired additional elements.
Note: This method cannot be used to select measures. Use single or range selection instead.
Select all similar
To select all elements of a specific type (e.g., all barlines, all text elements, all staccato markings):
- Select an element;
- Right click and chose Select…;
-
Several options are available:
- All Similar Elements: Selects all elements in the score similar to the chosen object.
- All Similar Elements in Same Staff: Selects all elements in the same staff similar to the chosen object.
- All Similar Elements in Range Selection: only applies if a range has been selected. Selects all elements in the range similar to the chosen object.
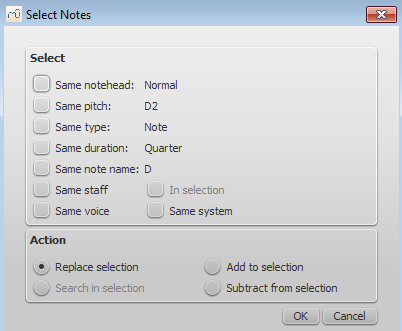
- More...: opens a dialog that lets you fine-tune more options. For example, if you have a notehead selected, the dialog will look something like this (as of version 2.1—previous versions had fewer options):
Select
- Same notehead: In this example, only noteheads of the same group will be selected;
- Same pitch: Only noteheads of the same pitch will be selected;
- Same type: All noteheads (of any group) will be selected;
- Same duration: Only noteheads of same duration will be selected;
- Same note name: Noteheads of that name in all octaves will be selected;
- Same staff: Only noteheads on the same staff will be selected.
Action
- Replace selection: The default option: starts the selection from scratch;
- Add to selection: Keeps everything you have already selected, and adds the current selection to it;
- Search in selection:
- Subtract from selection: Keep everything you have already selected, but takes away the current selection.
What selections are useful for
See also
- Basics chapter, esp. Note input
- Notation chapter, esp. Accidental
- Text chapter, esp. Tekstin muokkaaminen and Grid-based movement of symbols and staff text
Kumoa ja tee uudelleen
MuseScoressa on rajoittamaton määrä kumoa / tee uudelleen toimintoja.
Vakiopikanäppäimet ovat:
- Kumoa Ctrl+Z (Mac: ⌘+Z)
- Tee uudelleen Ctrl+Shift+Z or Ctrl+Y (Mac: ⌘+Shift+Z)
Tai hyödynnä työkalurivin painikkeita: 
Tallenna/vie/tulosta
MuseScoressa Tiedosto-valikon alta voi löytää vaihtoehtoja, kuten Tallenna..., Tallenna nimellä..., Tallenna kopio..., Tallenna valinta..., Tallenna verkkoon..., Vie..., Vie stemmat... ja Tulosta....
Tallenna
Tallenna..., Tallenna nimellä..., Tallenna kopio..., ja Tallenna valinta... sallivat sinun tallentaa paikallisia MuseScore-tiedostoja (.mscz and .mscx).
- Tallenna...: Tallentaa nykyisen partituurin tiedostoksi.
- Tallenna nimellä...: Tallentaa nykyisen partituurin uudeksi tiedostoksi.
- Tallenna kopio...: Tallentaa nykyisen parituurin uudeksi tiedostoksi, mutta jatkaa alkuperäisen tiedoston muokkaamista.
- Tallenna valinta...: Tallentaa valitsemasi tahdit uudeksi tiedostoksi. Varmistaaksesi MuseScore 2.1:n aikaisemmissa versioissa, että tiedosto on tallennettu oikein, tahtiosoituksen pitää näkyä valitun kohdan ensimmäisessä tahdissa, ellei se ole 4/4.
- Tallenna verkkoon...: Tallentaa nykyisen partituurin sivulle MuseScore.com (kts. Partituurien jakaminen verkossa).
Vie
Vie... ja Vie stemmat... sallivat sinun luoda kolmannen osapuolen tiedostoja, kuten PDF, MusicXML, MIDI, ja eri ääni- ja kuvatiedostomuotoja.
Valintaikkunassa Vie, voit valita, mihin tiedostomuotoon haluat viedä:
- Vie...: Vie nykyisen partituurin haluamallesi tiedostomuotoon.
- Vie stemmat...: Export current score and all linked parts to separate files in format of your choice.
MuseScore remembers which format you picked the last time and makes that the default for the next time.
There is a known issue with Windows XP and Vista, where you have to manually (un)set the filename's extension when choosing a different format than the one selected the previous time.
Note: Uncompressed MuseScore format (MSCX) is available in both 'Save' and 'Export'.
Tulosta
Print... allows to print your MuseScore file directly to a printer from MuseScore. Depending on your printer you will have different options, but generally you can define the page range, number of copies and collation.
If you have a PDF printer installed, you could also "export" to PDF using that, although this is not recommended.
For this to work properly with Adobe PDF, make sure to uncheck Rely on system fonts only, do not use document fonts in Printer properties.
Katso myös
Partituurien jakaminen verkossa
Go to musescore.com/sheetmusic to view other scores from MuseScore.
You can save and share your scores online at MuseScore.com. You can choose to save a score privately for personal access from any computer, or share it publicly. MuseScore.com enables the viewing and playback of scores in your web browser - an additional feature entitled VideoScores allows synchronization between the score and a YouTube video. For use outside of a web browser, you can download the score in a variety of formats (including PDF, MIDI, MP3, MusicXML, and the original MuseScore file).
Create an account
- Visit MuseScore.com and click on "Create new account". Pick a username and enter a valid email and press "Create New Account".
- Wait a few minutes for an email from MuseScore.com support. If no email arrives, check your spam folder.
- Click the link in the email and visit your user profile to change your password.
Share a score directly from MuseScore
To save a score online:
- Make sure that the Concert Pitch button is off, and that the individual parts are correctly transposed.
-
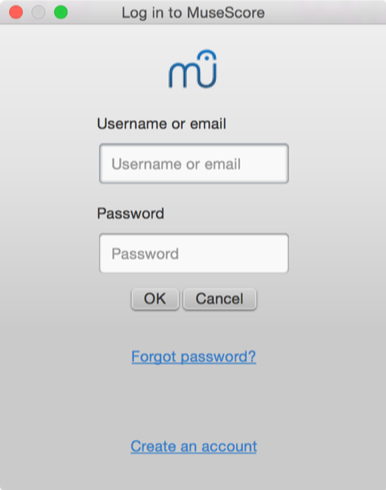
From the menu, select File→Save Online.... The "Log in to MuseScore" dialog will appear:
-
Enter your email address or MuseScore username, and password, then click OK. Note: If you don't have a MuseScore account yet, create one first by clicking on the "Create an account" link. That will open your browser app and bring you to musescore.com/user/register.
-
Upon successfully logging in, you'll be able to enter your score information.
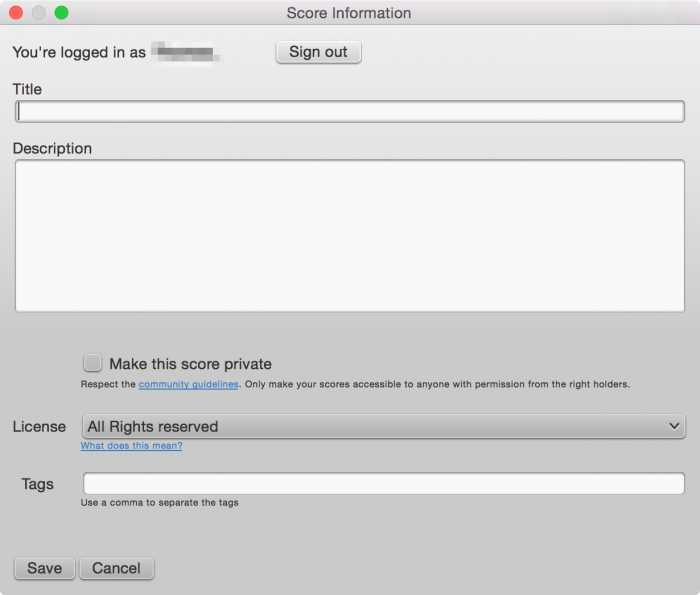
- Title: The title of the score.
- Description: The descriptive text that will appear next to it.
- Make the score private: If ticked, the score can only be viewed via a private link. If unticked, the score is visble to all.
- License: Chose an appropriate copyright license from the drop-down list. Note: Creative Commons license, allows people to use your scores under certain restrictions.
- Tags: You can add tags to help identify scores on MuseScore.com. Use commas to separate multiple tags.
-
In case you already saved the score online earlier, it will automatically update the existing one, and, as of version 2.1, you can enter some additional information in a changlog section of the dialog. Uncheck Update the existing score to save online as a new score.

-
(As of version 2.1) If you are using a different SoundFont than the default one and if you are able to export MP3 files, a checkbox "Upload score audio" will be visible and enabled. If the checkbox is checked, MuseScore will render the audio of the score using the synthesizer settings and upload the audio to MuseScore.com.
Upload a score on MuseScore.com
You can also upload a score directly on MuseScore.com.
- Click the Upload link on MuseScore.com.
- You have the same options as with the Save Online menu.
- You have also access to more information, such as Genre.
Note: Should you reach the five score upload limit, you can still upload scores directly from MuseScore, but only the last five are visible. If you wish more than this amount, upgrade to a Pro Account first.
Edit a score on MuseScore.com
If you want to make changes to one of your scores on MuseScore.com, edit the MuseScore file on your own computer, save it, and then do the following:
- If you originally shared the score directly from within MuseScore, simply go to File→Save Online... again to update the online score.
- If you originally uploaded the score via the Upload page on MuseScore.com, then you must follow these steps to update the online score:
- Go to the score page on MuseScore.com.
- Click the three dots menu ⋮ on the right and choose "Update this score".
- In the form, you can upload a replacement score file as well as change the accompanying information and privacy settings.
Switch to the direct method of updating an online score
It is much more convenient to update online scores from directly within MuseScore than by updating the score manually from the score page. Follow these steps if you originally uploaded the score via the Upload page and now want to switch to the direct method:
- Go to the score page on MuseScore.com and copy the URL.
- Open the score file on your computer with MuseScore.
- From the menu, select File→Score Properties... and paste the URL into the "Source" field.
Now whenever you want to update the online score simply go to File→Save Online....
External links
Soiva sävelkorkeus
Voit halutessasi näyttää partituurin kirjoitettuna tai soivana äänialana. Kirjoitettu sävelkorkeus ilmaisee partituurin sellaisena kuin sen kuuluisi näyttää tulostettuna muusikoiden luettavaksi. Valmistelun aikana saatat kuitenkin pitää sopivampana nähdä transponoivat soittimet nuotinnettuna niin kuin ne kuulostavat ilman transponointia. Tässä tapauksessa pitäisi sinun valita "Soiva sävelkorkeus".
Vaihtaaksesi partituurin näkymää kirjoitetun- ja soivan äänialan välillä, noudata yhtä seuraavista vaihtoehdoista:
- Paina työkalupalkissa yläoikealla sijaitsevaa Soiva sävelkorkeus -painiketta. Kun painike on korostettu, partituuri on soivassa sävelkorkeudessa.
- Valitse valikkopalkista Nuotit ja ruksaa tai poista merkintä vaihtoehdosta Soiva sävelkorkeus.
Ennen partituurin tulostamista, PDF-vientiä tai tallentamista verkkoon pitäisi sinun varmistaa, että Soiva sävelkorkeus -painike ei ole valittuna ja yksittäiset osat ovat asianmukaisesti transponoitu.
Katso myös
Ulkoiset linkit
- Concert pitch (englanninkielinen Wikipedia-artikkeli)
- Transposing Instrument (englanninkielinen Wikipedia-artikkeli)
- Transponoivat soittimet (Aleatorin verkko-oppimateriaali)
- Concert pitch or not?? (MuseScoren keskustelupalsta)