기초
이전의 "시작하기" 장에서는 새로운 악보 만들기를 위해 설치하는 방법과 과정을 배웠습니다. "기초"장에서는 MuseScore에 대한 개요를 제공하고 score를 어떻게 작동시키는지 일반적인 방법에 대해 서술하고있습니다.
편집 모드 (Edit mode)
편집 모드 는 악보에 입력된 여러 개체를 편집할 때 사용됩니다. 대부분의 개체들이 이 편집 모드에서 수정되어 집니다.
- 편집 모드로 들어 가려면 : 편집 대상 개체를 더블클릭 합니다.; 또는 개체를 오른쪽 클릭 한 후 요소편집(Edit Element)를 선택 합니다 ; 또는 개체를 한번 클릭한 후 다시 오른쪽 클릭 하여 요소편집 (Edit Element)를 선택 합니다, 또는 단축키 Ctrl+E (Mac: Cmd+E)를 누릅니다.
- 편집 모드 (edit mode)에서 빠져 나오려면 Esc키를 누릅니다.
텍스트의 편집
텍스트 편집 모드는 Text editing을 참조 바랍니다.
라인의 편집
Lines 및 이와 비슷한 슬러(이음줄), 이르페지오, 대괄호 같은 개체는 편집모드에서 그 선의 핸들을 표시할 수 있으며 키보드 명령 또는 마우스의 드래그 기능으로 핸들을 조정, 그 모양을 바꿀 수 있습니다.
Slur (이음줄) 의 편집 모드:

키보드 명령어 들:
- ←: 핸들을 왼쪽으로 0.1 staff space 이동 ( 1 staff space= 오선보의 두 선사이의 간격, Page Settings에서 설정된다)
- →: 핸들을 오른쪽으로 0.1 staff space 이동
- ↑: 핸들을 위로 0.1 staff space 이동
- ↓: 핸들을 아래로 0.1 staff space 이동
- Ctrl+← (Mac: ⌘+←): 핸들을 왼쪽으로 1 staff space 이동
- Ctrl+→ (Mac: ⌘+→): 핸들을 오른쪽으로 1 staff space 이동
- Ctrl+↑ (Mac: ⌘+↑): 핸들을 위쪽으로 1 staff space 이동
- Ctrl+↓ (Mac: ⌘+↓): 핸들을 아래쪽으로 1 staff space 이동
- Alt+←: 핸들을 왼쪽으로 0.01 staff space 이동
- Alt+→: 핸들을 오른쪽으로 0.01 staff space 이동
- Alt+↑: 핸들을 위쪽으로 0.01 staff space 이동
- Alt+↓: 핸들을아래쪽으로 0.01 staff space 이동
- Shift+←: Move handle's anchor (the note or measure to which it is attached) left
- Shift+→: Move handle's anchor right
- Tab: 다음 핸들로 이동
음표의 편집
두 음표 사이의 간격 조정
- 음표머리를 더블클릭 합니다. (또는 오른쪽 클릭 후 "요소 편집"을 선택 합니다, 또는 음표를 클릭한 후 단축키 Ctrl + E를 누릅니다)
- 좌, 우의 화살표 키로 원하는 만큼의 간격을 조정 합니다.
- 마지막으로 Esc 키를 눌러 변경을 확정 짓습니다. (이로써 음표 시스템이 다시 그려집니다).
주: 타이 (붙임줄)의 경우 때때로 다시 그릴때 오류가 발생할 수 있으므로 재입력 해야 할 경우가 있습니다.
대안 : 음표를 클릭한 후 "Horizontal offset" 의 설정을 화음(Chord) 의 Inspector 에서 설정함으로, 편집 모드 로 들어가지 않고 변경할 수 있습니다.
주e: 편집 모드 는 음표 기둥 에 대해 길이를 바꿀수 있도록 하며, 수평으로 위치조정은 할 수 없습니다. 이것은 클릭 한 후Inspector에서 horizontal offset 의 조정을 통하여 할 수 있습니다.
함께 보기
Palettes and workspaces
To the left of the document window is the Workspace. This can be toggled on and off using the menu command, View → Palettes, or the shortcut, F9.
A workspace, in turn, consists of a number of palettes. Each palette is a folder containing a group of musical symbols.
Workspaces
MuseScore provides two preset workspaces: Basic (the default option) and Advanced (a version with more palettes and symbols). These contain symbols drawn from the various sections of the Master palette. In addition, you can create your own custom workspaces (below).
- To switch between workspaces: Use the drop-down menu at the bottom of the workspace panel.
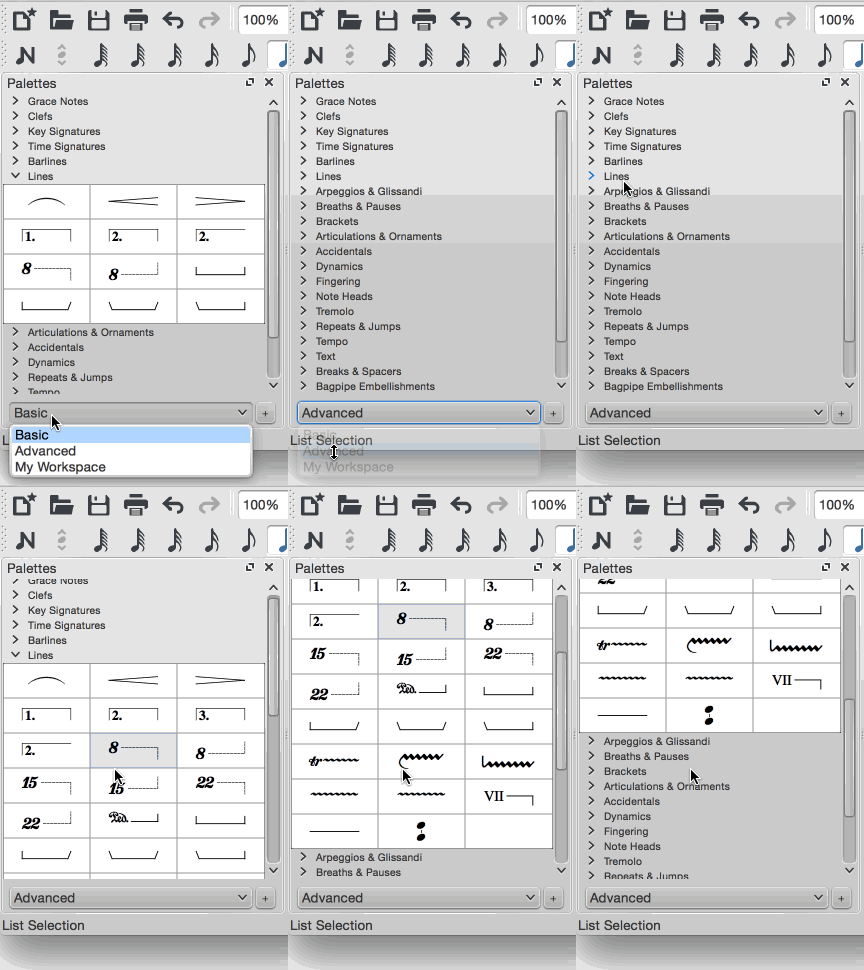
The names of palettes within a workspace are listed under the title "Palettes."
Single Palette Mode
If you only want to allow one palette to open at a time, right click at the top of the workspace and check the "Single palette" box. This will cause a palette to automatically close when you open a different one.
Docking/undocking
To dock or undock a workspace, see Side panels.
Custom workspace
A custom workspace allows you to select which palettes are listed, and to customize the contents of those palettes.
To create a customizable workspace:
- Select an existing workspace. Use the drop-down list at the bottom of the workspace panel if needed.
- Click the + button, enter a name for the new workspace and press OK. The new workspace is added to the panel.
Alternatively you can use the menu option:
- Select Edit → Workspaces, and chose a workspace.
- Select New. Fill in the new workspace name and click OK.
Right-clicking over the workspace will display a menu: this has options allowing you to insert, delete, rename and reorder the palettes within it. The contents of individual palettes can be edited in a similar fashion once you've checked "Enable Editing" for a palette. For more details, see Custom palettes and Palette menu (below).
Palettes
Open/close palette
- Click once on the name of the palette or its accompanying side-arrow.
Apply symbols from a palette
A palette symbol may be applied to the score using one of the following methods:
- Select one or more score elements and double click the palette symbol.
- Drag and drop the symbol onto the desired score element in the staff.
Tip: To prevent accidental rearrangement of contents during use, right-click over a palette name and untick "Enable Editing."
For example, to add tenuto marks (—) to a selection of notes:
- Select the desired notes.
- In the Articulations & Ornaments palette, double-click on the tenuto symbol
Once added to the score, objects can be copied, pasted, and duplicated—see 복사하기와 붙여넣기.
Preset palettes (Advanced workspace)
The more fully-featured Advanced workspace contains the following palettes:
- Grace Notes
- Clefs
- Key Signatures
- Time Signatures
- Barlines
- Lines
- Arpeggios and Glissandi
- Breaths and pauses
- Brackets
- Articulations and Ornaments
- Accidentals
- Dynamics
- Fingering
- Note Heads
- Tremolo
- Repeats and Jumps
- Tempo
- Text
- Breaks and Spacers
- Bagpipe Embellishments
- Beam Properties
- Frames and Measures
- Fretboard Diagrams
Custom palettes
Once you have created a custom workspace (see above), and enabled editing (see Palette menu below), you can customize the palettes within it to your own requirements.
To add an existing score element (such as a line, text, dynamic, fretboard diagram etc.) to a custom palette:
- Press and hold Ctrl+Shift (Mac: Cmd+Shift), then drag the symbol onto the palette.
To add a symbol to a custom workspace from the Master palette:
- Drag the symbol from the Master Palette window into a custom palette.
To re-arrange a symbol in a custom palette:
- Drag the symbol to the cell you want it to display in: it will swap places with the symbol currently occupying that cell.
Palette menu
Right-clicking on the name of a palette in a custom workspace brings up this menu:
-
Palette Properties...: Adjust the appearance of the open palette:
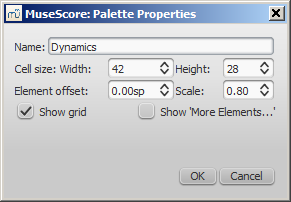
- Name
- Cell Size: Width, Height
- Element Offset: Adjust the vertical offset of all elements in the palette.
- Scale: Make all palette elements appear larger or smaller.
- Show grid: Visually divide the palette into cells, one for each element.
- Show ‘More Elements…’: Create a cell which opens the Master Palette.
- Insert New Palette: Create a new empty palette.
- Move Palette Up / Move Palette Down: Reorder the palettes.
- Enable Editing: Allow modifying the contents of the palette.
- Save Palette: Save as an .mpal file.
- Load Palette: Load an .mpal file.
- Delete Palette: Remove the palette from the workspace entirely.
Right-clicking on an element within a palette (if editing of the palette is enabled) brings up this menu:
- Clear: Remove the element from the palette
- Properties...: Open the Palette Cell Properties dialogue:
- Name: The tooltip that appears when you mouse over the element.
- Content offset (X, Y): Adjust the position of the element in the palette.
- Content scale: Make the element appear larger or smaller in the palette.
- Draw staff: Draw the five lines of a musical staff behind the palette element.
- More Elements: Open the relevant Master Palette section.
Note: Changing values in "Palette Cell Properties" only affects the appearance of elements in the palette. It does not change their sizes or offsets on the score page.
Behavior of applied text and lines
If the symbol you are adding to the score from a palette contains a text element (e.g. staff text, dynamic, fingering, volta etc.), then properties such as font-type, font-size, text color, and alignment will adapt according to the following rules:
-
Text properties which have not been altered by the user will adopt the relevant, prevailing text styles.
-
Custom text-properties—i.e. those changed by the user before saving the symbol to a custom palette—remain as customized.
By contrast, the line properties of lines applied from a palette always remain unchanged (i.e. as set by the user before saving to a custom workspace, or as predefined in the Basic/Advanced workspaces).
See also
Inspector and object properties
Most score elements have properties that can be edited in one of two ways:
-
Click on any element, and many of its properties can be viewed and changed from the Inspector panel on the right-hand side of your screen.
-
Right-click on an element and select an option with the word Properties in it. This option opens a dialog with advanced properties, only available for certain types of elements.
Inspector
The Inspector is shown by default on the right of your screen. It can be displayed or hidden from the menu: select View and check/uncheck Inspector, or use the shortcut F8 (Mac: fn+F8).
In the Inspector, the properties of any selected object are displayed and can be edited. This applies to virtually every single element in the score window—notes, text, barlines, articulations etc. Multiple elements can also be selected and edited simultaneously, as long as they are of the same type. However, if the selected objects are of different types, then the Inspector restricts you to editing color and visibility only.
The Inspector panel can be un-docked to become a floating panel by clicking the double-chevron symbol or double-clicking the top bar of the panel.

To re-attach the panel double-click on the top bar again. See also: Side panels.
Inspector categories
When you select one or more elements of a specific type, the properties which can be edited are conveniently divided into categories in the Inspector. Categories can be identified by their bold, centered lettering. For example, if you select a barline, you will see the following displayed at the top of the Inspector:
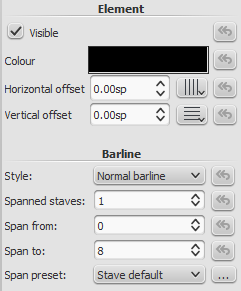
For details about how to adjust the properties of various score elements, refer to the relevant sections in the handbook. However, a few general points will be covered here:
Element
All score elements, except frames, breaks and spacers, display this category in the Inspector when selected. The various options are as follows:
-
Visible: Uncheck this box to make selected elements invisible: alternatively, use the shortcut V (toggle). Invisible elements do not appear in the music when printed out or exported as a PDF or image. If you still want them to remain on display in the document window, make sure that the "Show Invisible" option is selected in View → Show Invisible. Invisible elements will then be colored light gray.
-
Color: Click on the rectangle to open a "Color Select" dialog. Adjust the color and opacity of selected elements.
-
Horizontal offset / Vertical offset: Allows you to position selected elements exactly (in terms of space units). A positive number moves the elements right or down; a negative number moves the elements left or up. Snap to grid buttons are also provided.
Element Group
This category is displayed only when you have selected a mixture of different types of elements, and allows editing of color and visibility only.
Segment
This category is used to increase or decrease the space before/after an element in a music staff. Adjusting leading/trailing space here also affects any associated lyric syllables.
Chord
This category is displayed only if notes are selected. Any change to a notehead property under Chord affects the whole chord (i.e. all the notes in one voice) at that location—and not just the selected note. If you want to make changes to the position of just one note in a chord, then use the Element category (above).
Note
This category allows you to make changes to selected notes (but for note position—see Element). It contains the following properties:
- Small: Make notehead smaller (you can specify the relative size of all small notes from the menu: Style → General… → Sizes…).
- Head group: See Notehead groups.
- Head type: See Notehead types.
- Mirror head: Position notehead to the left or right of the stem (default is "Auto").
- Tuning: Adjust tuning of note to the nearest cent.
- Play: Unticking this box silences the note.
- Velocity type: Sets the MIDI velocity of notes directly. Chose one of two options:
- Offset: Make the value shown in "Velocity" relative to the previous dynamic marking.
- User: Make the value shown in "Velocity" absolute (i.e. the MIDI velocity is unaffected by dynamic markings).
- Velocity: Set the MIDI velocity according to the option displayed in "Velocity type."
- Fix to line: When ticked, the note is fixed to the top line of the standard 5-line staff.
- Line: A positive number moves the "fixed" note down; a negative number moves it upwards.
Select
This category appears differently according to the selection you have made:
- If you select a notehead, the "Select" category displays buttons which allow you to easily switch the selection to the stem, beam, hook, duration dot (or dots) or tuplet number associated with the notehead (see image below).

- If you select a range of measures, the "Select" category allows you to select either all notes, grace notes (from version 2.1) or rests.
Beam
This section is displayed in the Inspector when you select one or more note beams, and allows you to make fine adjustments to beam position and angle, and also change the spacing of beamed notes. See Adjust beam with the inspector.
Clef
This section appears when you select a clef: the tick box allows you to turn on/off the display of a preceding courtesy clef.

Properties dialogs
Properties of some objects are accessed by right-clicking on the object and choosing a "Properties" option from the context menu: these are in addition to the object's properties displayed in the Inspector.
(Note: Properties should not be confused with Styles. Changes to properties only affect the single element selected; all style controls apply to the entire score.)
Articulation properties
Right-click on an articulation and select Articulation Properties... See Articulations and ornaments.
Fretboard diagram properties
Right-click on a fretboard diagram and select Fretboard Diagram Properties... Allows you to create custom fretboard diagrams. See Edit fretboard diagram.
Line properties
Right-click on a line and select Line Properties... There are settings for the beginning, end, or continuation of the line. You can add or remove text, adjust the text's placement, and set the length and angle of optional hooks. Click the ... button to access text properties for text included in the line. See Custom lines and line properties.
Measure properties
Right-click on an empty part of the measure and select Measure Properties... Adjust visibility, bar duration, repeats, stretch and numbering. See Measure properties.
Staff properties
Right-click either an empty part of a measure or the name of an instrument and select Staff Properties... This dialog allows you to adjust attributes of both the single staff and the instrument it is a part of. See Staff properties.
Text properties
Right click on a text-based element and select Text Properties... See Text styles and properties. If the element is a line with text in it, see → above.
Time signature properties
Right-click on a time signature and select Time Signature Properties... Used to adjust appearance of time sig. and beam properties of notes. See Time signatures.
See also
| 첨부 파일 | 파일 크기 |
|---|---|
| Note inspector.jpg | 67.14 KB |
| Staffproperties.jpg | 91.41 KB |
| Buttonstaffproperties.jpg | 1.03 KB |
| Staffproperties2ndaccess.jpg | 22.51 KB |
| View_en.png | 25.03 KB |
| Note inspector.png | 133.85 KB |
| Measure Properties 1.png | 53.21 KB |
| notes.png | 2.65 KB |
| inspector_select.png | 3.25 KB |
| Barline inspector.png | 10.85 KB |
| Measure Properties 2.png | 60.54 KB |
| inspector-top-bar.jpg | 3.08 KB |
| Previous_Next_Buttons.png | 7.36 KB |
| Staff_Properties_en.png | 30.14 KB |
| clef_inspector.png | 2.09 KB |
마디의 조작
추가
-
악보의 끝에 하나의 빈 마디를 추가하기 위해서는 Ctrl+B (Mac: ⌘+B)을 누르거나, 메뉴의 추가(Add) → 마디 (Measures) → 한 마디 추가 (Append One Measure)를 차례로 선택 합니다.
-
악보의 끝에 여러개의 빈 마디를 추가하기 위해서는 Alt+Shift+B (Mac: Option+Shift+B) 을 누르거나, 메뉴의 추가(Add) → 마디(Measures) → 마디 추가.. (Append Measures..). 를 선택한 후 표시되는 다이아로그에서 추가하고자 하는 마디수를 설정, OK를 클릭합니다.
삽입
-
악보에 마디 하나를 삽입하고자 할때에는 먼저 삽입위치의 마디를 선택한 다음 Ins 를 누르거나, 메뉴의 추가(Add) → 마디(Measures) → 마디하나삽입(Insert Measure)을 차례로 선택하면 처음에 선택했던 마디 앞에 하나의 마디가 삽입 됩니다.
-
악보에 여러 마디를 삽입하고자 할때에는 먼저 삽입위치의 마디를 선택한 다음 Ctrl+Ins 를 차례로 누르거나, 메뉴의 추가(Add) → 마디(Measures) → 마디삽입..(Insert Measures...)을 차례로 선택한 후 표시되는 다이아로그에 삽입할 마디수를 지정하면 됩니다.
삭제
-
하나의 마디를 삭제하고자 할때 먼저 삭제할 마디를 선택한 다음 Ctrl+Del (Mac: Cmd+Del)를 누릅니다.
-
여러 마디를 삭제하고자 할때에는 먼저 삭제할 처음 마디를 선택한 다음 Shift키를 누른 채 삭제할 마지막 마디를 클릭 합니다. 그 다음Shift 키를 떼고 Ctrl+Del (Mac: Cmd+Del)키를 누릅니다.
-
악보의 중간에서 부터 마지막까지 삭제하고자 할때 먼저 삭제할 처음 마디를 선택한 다음 Ctrl+Shift+End (Mac: Cmd+Shift+End)를 눌러 마지막 까지 범위를 정한 다음 Ctrl+Del (Mac: Cmd+Del)을 누릅니다.
-
악보의 처음부터 중간까지 삭제 하고자 할때에는 삭제할 마지막 마디를 선택한 다음 Ctrl+Shift+Home (Mac: Cmd+Shift+Home)를 눌러 삭제범위를 정한 다음 Ctrl+Del (Mac: Cmd+Del)를 누릅니다.
주 : 오선보에 여러파트가 존재할 경우 하나의 파트에 대한 삭제 조작이 이루어 지더라도 모든 파트의 해당 마디가 함께 삭제 됩니다.
속성
마디의 속성을 변경하고자 할때 마디의 빈 공간에서 오른쪽 클릭 한 후 마디속성..( Measure Properties...)을 선택 합니다:
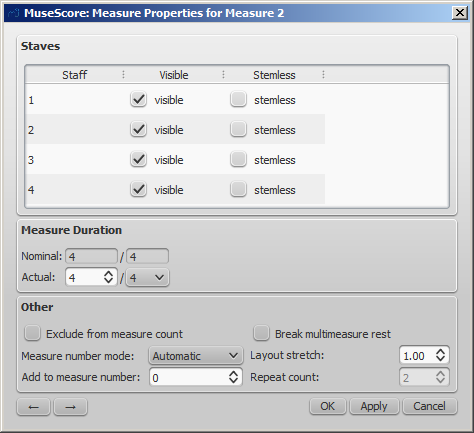
마디 속성 윈도우가 표시되었을때 아래쪽 부분의 화살표 키에 의해 이전 마디, 혹은 다음 마디의 속성을 편집할 수 있습니다.:  (주 : 표시 창이 변경되면 처음 선택한 마디가 아니라는 점에 주의하여 주십시요).
오선 보표
- 표시 ( visible ) 속성의 설정으로 마디의 음표와 오선보를 표시/비표시 를 지정 할 수 있습니다.
- 음표기둥( stemless) 속성의 설정으로 음표기둥의 표시/비표시 를 지정할 수 있습니다. 단 이 기능은 2분음표와 4분음표에 대해서만 적용됩니다.
마디의 길이
- 명목 Nominal 길이 (변경할 수 없습니다) 는 악보의 박자 기호와 같습니다.
- 실제 Actual 길이는 악보의 박자표에 관계없이 변경 가능 합니다.
일반적으로 명목 길이와 실제 길이는 별도로 구분됩니다. 마디의 실제 길이는 못갖춤 마디와 같이 정해진 박자보다 적거나, 죠인트 된 마디와 같이 긴 길이를 가질수 있습니다. ( 다음의 을 참조 바랍니다).
다음 그림에서는 4분음표의 여린박, 즉 못갖춘 마디로 시작 되므로 명목 길이는 4분음표 4개, 4/4 이지만 실제 길이는 1/4 가 됩니다. 가운데 두 마디는 명목, 실제 길이 모두 4/4 이며, 마지막 마디는 점2분음표로 끝나므로 실제 길이는 3/4가 됩니다.:

기타
-
마디 번호에서 제외
이 "마디수 제외 Exclude from measure count" 는 "불규칙적인" 마디에 적용 하며, 마디 번호를 부여할 때 계산에서 제외 됩니다. 통상 못갖춘 마디 등 에 "마디수 제외 Exclude from measure count" 기능을 사용합니다. -
마디 번호에 추가
이 "마디번호에 추가 Add to measure number" 옵션을 사용하면 마디번호에 영향을 주게되며 양수와 음수를 지정 함으로써 마디번호의 증감 효과를 얻게 됩니다. "-1" 을 지정함으로 마디번호 카운트에서 제외하는 효과를 얻을수 있습니다. -
간격 조정
이 기능은 기보 요소들 (음표나 쉼표 등)의 수평 간격을 넓히거나 좁힐 수 있습니다. This provides a more precise control over the exact same measure spacing property as the menu commands or keyboard shortcuts for Increase/Decrease Stretch ({ and }), which are accessed outside of the Measure Properties dialog while a measure is selected. -
Repeat count
If the measure is the last of a repeat, you can define how often it is played. -
Break multimeasure rests
This property will separate a multimeasure rest at the start of the selected measure. This option should be checked before you turn on the "Create multimeasure rests" option in Style → General..., in the "Score" tab.
Multimeasure rests are automatically broken at important breaks, such as rehearsal marks, time signature changes, double barlines, irregular measures, etc.
The default for scores is off, for parts is on.
Numbering
MuseScore automatically numbers the first measure of each System (except for the first system, actually except for a measure with the number 1), but more numbering options are possible. From the main menu, choose Style → General..., in the left pane, choose the "Header, Footer, Numbers" tab. At the bottom of the right pane is the "Measure Numbers" ("Bar Numbers") section.
Mark the checkbox next to the "Measure Numbers" ("Bar Numbers") to turn on automatic measure numbers.
Mark "Show first" if you want the first measure numbered.
Mark "All staves" if you want numbers on all staves. Otherwise, only the top staff of each system shows measure numbers.
Choose to show numbers on "Every system" which numbers the first measure of each line, or show numbers by "Interval" and specify the size of the interval. For example, an interval of 1 numbers every measure; an interval of 5 numbers every fifth measure.
나누기 와 합치기 (Split and join)
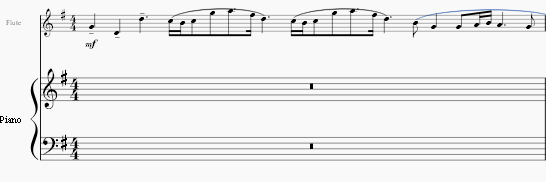
You may want have to have a longer or shorter measure without changing the time signature. You can change a measure's duration in Measure Properties, but there is now a new option to split or join measures. (Beams may be automatically modified.)
-
Join
- Select the measures you want to join
- Edit → Measure → Join Measures
Note: If you select measures on only one staff in a score with multiple staves, the same measures will be joined in each staff of the system.
-
Split
- Select a note (or chord)
- Edit → Measure → Split Measures
Note: If you select only one note from one staff, each staff of the system will be split at the same place.
함께 보기
Voices
A voice is a musical line or part which can have its own rhythm independently of other voices on the same staff. Voices are sometimes called "layers" in other notation software.
You can have up to 4 voices on each staff line. In a polyphonic measure, voice 1 usually takes the up-stem notes and voice 2 takes the down-stem notes.

N.B. Be careful not to confuse the concept of MuseScore voices (1, 2, 3, 4) with the order of voices found in vocal scores (SATB etc.). In particular, when creating a closed SATB score, use only (MuseScore) voices 1 and 2 for both upper and lower staves. There is no need to use (MuseScore) voices 3 and 4 unless there are more than two parts in the same staff.
When to use voices
- If you need stems pointing in opposite directions within a chord, on a single staff.
- If you need notes of different durations within a single staff, played simultaneously.
How to enter notes in different voices
The following instructions show you how to notate a passage of music in two voices:
-
Enter voice 1 notes first: Make sure you are in note input mode : the Voice 1 button becomes highlighted in blue in the toolbar. Enter the notes in the top voice first. When inputting, some notes may have down-stems, but these will flip automatically when the second voice is added.
The following excerpt shows a treble staff with just the voice 1 notes entered:

-
Move cursor back to start of section: When you have finished entering a section of voice 1 notes, press the ← key repeatedly to move the cursor, note-by-note, back to the first note of the section; or alternatively use Ctrl+← (Mac:Cmd+←) to move the cursor back one measure at a time. Or else you can simply exit note input mode (press Esc) and click directly on the first note.
-
Enter voice 2 notes: Make sure you are in note-input mode and that the voice 1 note at the beginning of the section is selected. Click on the "Voice 2" button
 (on the right of the toolbar), or use the shortcut Ctrl+Alt+2 (Mac: Cmd+Option+2). Enter all the lower voice notes (down-stem).
The following image shows the above example after the addition of voice 2 notes:

Deleting and hiding rests
All rests can be made invisible if required (select the rest and press V, or uncheck the "Visible" checkbox in the Inspector). Rests in voices 2, 3 or 4 can also be deleted but it is not usually recommended: make them invisible instead. Rests in voice 1 cannot be deleted.
Restoring deleted rests
If a rest has been deleted in voices 2-4, you will need to restore it before you can enter a note on that beat in that voice (the problem may arise, for example, in imported XML or MIDI files). The easiest way to fix such a measure is to exchange that voice with voice 1 twice. For the exact method, see Exchange voices of notes (below).
Exchange voices of notes
To swap the notes between any two voices:
- Select one or more continuous measures (or a range of notes);
- From the Menu bar, select Edit → Voices;
- Select the option for the two voices you want to exchange.
Notes: (a) The selection can encompass content of any voice, but only two will be processed at once. (b) If you select a partial measure the operation will still apply to the whole measure.
Move notes to another voice (without swapping)
You can also move notes from one voice to another (without note-swapping):
- Ensure you are not in note input mode.
- Select one or more noteheads (in any voice).
- Click on the destination voice in the Note Input toolbar or use the shortcut Ctrl+Alt+1–4 (Mac: Cmd+Option+1-4).
Note: For a successful move, the following conditions need to be met:
- The chord in the destination voice must be the same duration as the note to be moved there.
- Alternatively, if the destination voice is occupied by a rest, it must be of sufficient duration to accommodate the moved note.
- Notes should not be tied.
See also
External links
Selection modes
Objects in the score—such as notes, measures, articulations etc.—can be selected in several ways: (1) one at a time, (2) as a continuous range, or (3) as a list.
Select a single object
Most score objects can be selected by simply clicking on them in "normal" (i.e. not note-input) mode.
Select a single note
- Make sure you are not in note input mode;
- Click on a note.
Note: Selecting a single note then copying and pasting it, will only copy and paste the pitch—not duration or other properties (such as stemless). To copy the entire note, including all properties, you need to hold down Shift—as for chord selection (below).
Select a chord
- Make sure you are not in note input mode;
- Press and hold Shift, then click on a note in the chord.
Select a single measure
- Click on a blank space within the measure.
Note: To select a range of consecutive measures, see Shift selection and Shift + click selection (below).
Select a continuous range of objects
There are several ways to select a continuous range of notes, chords or measures:
1. Shift selection
- Make sure you are not in note entry mode;
- Select the first note, chord, rest or measure in the range. You can extend the selection up or down to adjacent staves, if needed, using Shift+↑ or ↓;
- Then choose one of the following options:
- To advance the selection one chord at a time to the right: Press Shift+→.
- To advance the selection one chord at a time to the left: Press Shift+←.
- To advance the selection one measure at a time to the right: Press Shift+Ctrl+→ (Mac: Shift+Cmd+→).
- To advance the selection one measure at a time to the left: Press Shift+Ctrl+← (Mac: Shift+Cmd+←).
- To advance the selection to the beginning of the line: Press Shift+Home (Mac: Shift+Fn+←).
- To advance the selection to the end of the line: Press Shift+End (Mac: Shift+Fn+→).
- To extend the selection to the beginning of the score: Press Shift+Ctrl+Home (Mac: Shift+Cmd+Fn+←).
- To extend the selection to the end of the score: Press Shift+Ctrl+End (Mac: Shift+Cmd+Fn+→).
2. Shift + click selection
To select a range of notes or rests:
- Make sure you are not in note entry mode;
- Click on the first note or rest in the range;
- Press and hold Shift, then click on the last desired note or rest.
Note: The final selected element can be in the same staff or in staffs above or below the initial note/rest. All selected elements will be enclosed in a blue rectangle, including associated lines and articulations (but not voltas). You can repeat the operation to extend the selected range as required.
Select a range of measures
- Click on a blank space in the first desired measure;
- Hold down Shift, then click on a space in the last measure of the desired range.
Note: As with selecting notes, the range can be extended vertically as well as horizontally.
3. Drag selection
This method can be used to select notes or rests, or, independently, to select non-note symbols such as staccato dots, lyrics etc.:
- Press and hold Shift, then drag the cursor across the desired range.
4. Select All
This method selects the whole musical score including notes, rests and associated elements. Use one of the following options:
- Press Ctrl+A (Mac: Cmd+A).
- From the menu bar, select Edit → Select All.
5. Select section
This method is used to select a section—a region of the score starting and/or ending with a section break:
- Click on an empty space in a measure in the section;
- From the menu bar, select Edit → Select Section.
Note: See Copy and paste: Selection filter to disable certain types of elements from being selected in a range selection.
Select a list of objects
To select a list (or discontinuous range) of score elements:
- Click on the first element;
- Hold down Ctrl (Mac: Cmd) and successively click on the desired additional elements.
Note: This method cannot be used to select measures. Use single or range selection instead.
Select all similar
To select all elements of a specific type (e.g., all barlines, all text elements, all staccato markings):
- Select an element;
- Right click and chose Select…;
-
Several options are available:
- All Similar Elements: Selects all elements in the score similar to the chosen object.
- All Similar Elements in Same Staff: Selects all elements in the same staff similar to the chosen object.
- All Similar Elements in Range Selection: only applies if a range has been selected. Selects all elements in the range similar to the chosen object.
- More...: opens a dialog that lets you fine-tune more options. For example, if you have a notehead selected, the dialog will look something like this (as of version 2.1—previous versions had fewer options):
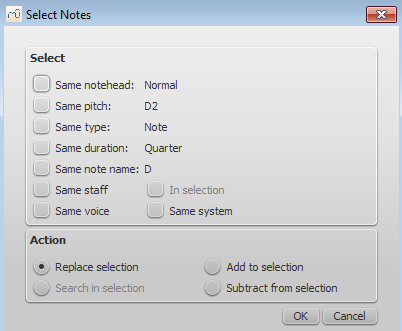
Select
- Same notehead: In this example, only noteheads of the same group will be selected;
- Same pitch: Only noteheads of the same pitch will be selected;
- Same type: All noteheads (of any group) will be selected;
- Same duration: Only noteheads of same duration will be selected;
- Same note name: Noteheads of that name in all octaves will be selected;
- Same staff: Only noteheads on the same staff will be selected.
Action
- Replace selection: The default option: starts the selection from scratch;
- Add to selection: Keeps everything you have already selected, and adds the current selection to it;
- Search in selection:
- Subtract from selection: Keep everything you have already selected, but takes away the current selection.
What selections are useful for
See also
- Basics chapter, esp. Note input
- Notation chapter, esp. Accidental
- Text chapter, esp. Text editing and Grid-based movement of symbols and staff text
Viewing and navigation
This chapter describes the options available in the View Menu, and in the Zoom and Page View/Continuous View menus (located in the toolbar above the score). It also details the various navigation commands and functions.
View menu
Show sidebars/panels
- Start center: F4
- Palettes: F9
- Master palette: Shift+F9
- Inspector: F8
- Play Panel: F11
- Navigator: F12
- Mixer: F10
- Synthesizer
- Selection filter: F6
- Piano keyboard: P
Zoom in/out
There are several ways to zoom the score in or out:
-
Keyboard shortcut:
- Zoom In: Ctrl++ (Mac: Cmd ++)
- Zoom Out: Ctrl +- (Mac: Cmd +-).
-
View menu:
- Zoom In: View→Zoom In
- Zoom Out: View→Zoom Out.
-
Mouse
- Zoom In: Scroll up with the mouse wheel while holding down Ctrl (Mac: Cmd)
- Zoom Out: Scroll down with the mouse wheel while holding down Ctrl (Mac: Cmd).
-
Drop-down menu: To set a specific zoom, use the dropdown menu in the standard toolbar to set the view magnification of the score (25–1600 %) or display it using the options "Page Width", "Whole Page", or "Two Pages".
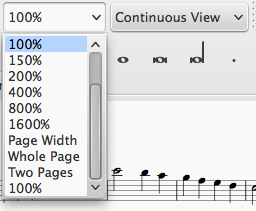
-
To return to 100% zoom: Use the shortcut Ctrl+0 (Mac: Cmd+0).
Toolbars (display)
As of MuseScore 2.1, this menu option allows you to hide or display the toolbars above the document window: File Operations, Playback Controls, Concert Pitch, Image Capture, Note Input (see Toolbars below).
Show Status bar
The Status bar, at the bottom of the screen, gives information about selected score elements. Tick/untick this option to display or hide.
Split display
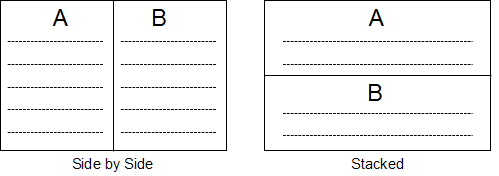
It is possible to split the document display so as to view two documents at once, or to view two different parts of the same document. Tabs allow you to choose which document to display in each view. You can drag the barrier separating the two scores to adjust the amount of space in the window devoted to each:
- Documents Side by Side: Divides the window vertically into two score views.
- Documents Stacked: Divides the window horizontally into two score views, one above the other.
Visibility options
This section allows you to display or hide various non-printing elements:
- Show Invisible: View/hide elements that have been made invisible for printing and export. If this option is ticked, invisible elements are shown in the score window as light gray.
- Show Unprintable: View/hide breaks and spacer symbols.
- Show Frames: View/hide the dotted outlines of frames.
- Show Page Margins: View/hide Page Margins.
Full screen
Full Screen mode expands MuseScore to fill your screen so more content is visible.
Page/Continuous View
You can switch between two different views of the score using the drop-down list in the toolbar area:
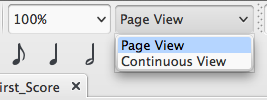
To scroll the score:
- Vertically: Move the mouse wheel up or down.
- Horizontally: Press Shift and move the mouse wheel up or down.
Page View
In Page View, the score is formatted as it will appear when printed or exported as a PDF or image file: that is, page by page, with margins. MuseScore applies system (line) and page breaks automatically, according to the settings made in Page settings and Style: General. In addition, you can apply your own system (line), page or section breaks.
To choose between horizontal or vertical page scrolling, see Preferences: Canvas (Scroll pages).
Continuous View
In Continuous View, the score is shown as one unbroken system. Even if the starting point is not in view, measure numbers, instrument names, clefs, time and key signatures will always be displayed on the left of the window.

Note: Because the layout is simpler, MuseScore may perform faster in Continuous View than Page View.
Toolbars

The Toolbar area is located between the Menu bar and document window. It contains symbols which allow you to perform certain operations. It can be divided into the following toolbars:
- File Operations: New score, Load score, Save, Print, Undo, Redo.
- Zoom/Page View.
- Playback controls: Enable MIDI, Rewind, Play/Stop, Loop, Play Repeats, Metronome.
- Concert Pitch: Displays score in written or concert (sounding) pitch.
- Image Capture: Allows you to take a snapshot of part of the score.
- Note Input: Note entry mode, Duration, Tie, Rest, Accidentals, Flip stem direction, Voice (1, 2, 3, 4).
To choose which toolbars to display, right-click on an empty space in the toolbar area (or on the title bar of the Inspector) and, from the menu, check or uncheck the required options. This menu also allows you to view or hide the Piano keyboard, Selection sidebar, Palettes, the Inspector, and (if already displayed) the "Drum Tools" (i.e. Drum input palette).
These display options can also be accessed in the View menu, and, as of 2.1, in View→Toolbars.
Side panels
The workspaces, Inspector and Selection filter are conveniently displayed as side panels to the left and right of the score window. To undock a side panel use one of the following methods:
- Drag the panel;
- Click on the double chevron at the top of the panel;
- Double click in the title area at the top of the panel.
To dock a panel use one of the following procedures:
- Drag the panel to the top/bottom of an existing side panel and it will stack vertically above/below that panel.
- Drag the panel to the middle of an existing side panel and it will overlay that panel. Both panels can then be accessed by tabs.
Alternatively, double-clicking the title bar of the panel will restore it to its previously docked position.
Navigation
There are various commands available to help you navigate through the score. These are listed under Keyboard shortcuts: Navigation.
Navigator
The Navigator is an optional panel which allows you to navigate a long score more easily, or go to specific pages. To view/hide, go to the View→Navigator, or use the shortcut F12 (Mac: fn+F12). It appears at the bottom of the document window if scrolling pages horizontally, or on the right-hand side of the document window if scrolling pages vertically (see Preferences: Canvas).

The blue box represents the area of the score that is currently visible in the main window. You can drag either the blue box or the scroll bar, or click on an area to immediately go to it.
Find
The Find function allows you to speedily navigate to a specific measure, rehearsal mark or page number in the score:
- Press Ctrl+F (Mac: Cmd+F), or select Edit→Find. This opens the Find (or Go to) bar at the bottom of the workspace.
-
Use one of the following options:
- To go to a numbered measure: enter the measure number (counting every measure, starting with 1, irrespective of pickup measures, section breaks or manual changes to measure number offsets).
- To go to a numbered page: enter the page number using the format pXX (where XX is the page number).
- To go to a numerical rehearsal mark: enter the number using the format rXX (where XX is the name of the rehearsal mark (as of version 2.1).
- To go to a rehearsal mark starting with a letter: enter the name of the rehearsal mark (the search is case insensitive).
N.B.: It is best to avoid naming rehearsal marks with the single letters "R," "r," "P", "p," or one of these letters with an integer (e.g. "R1" or "p3"), as this can confuse the search algorithm.
See also
복사하기와 붙여넣기
복사하기와 붙여넣기는 음표나 마디가 반복될때 유용하게 사용할 수 있습니다. 복사할 대상을 선택하기 전에 Esc 키를 눌러서 note input mode(음표입력 모드) 를 해제 합니다.
복사
- 복사할 첫번째 음표를 Click 하여 선택하기 시작 합니다.
- 다음에는 Shift+Click , 즉 Shift 키를 누른 상태에서 복사할 대상의 마지막 음표를 클릭 합니다. 그러면 파란 사각형으로 모든 대상 음표들이 지정 됩니다.
- 메뉴에서 Edit(편집) → Copy(복사) 를 선택하시거나 단축키인 Ctrl+C (Mac: ⌘+C) 를 누르면 복사 됩니다.
붙여넣기
- 붙여넣기를 시작할 음표나 마디를 Click 합니다.
- 메뉴의 Edit(편집) → Paste(붙여넣기) 를 선택 하시거나 단축키인 Ctrl+V (Mac: ⌘+V) 를 누르면 붙여넣기가 됩니다.
보다 빠른 반복
반복되는 마디 또는 음표의 경우 다음 과정으로 보다 빠르게 수행 됩니다:
- 음표, 마디, 다수의 음표들을 위의 복사과정과 같이 선택 합니다. 위에 설명.
- 키보드의 R 을 누르면 선택된 부분이 반복되어 입력 됩니다.
복제하기
텍스트나 선, 기타 요소들을 즉시 복사하여 붙여넣기를 하려면 다음 절차에 따릅니다.:
- 키보드의 Ctrl+Shift (Mac: ⌘+Shift)를 누르고 있는 상태에서, 요소들을 클릭 하여 악보의 어느곳이건 드래그 하시면 됩니다. .
- 마우스 버튼을 떼면 똑같은 요소들이 새로운 장소에 복사됩니다.
선택시의 필터
뮤즈스코어는 필터를 사용할 수 있어서 복사할 요소들을 선택하기 전에 어떤 속성들을 복사하여 붙여 넣을 것인가 선택할 수 있습니다.
- 선택의 필터를 사용하시려면 키보드 F6 (Mac: fn+F6) 를 누르거나 메뉴의 View(보기) → Selection Filter(선택 필터)를 여시면 됩니다.
이 필터들은 파렛트와 같은 모양으로 고정되지 않은, 움직이는 창으로 표시 됩니다. 또한 이 움직이는 창을 파렛트나 Inspector위로 드래그 하시면 파렛트 (또는 Inspector)와 같은 공간안에서 아래쪽의 탭으로 접근할 수 있습니다.
-
복사하지 않을 속성들에 대한 체크박스의 체크를 해제 합니다.
예제 : Articulations 와 이음줄이 체크되지 않았습니다.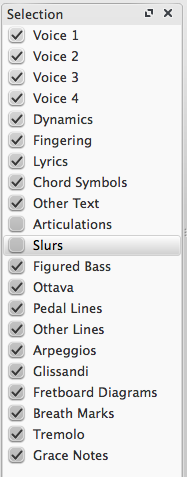
-
전에 설명 하였듯이 복사 및 붙여넣기를 합니다.
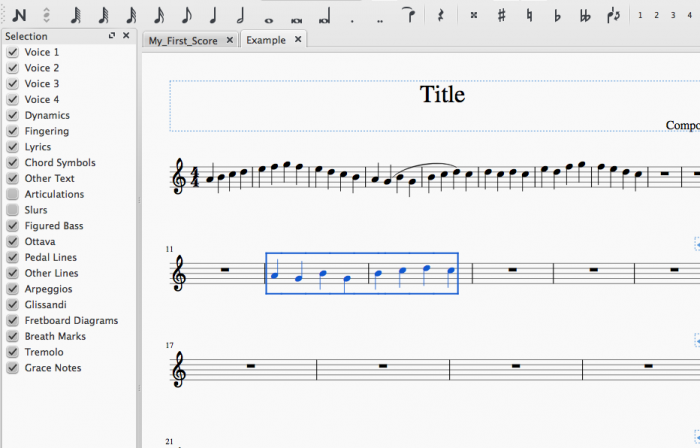
(이 예에서는 4번, 5번 마디를 복사하여 12번, 13번 마디에 붙여넣었습니다) -
결과를 보시면 — 이음줄은 복사되지 않았습니다:
함께보기
만일 리듬의 변화 없이 음표만을 변경하고자 하시면 transposition 또는 re-pitch mode 를 복사, 붙여넣기에 함께 사용하시기 바랍니다.
외부 링크
Open/Save/Export/Print
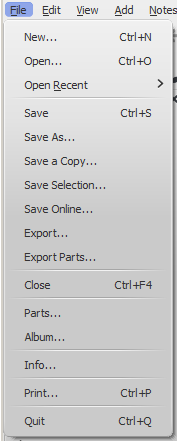
In the File menu you can find the following options:
- Open, Open recent.
- Save, Save As..., Save a Copy..., Save Selection..., Save Online...
- Export..., Export Parts...
-
Open
Apart from native format files (*.mscz and *.mscx), MuseScore can also open MusicXML, compressed MusicXML and MIDI files, as well as a variety of files in other formats.
To open any supported file:
- Chose one of the following options:
- Press Ctrl+O.
- Click on the "Load score" icon on the left side of the toolbar area.
- From the menu bar, select File→Open....
- Select a file and click Open; or simply double-click a file.
Open recent… allows you to chose from a list of recently-opened scores.
Save
Save…, Save As…, Save a Copy… and Save Selection… allow you to save native MuseScore files (.mscz and .mscx).
- Save...: Save current score to file.
- Save As...: Save current score to new file.
- Save a Copy...: Save current score to new file, but continue to edit original file.
- Save Selection...: Save selected measures to new file. In MuseScore versions earlier than 2.1, to ensure that the file is saved correctly, the time signature needs to be displayed in the first measure of the selected passage, unless it is 4/4.
- Save Online...: To save and share your scores on the web at MuseScore.com. For details, see Share scores online.
Export
Export... and Export Parts... allow you to create non-MuseScore files, such as PDF, MusicXML, MIDI, and various audio and image formats. In the Export dialog, you can choose which format to export to:
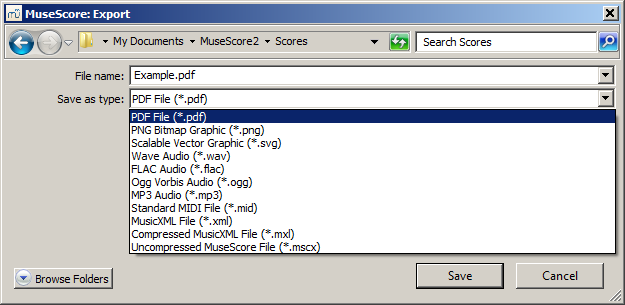
- Export...: Export current score to format of your choice.
- Export Parts...: Export current score and all linked parts to separate files in a format of your choice.
MuseScore remembers which format you picked the last time and makes that the default for the next time. Note: There is a known issue with Windows XP and Vista, where you have to manually (un)set the filename's extension when choosing a different format than the one selected the previous time.
Print... allows to print your MuseScore file directly to a printer from MuseScore. Depending on your printer you will have different options, but generally you can define the page range, number of copies and collation.
If you have a PDF printer installed, you could also "export" to PDF using Print, but it's usually better to use the native PDF option under Export for more accurate rendition. Note: For this to work properly with Adobe PDF, make sure to uncheck "Rely on system fonts only, do not use document fonts" in Printer properties.
See also
실행취소와 다시실행(Undo, Redo)
MuseScore는 실행 취소 / 다시 실행 작업을 무제한으로 기억합니다.
기본적인 단축키는:
- 실행취소 Ctrl+Z (Mac: ⌘+Z)
- 다시실행 Ctrl+Shift+Z or Ctrl+Y (Mac: ⌘+Shift+Z)
또는 도구창에있는 버튼을 사용하세요: 
Share scores online
Go to musescore.com/sheetmusic to view other scores from MuseScore.
You can save and share your scores online at MuseScore.com. You can choose to save a score privately for personal access from any computer, or share it publicly. MuseScore.com enables the viewing and playback of scores in your web browser - an additional feature entitled VideoScores allows synchronization between the score and a YouTube video. For use outside of a web browser, you can download the score in a variety of formats (including PDF, MIDI, MP3, MusicXML, and the original MuseScore file).
Create an account
- Visit MuseScore.com and click on "Create new account". Pick a username and enter a valid email and press "Create New Account".
- Wait a few minutes for an email from MuseScore.com support. If no email arrives, check your spam folder.
- Click the link in the email and visit your user profile to change your password.
Share a score directly from MuseScore
To save a score online:
- Make sure that the Concert Pitch button is off, and that the individual parts are correctly transposed.
-
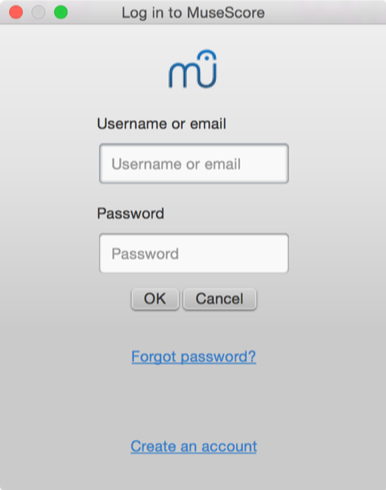
From the menu, select File→Save Online.... The "Log in to MuseScore" dialog will appear:
-
Enter your email address or MuseScore username, and password, then click OK. Note: If you don't have a MuseScore account yet, create one first by clicking on the "Create an account" link. That will open your browser app and bring you to musescore.com/user/register.
-
Upon successfully logging in, you'll be able to enter your score information.
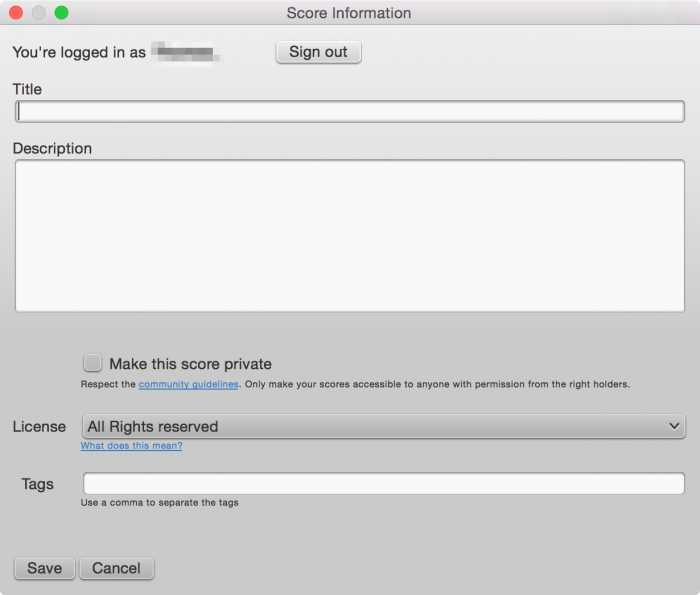
- Title: The title of the score.
- Description: The descriptive text that will appear next to it.
- Make the score private: If ticked, the score can only be viewed via a private link. If unticked, the score is visble to all.
- License: Chose an appropriate copyright license from the drop-down list. Note: Creative Commons license, allows people to use your scores under certain restrictions.
- Tags: You can add tags to help identify scores on MuseScore.com. Use commas to separate multiple tags.
-
In case you already saved the score online earlier, it will automatically update the existing one, and, as of version 2.1, you can enter some additional information in a changlog section of the dialog, which you can then retrieve on MuseScore.com under "Revision history" for that score. Uncheck Update the existing score to save online as a new score.

-
(As of version 2.1) If you are using a different SoundFont than the default one and if you are able to export MP3 files, a checkbox Upload score audio will be visible:

If the checkbox is checked, MuseScore will render the audio of the score using the current synthesizer settings and upload the audio to MuseScore.com.
Upload a score on MuseScore.com
You can also upload a score directly on MuseScore.com.
- Click the Upload link on MuseScore.com.
- You have the same options as with the Save Online menu.
- You have also access to more information, such as Genre.
Note: Should you reach the five score upload limit, you can still upload scores directly from MuseScore, but only the last five are visible. If you wish more than this amount, upgrade to a Pro Account first.
Edit a score on MuseScore.com
If you want to make changes to one of your scores on MuseScore.com, edit the MuseScore file on your own computer, save it, and then do the following:
- If you originally shared the score directly from within MuseScore, simply go to File→Save Online... again to update the online score.
- If you originally uploaded the score via the Upload page on MuseScore.com, then you must follow these steps to update the online score:
- Go to the score page on MuseScore.com.
- Click the three dots menu ⋮ on the right and choose "Update this score".
- In the form, you can upload a replacement score file as well as change the accompanying information and privacy settings.
Switch to the direct method of updating an online score
It is much more convenient to update online scores from directly within MuseScore than by updating the score manually from the score page. Follow these steps if you originally uploaded the score via the Upload page and now want to switch to the direct method:
- Go to the score page on MuseScore.com and copy the URL.
- Open the score file on your computer with MuseScore.
- From the menu, select File→Score Properties... and paste the URL into the "Source" field.
Now whenever you want to update the online score simply go to File→Save Online....
External links
콘서트 피치
도구모음의 오른쪽에 있는 콘서트 피치 버튼은 각 오선보에 있는 이조 악기의 음표 표시를, 쓰여진 음표와 실제 소리의 음표 간 표시를 바꾸어 줍니다. 이 기능은 이조 악기 들 에게 필요하며 이조 악기들은 표시된 음표의 피치(음정)가 실제 소리나는 음정과 다르므로 이 표시의 전환을 해줍니다. 이 기능을 사용하면 조표와 음자리표가 악기에 따라 바뀌어 표시되는 경우가 있습니다.
주의: 인쇄하기 전에 이조악기의 오선보가 포함되어 있다면 이 콘서트 피치 모드를 OFF로 설정하시기 바랍니다. 그렇지 않으면 올바른 조 의 연주가 불가능해 집니다.
함께 보기
외부 링크
- Concert pitch or not?? (포럼 토론)