Lyrics
Enter a lyrics line
First line
- Enter the notes of the melody line;
- Select the note where you want to start entering lyrics;
- To enter lyrics mode, type Ctrl+L (Mac: Cmd+L); or from the main menu, select Add→Text→Lyrics;
- Type a syllable;
- Use the following options to continue entering lyrics:
- Go to the next syllable: Press Space (or Ctrl+→ (Mac: Alt+→)) at the end of a syllable.
- Hyphen (to connect syllables): Press - at the end of a syllable.
- Go to the previous syllable: Press Shift+Space (or Ctrl+← (Mac: Alt+←)).
- Move left: Press ← (left arrow). If the cursor is at the beginning of a syllable, it will jump to the previous one.
- Move right: Press → (right arrow). If the cursor is at the end of a syllable, it will jump to the next one.
- Move to the syllable below: Press ↓ (down arrow).
- Move to the syllable above: Press ↑ (up arrow).
- Start new lyrics line: Press ↵ (Return) at the end of an existing lyrics syllable (Note: Don't use the Enter key from the numeric keypad!).
- To exit lyrics mode, press Esc or click outside of the text box.
Subsequent lines
If you want to add another lyrics line to an existing one (e.g. a 2nd or 3rd verse etc.):
- Choose one of the following options:
- Select the note where you want to start the new lyrics line. Enter lyrics mode as shown in step 3 (above). The cursor moves to a new (blank) line.
- Enter text edit mode on an existing syllable, go to the end of the syllable and press ↵ (Return). The cursor moves to the next line.
- Continue entering lyrics from step 4 (above).
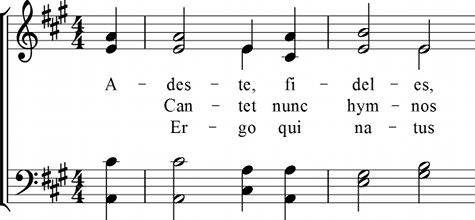
Example:

Special characters
In most cases, lyrics can be edited just like normal text. However, special keyboard shortcuts are required to enter the following characters:
-
Space character: Ctrl+Space (Mac: Alt+Space).
-
- (hyphen): Ctrl+- (Mac: Alt+-).
-
_ (underscore): Ctrl+Shift+_ (Mac: Alt+Shift_).
-
Line feed: Ctrl+↵ (Mac: Alt+Return) or Enter (from the numeric keypad).
Verse numbers
To number verses, simply type the number (e.g. 1.) and a space before the first syllable. MuseScore will automatically align the numbers and first syllable correctly.
Melisma
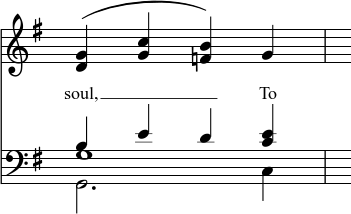
A melisma is a syllable or word that extends over two or more notes. It is indicated by an underline extending from the base of a syllable to the last note of the melisma. The underline is created by positioning the cursor at the end of a syllable and pressing Shift+_: once for each note in the melisma. See the image below:

The above lyric was created in the following manner:
- Type the letters, soul,.
- At the end of the word, press Shift+___.
- Type the letters To, then press Esc.
For non-last syllables to extend, just use additional dashes -, usually only one of them will show (more when the distance between the syllables is large enough), and the syllable will right-align to the first note, similar to last syllables that got notated with a melisma, see above.
Elision (Lyric) slur / Synalepha
Two syllables under a note can be joined with an elision slur, also known as a "lyric slur" or "synalepha". For example:

To create the example lyric text, starting with the syllable text "te":
- Type te;
- Click on the keyboard icon
 in the bottom-left corner of the screen, or press F2 to open the Special Characters palette;
 -
Use one of the following options:
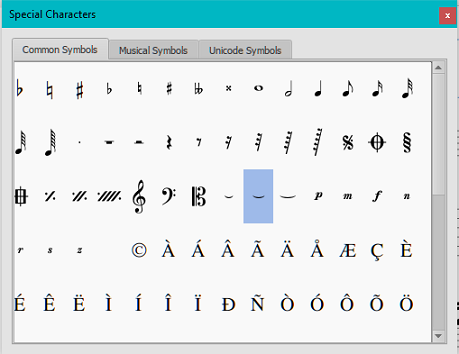
- Double-click one of the three elision slurs in the "Common Symbols" tab: "Narrow elision", "Elision", or "Wide elision" (these can be found between the "C Clef" and the "p" dynamic—see image below):

- Double-click the elision slur found after the 7/8 fraction in the "Common Symbols" tab (next to last character in the image above). Depending on the font, add one or more spaces before/after the slur using Ctrl+Space (Mac: Alt+Space).
Note: Not all fonts include the "undertie" character (U+203F ‿ "undertie", present in "Special Characters" mainly for compatibility with MuseScore 1.x scores). To find out which fonts on your computer support it, see "fontlist" (look for any font that shows a tie between "te" and "A" instead of a blank rectangle).
- Double-click one of the three elision slurs in the "Common Symbols" tab: "Narrow elision", "Elision", or "Wide elision" (these can be found between the "C Clef" and the "p" dynamic—see image below):
-
Type A.
As of 3.6: Ctrl+Alt+- or AltGr+- (Mac: Cmd+Alt+-).
Edit Lyrics
- Enter text edit mode on an existing syllable;
- Use standard text editing commands to make changes;
- Continue entering lyrics (see above); or exit lyrics mode by pressing Esc.
Copy lyrics to clipboard
To copy all lyrics to the clipboard:
- From the menu bar, select Tools→Copy Lyrics to Clipboard.
Paste lyrics from clipboard
To copy and paste lyrics from a text file (say) into a score:
- Enter the notes in the score to which the lyrics will be attached.
- Set up your lyrics in a text file, with appropriate spaces, hyphens, line-breaks etc.
- Copy the lyrics from the text-file into the clipboard.
- Select the start note in MuseScore, and press Ctrl+L (Mac: Cmd+L) (step 3 under Enter lyrics in a score).
- Repeatedly applying paste will enter successive words of the lyrics. You may need to enter melismas and make other corrections as you go along.
Adjust settings of lyrics
To edit selected lyrics object(s) on a score:
- Select object(s), see Selection modes.
- Edit properties in the Inspector as required.
Note: in Musescore 3.6.2, the Minimum distance property for lyrics objects is not implemented, see patch file by upx on https://musescore.org/en/node/357739#comment-1218262
To edit default setting, edit the style profile, see https://musescore.org/en/handbook/3/layout-and-formatting#concept2 and https://musescore.org/en/handbook/3/text-styles-and-properties
- "Style for lyrics objects" Format→Style→Lyrics
- "Style for text inside staff text" Format→Style→TextStyles→Staff
- "Style for text inside lyrics odd lines" Format→Style→TextStyles→Lyrics odd lines
- "Style for text inside lyrics even lines" Format→Style→TextStyles→Lyrics even lines
Layout settings are culminative
Adjust the vertical position of lyrics at the same line (same vertical position on a page)
All lyrics at the same line (same vertical position on a page) are in the same system (layout concept), see Layout and formatting chapter. To select them, see Selection mode : Select All similar chapter. Check Same system option in the selection window. To assign one value to all of them, enter a new value in the X and Y offsets property in the Inspector.
See also
External links
- How to insert Lyrics (MuseScore HowTo)
- How to move lyrics (MuseScore HowTo)
- How to add a block of text to a score (MuseScore HowTo)
- How to copy lyrics, or lyrics with rhythm (MuseScore HowTo)
- How to add lyrics in columns (MuseScore HowTo)
- Video tutorial: MuseScore in Minutes: Lesson 6 - Text, Lyrics and Chords