Basics
Setting up your score
Overview
To create a new score, use one of the following options:
- In the Home→Scores tab, select New score, or click New (bottom right)
- From the menu, select File→New
- Use the keyboard shortcut, Ctrl+N (Mac: Cmd+N)
This will open the New Score dialog (more instructions about this dialog are below). Once you've finished setting up your score, it will be visible in the Score tab.
Instruments
When creating a new score, you can either choose instruments yourself or use a template that comes pre-configured with appropriate instruments (these can always be changed later).
Choose instruments
In the New Score dialog, make sure the Choose instruments tab is selected.
MuseScore contains over 500 instruments. Instruments are grouped into categories, and categories are organized into families. If you know what you’re looking for, you can type an instrument's name into the search bar. Alternatively, you can browse instruments by group from the Family dropdown menu.
Adding instruments
To add an instrument to your score:
- Double-click on an instrument name, or
- Click on the instrument name to select it, then click the → button
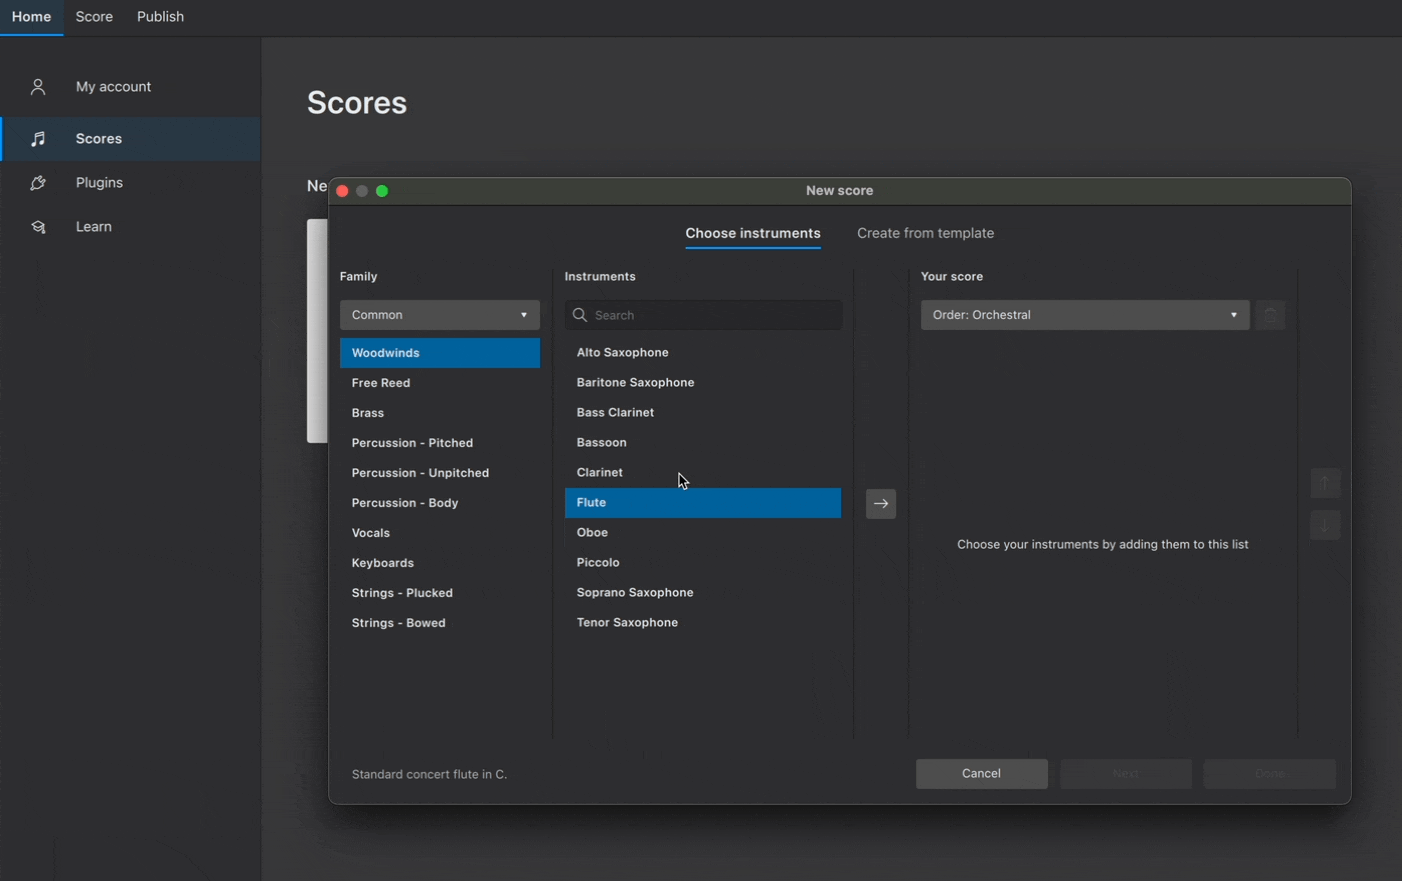
Instruments are automatically arranged according to the order shown in the dropdown menu under Your Score. From this menu, you can choose from a range of standard score configurations.
Changing order of instruments
To manually change the order of instruments:
- Select an instrument in the Your Score panel
- Click on ↑ or ↓ to change its position
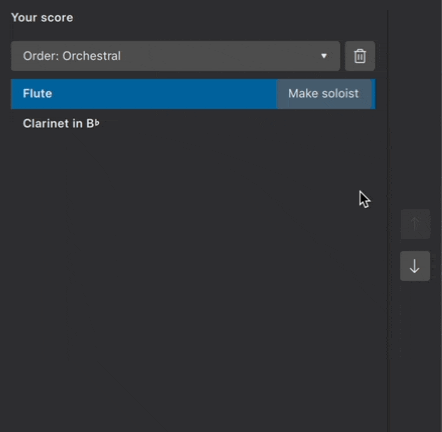
Removing instruments
To delete an instrument from your score:
- Select an instrument in the Your Score panel
- Click the trash can button

You can also delete multiple instruments at once by first holding down Shift and selecting multiple instruments, then clicking the trash can button.
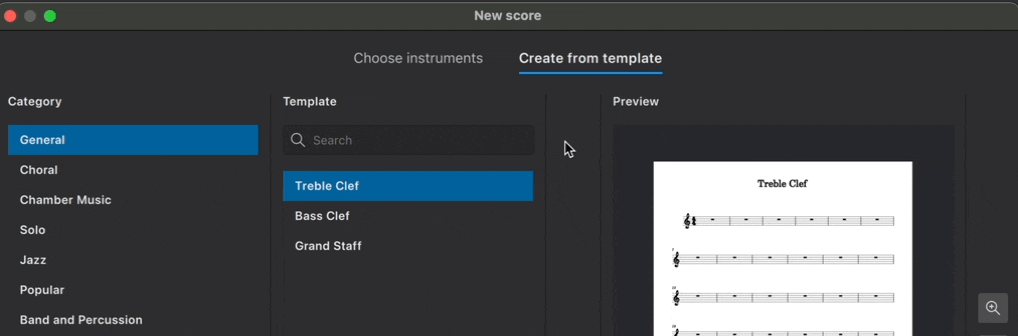
Create from template
Scores can also be created from pre-configured templates.
Templates are organized into categories based on musical style or ensemble configuration. Each template contains the instruments most commonly required for a particular type of score. Instruments are ordered and styled according to conventional practice.
To create a score from a template:
- Click Create from template
- Select a group of templates from the Category panel
- Choose your desired template from the center panel
- Click Done
You can also search across all available templates in the search bar.
Visit Templates and styles to learn more templates, including how to create your own for future use.
Additional score information
Click Next in the New score dialog to specify additional information about your score.
Key signature
By default, new scores are created with a key signature containing no sharps or flats (C major). Specify a different key signature by clicking the button under Key signature. Major keys are shown first; minor keys can be displayed by selecting the Minor tab.
Time signature
New scores are created in 4/4 by default. Change this by clicking the button under Time signature. Change the number of beats per bar using the arrows in the spin box, and change the beat quality from the dropdown menu. You can also select common and cut-common (alla-breve) time signatures in this popup.
Tempo
By default, new scores will play at a tempo of quarter note (crotchet) = 120 beats per minute (bpm). Metronome markings are not automatically included in new scores.
To customize the starting playback tempo, and to show a metronome marking above the uppermost stave:
- Click the button under Tempo
- Tick Show tempo marking on my score
- Select the desired beat value
- Enter the desired number of beats per minute in the text field (or use the up and down arrows to scroll through the tempo range)
Learn more about tempo text indications, metronome markings, and playback speed in tempo markings.
Measures
New scores are created with 32 measures and no pickup (anacrusis). To change the starting number of measures in your new score:
- Click the button under Measures
- Enter the desired number of measures in the Initial number of measures field
Learn more about Adding and removing measures at any time after score creation.
To start your score with a pickup:
- Click the button under Measures
- Tick Create pickup measure
- Enter the desired number of beats for the pickup in the text field
- Select the metrical value of the pickup measure from the drop-down menu
You can always create a pickup later. Learn how to do this in Pickup and non-metered measures.
Title and other text
Enter text in the fields at the bottom of the New score dialog, and MuseScore will automatically place it in an appropriate format in your new score. You can enter text labels for the score's:
- Title
- Composer
- Subtitle
- Lyricist
- Copyright
This information gets saved to the score's project properties, which you can change at any time.
Once you've finished specifying additional score information, click Done to confirm your selections and create your score.
Changing instruments after score creation
There are three ways to change existing score instruments:
- Use the keyboard shortcut I while in the Score tab
- Click Add from the Instruments panel (If this panel is not yet visible, press F7, or select View → Instruments)
- Click Replace instrument in the Staff/Part properties dialog
Entering notes and rests
This page explains music creation on standard staves only. See also the tablature and percussion pages.
Overview
To enter a note or rest, simply choose a duration in the toolbar, then type the pitch name (A–G) for a note or a 0 (zero) for a rest. MuseScore Studio supports inputting music via the computer keyboard, mouse, a MIDI keyboard, or MuseScore's own virtual piano keyboard.
MuseScore supports virtually unlimited undo history, so you don't have to worry about making mistakes. Just click the undo button on the far right of the toolbar, or use the standard keyboard shortcut Ctrl+Z (Mac: Cmd+Z).
Entering notes
This chapter explains the default input mode, step-time, where notes and rests are entered one at a time. For other modes of entry, see Alternative note input methods.
Selecting a start point
To add a note or rest to the score, start by selecting a location to begin entry. You can use the mouse or the keyboard navigation commands.

Entering note input mode
Next, enter note input mode by pressing the pencil icon in the toolbar, or using the keyboard shortcut N. The note input cursor appears, indicating where the next note will be added in the score.

If you don't select a starting location first, MuseScore places the cursor at the last input position, or in some other logical place, so be sure the cursor is where you intend.
Once in note input mode, enter notes left to right by first selecting a duration and then entering a pitch or rest. When you are done entering notes in this location and are ready to do something else—for example, entering notes at a different location, adding other markings, or performing other operations like copy and paste—you can leave note input mode by clicking the note input button or pressing N again. You can also press Esc to return to normal mode from note input or any other mode.
Selecting duration
While in note input mode, select a note value for the next note to be entered by:
- Clicking a corresponding note icon in the Note Input toolbar (directly above the score window)
-
Entering the keyboard shortcut 1–9 corresponding to the desired duration

The keyboard shortcuts are designed to be efficient and easy to remember. The most common note values are eighth, quarter, and half (UK: quaver, crochet, minim) and these are represented by the keys 4, 5, and 6 respectively (the middle row of a numeric keypad). Shorter note values are represented by smaller numbers, longer values by larger numbers. The full list is as follows:
- 64th (hemidemisemiquaver): 1
- 32nd (demisemiquaver): 2
- 16th (semiquaver): 3
- Eighth (quaver): 4
- Quarter (crotchet): 5
- Half (minim): 6
- Whole (semibreve): 7
- Double whole (breve): 8
- Longa: 9
- Dot: . (changes the selection into a dotted note/rest)
Other durations, including double dots and 128th notes, can be selected if you first customize your toolbar and/or define your own keyboard shortcuts.
Note: It is also possible to select duration using a MIDI keyboard, if you set up the keys you wish to use for this in advance.
Selecting pitch
Once you have selected a duration, you can enter pitches using the computer keyboard, mouse, MIDI keyboard, or virtual piano keyboard.
Selecting pitch using the computer keyboard
This is generally the most efficient way to enter notes in MuseScore.
To enter a note of a given pitch using the computer keyboard, simply press the corresponding letter (A–G) on your computer keyboard.

Notes entered in this way will replace any rests or notes that were already present at the cursor location. To add a note to an existing note or chord, press Shift while entering the note. See the section on chords below for more information.
When entering notes by letter name, MuseScore will choose the octave that is closest to the previous note on that staff. This works well for passages that move mostly by steps and small leaps. If you need to change the octave for a larger leap, use Ctrl+↑ and Ctrl+↓ (Mac: Cmd+↑ and Cmd+↓) to raise or lower the pitch of the previously entered note by an octave.
Selecting pitch using the mouse
To enter a note using the mouse, position your mouse on the desired line or space in the staff, then click. The mouse cursor will show you a preview of the note you are about to enter to help you place it accurately.

If any notes already exist at the location where you are entering a new note, the new note will be added above or below it. To replace existing notes instead, press Shift while entering the new note.
It can be difficult to enter notes very far above or below a staff with this method, because MuseScore may interpret clicks far from the intended staff as an attempt to enter notes onto the staff above or below. Instead, try entering the note an octave lower or higher, then raise or lower the pitch by an octave using Ctrl+↑ and Ctrl+↓ (Mac: Cmd+↑ and Cmd+↓).
Note: Although one would normally enter notes left to right, the mouse entry method actually allows you to enter a note at any location where there is an existing note or rest to replace.
Selecting pitch using a MIDI keyboard
If you have a MIDI keyboard connected, you can enter notes while in note input mode by simply pressing the corresponding keys.
When playing notes on a MIDI keyboard, they are entered consecutively so long as you release each key fully before pressing the next. If you press a key before releasing the previous key, the new note is added above or below the previous note.
Notes entered via MIDI keyboard that are outside of the current key signature will have accidentals applied automatically, but the spelling of the accidental may not be what you intend. To change the enharmonic spelling of a note, press J.
Selecting pitch using the virtual piano keyboard
You can also input notes using the on-screen Piano keyboard window. To display this, use View→Piano keyboard or press the shortcut P. The window can be closed the same way.

To enter a note of a given pitch, simply click the appropriate piano key with your mouse.
As with the computer keyboard, notes entered in this way replace any existing notes or rests. To create chords instead, press and hold Shift while entering notes.
Note: To resize the keyboard, position the mouse within the window and hold Ctrl (Mac: Cmd) while scrolling up or down.
Entering chords
For the purpose of this section, chords are any combinations of multiple notes all starting at the same time, all sharing the same duration, and all sharing a single stem.

If you wish to enter notes that sound together but start at different times, have different durations, or have separate stems, see Voices. Text of the form "Dm7" is a chord symbol, discussed in Chord symbols.
Just as for individual notes, chords can be entered by computer keyboard, mouse, MIDI keyboard, or virtual piano keyboard. Except for MIDI keyboard (where you can play multiple notes at once), the notes are still entered one at a time, but in a way that tells MuseScore to combine them into a chord rather than add them sequentially.
- To add a note to a chord using the computer keyboard, press and hold Shift while entering the note
- To add a note to a chord using the mouse, click the location where you wish to add the note
- To add a note to a chord using a MIDI keyboard, either play all the notes at the same time, or play them one at a time but do not release one key before pressing the next
- To add a note to a chord using the virtual piano keyboard, press and hold Shift while entering the note
When using Shift+A–G to add a note to a chord, the note will be added above any notes already present at the cursor location. You can also specify the note to be added based on the interval above or below the currently-selected note.
- To add an interval above the selected note, use one of the following:
- From the Note input toolbar, select Add→Intervals and choose an interval from the list
- Press Alt+1-9.
- For intervals below the selected note, you can apply a custom shortcut of your own (see Preferences)
Entering rests
Rests can be entered using the computer keyboard or mouse. The duration is selected in the same way as for notes (e.g., using the toolbar or keyboard shortcuts 1–9). Then instead of entering a pitch as you would for a note, choose one of the following options.
- From the computer keyboard: Press 0 (zero)
- From the note input toolbar: Click the rest icon, then click in the score
-
Using a mouse: Right-click in the score

Accidentals

Standard accidentals (flat, natural, sharp, double flat, double sharp) can be entered either by selecting one before entering the pitch it applies to or by adding them to a note already entered.
Selecting an accidental before entering a pitch
To specify an accidental to be applied to the next note entered, you can use the buttons on the Note input toolbar above the score or the corresponding keyboard shortcuts. This can be done either before or after selecting the duration.

The default accidental shortcuts are:
- Flat : -
- Sharp : +
- Natural : =
Unlike selecting duration—which applies to all subsequent notes until you change it—an accidental is applied only to the next note entered. But the usual rules of music notation apply, so if you apply a flat to a given note, any subsequent notes you enter of that same pitch within the same measure will be flatted as well, even though no explicit flat sign will be added in front of them.
Adding an accidental after entering a pitch
Appropriate accidentals are automatically added to a note when you increase or decrease its pitch:
- Move pitch up a semitone (spells with sharps): ↑
- Move pitch down a semitone (spells with flats): ↓
You can also apply an accidental to a note by clicking the appropriate icon in the Accidentals palette. This palette also contains a large number of microtonal and other special accidentals.
Adding courtesy/cautionary accidentals
Although the rules of music notation say that a barline cancels an accidental, and that any note on the same staff line or space in the next measure returns to the pitch indicated by the key signature, it is considered good practice to add a courtesy (also called cautionary) accidental anyhow. These do not change the pitch of the note, so they cannot be added with the ↑ and ↓ keys. However, any of the other methods described above work.
While parentheses or brackets are not required for courtesy accidentals, some editors do choose to use them. To add parentheses or brackets around an accidental, you will need to temporarily leave note input mode, select the accidental, then either use the Properties panel to select a bracket type, or click the parentheses or brackets in the More section of the Accidentals palette.
Note: There are also a set of plugins pre-installed with MuseScore that can automatically add courtesy accidentals as needed.
Ties
A tie is a curved line between two notes of the same pitch, indicating that they are to be played as one combined note. Even though they look similar, ties should not be confused with slurs, which join notes of different pitches and indicate legato articulation.
Because ties are always between notes of the same pitch, you do not need to enter the pitch for the second note. After entering the first note:
- Select the duration for the second note
-
Click the tie button on the toolbar or use the shortcut T

The tie command adds the second note and ties it to the first in one step. If the first note you entered is part of a chord, then the tie command actually creates an entire second chord with the same pitches as the first and ties all of the notes.

Note: Ties normally connect adjacent notes in the same voice, but MuseScore also supports ties between non-adjacent notes and between notes in different voices as described in the section on editing.
See also
Working with multiple voices
Overview
A MuseScore voice is a line of music on a staff that has its own rhythm independent of other music on the same staff. Other notation programs may refer to it as a "layer".
"Voice", in a different sense, may also refer to a pitch range in vocal music—soprano, alto, tenor, bass etc. It is important not to mix up the two meanings by assuming, for example, that the four "voices" in an SATB choir are equivalent to MuseScore "voices" 1–4 (see below); that would be to confuse chalk with cheese.
MuseScore allows up to four voices in one staff: Voice 1, Voice 2, Voice 3, and Voice 4. When writing music on a staff, one usually starts in voice 1 then moves on to voice 2. Voices 3 & 4 are less commonly used.
Two voices on the same staff are normally indicated using opposing stems—an upper voice with stems up and a lower voice with stems down:

In a four-part SATB arrangement on two staves, you would use voices 1 & 2 on the top staff for soprano and alto, and voices 1 & 2 on the bottom staff for tenor and bass:

Entering notes and rests in multiple voices
The first step to enter multiple voices is to determine whether you need to write notes as voices in one staff, or spread voices among multiple staffs such as four voices among two staffs of a piano, or among multiple instruments such as four voices on four string instruments. You should consider the design of MuseScore's notation function and your production needs. Do not base your decision merely on academic reasons.
- MuseScore sets stem directions automatically based on the voice used and which voices are used in each measure. In measures where only Voice 1 is used, but no notes or rests are written on Voice 2, Voice 3 or Voice 4, stem directions of notes are determined by pitch; notes above the center line have stems pointing down, while notes below the center line have stems pointing up. Otherwise, the stem directions are determined according to the voice: up for Voice 1 and Voice 3, down for Voice 2 and Voice 4.
- To assign an overriding stem direction setting manually, use the Flip direction button on the toolbar, or the keyboard shortcut X, also see Stems and flags.
- Writing on voice 2 right away may seem correct academically, but MuseScore will create rest symbols in voice 1 automatically which might be redundant in some cases. Popular options in this scenario are to either manually hide rests afterwards (jump to how to) or to simply use voice 1 instead of voice 2.
- It's not yet possible to assign different sounds to individual voices, so you may have to use multiple instruments. For example, you cannot assign a Soprano VSTi to voice 1 and a Tenor VSTi to voice 2, only one or the other.
- Sometimes you must use multiple voices in one staff to create certain visual notation result in MuseScore, even if they aren't different voices musically. For example, in MuseScore, inside one voice, a chord can only be created with notes of the same duration. If constituent notes of a chord have varying durations, you must use separate voices to write them. A list of common similar scenarios can be found on the Handbook 3 Voices page.
Using multiple instruments
If you decide you need to write different voices as notes on different instruments, start by creating multiple instruments using Setting up your score: Changing instruments, then edit clef symbols as required, and then compose on Voice 1 in all of these staffs. A common example is to write four voice SATB open score on four instruments' Voice 1.
To convert separate staffs into one staff containing multiple voices, or to do the opposite, see Implode and explode. A common example is SATB open score <-> short score conversion,
Enter notes and rests in multiple voices in one staff
To enter new notes into a Voice:
- Select your starting point in the score.
- Click the pen icon on the toolbar or press N to enter note input mode.
- Select the desired voice using the toolbar icons or press one of the keyboard shortcuts Ctrl+Alt+1–Ctrl+Alt+4
- Enter notes and rests normally as described in Entering notes
You can repeat these steps to enter notes into other voices.
Note: to enter new notes, make sure you are in note input mode before selecting the desired voice, otherwise you will change the voice of any currently-selected elements instead.
Note: the note toolbar only displays voice 1 and 2 icons by default. You can make all voice icons visible using the controls that appear when you click the gear icon on the toolbar. For more information, see the section on customizing the note input toolbar.
Editing notes and rests in multiple voices
Adjusting rests
To make sense notation wise, rests should be used in each existing voice whenever necessary to complete beats of a measure, Musescore creates them automatically. In measures containing multiple voices, rests are automatically added to voices of lower number whenever appropriate. MuseScore also automatically positions rests to avoid overlapping other score elements.
To hide, delete, or adjust the position of these rests to create better layout, use one of the following methods:

Hiding or deleting rests
Rests may be hidden by selecting them and unchecking the Visible box in the Properties panel or using the keyboard shortcut V.
Rests in voices 2-4 may also be deleted by selecting them and pressing Delete. However, this leaves a "hole" in the voice that can be difficult to edit later. To restore missing rests from a voice, you can use the commands in Tools→Voices to exchange the contents of the voice with those of voice 1, which will fill the holes with rests again. You can then use the same command to move the contents of the voices back where they were.
Note: to ensure the correct duration of each measure, voice 1 rests can be hidden, but they cannot be deleted.
Positioning rests
While MuseScore will normally avoid collisions with other voices, it can sometimes be helpful to move rests up or down to create more space or to clarify which voice they apply to.
To move a rest vertically, select it and press Up or Down to move it a staff space at a time.
For more information on manual positioning, see Changing position of elements.
You can also change the default vertical offset between rests and elements in other voices from 1 space to 2 spaces in Format→Style…→Rests
Changing voice of existing notes
Notes originally entered into one voice can be moved into another voice, depending on the situation. For more information, see Changing voice in normal mode.
Combining voices into chords
In cases where the rhythms match, notes originally entered as multiple voices can be combined into chords in a single voice. For more information, see the Implode command.
Separate chords into Voices
To separate a chord written in one voice into separate notes of different voices:
-
- Manually select the notes
- Press the toolbar button to assign a Voice to selected notes, or use the Ctrl+Alt+1–Ctrl+Alt+4 Keyboard shortcuts.
- Explode onto an empty stave, and then implode. See Implode and explode
See also
- Instrument Parts (and see Part in the Glosary)
- Editing notes and rests
- Stems and flags
- Positioning of elements
- Implode and explode
Alternative note input methods
Accessing alternative note input methods
In addition to the default step-time note entry method, there are several other methods by which notation can be entered in MuseScore.
To enter these alternative note input methods:
- Click and hold the Note input button in the Note input toolbar.
- Select from one of the available note input methods.
Keyboard users can get to the Note input button by pressing Shift+Tab or Shift+F6 a few times from the score. Screen readers will say something like "Note input toolbar: Default (step-time)". Press Space on this button to open a menu that contains all the available note input methods.
Each note input mode can also be activated directly using an assigned keyboard shortcut (See Keyboard shortcuts to learn how to assign these).
Note that the selected note input method remains in effect even when you leave note input mode and will be enabled the next time you enter note input mode. So if you change to the Re-pitch method for a single passage, be sure to change back to the Step time method when you are done.
Rhythm only
The Rhythm note input method allows you to enter durations with a single keypress. This is especially useful for unpitched percussion instruments that use a single sound. In addition, you can combine Rhythm and Re-pitch methods for an efficient workflow in certain circumstances.
- Select your starting point in the score.
- Select the Rhythm note input method as described above.
- Select a duration from the note input toolbar, or use the keyboard shortcuts 1-9, to add a note of the selected duration.
- Add a dotted duration by pressing . and selecting/typing your desired duration. In this mode, the duration dot is toggled on/off for all subsequently entered durations. It's worth noting that the duration dot needs to be activated prior to entering the note value, rather than afterwards.
- Enter rests by clicking the rest icon in the note input toolbar and select/type your desired duration. When the desired duration already has been selected (from the previous entered note), pressing 0 will enter the rest. Click the rest button to return to entering notes.
- Continue pressing duration keys to enter notes with the chosen durations.
By default, notes are entered onto the middle staff line. You can use the cursor keys to change the pitch of the note just entered, and subsequent notes will also be entered using that pitch. You can also use Re-pitch mode to quickly enter pitches for a passage after entering the rhythm.
Re-pitch
The Re-pitch note input method allows you to change the pitches of a sequence of notes while leaving their durations unaltered.
- Select your starting point in the score.
- Select the Re-pitch note input method as described above, or use the keyboard shortcut Ctrl+Shift+I (Mac: Cmd+Shift+I).
- Enter pitches using the computer keyboard, MIDI keyboard or virtual piano keyboard. Note: you cannot use the mouse to input notes in the Re-pitch method.
The Re-pitch method can be an extremely efficient way of entering notes in music with repeated rhythmic patterns. Simply copy and paste an existing passage that uses the same rhythm as your new passage, then use re-pitch mode to alter the pitches. The same technique can be used to enter multiple instrumental or vocal parts that share the same rhythm but different pitches.
Real-time
The real-time note input methods basically allow you to perform the piece on a MIDI keyboard (or MuseScore's virtual piano keyboard) and have the notation added for you. However, you should be aware of the following limitations which currently apply:
- You must pre-select the shortest duration you wish to use.
- You cannot enter tuplets in Real-time note input.
- You must enter notes onto a single staff and in a single voice, just as with other note input modes.
- It is not possible to use a computer keyboard for Real-time note input.
These restrictions mean that MuseScore has very little guessing to do when working out how your input should be notated, which helps to keep these methods accurate.
Real-time (metronome)
With the Real-time (metronome) note input method, you play at a fixed tempo indicated by a metronome click. You can adjust the tempo by changing the delay between clicks from the menu: Edit→Preferences...→Note Input (Mac: MuseScore→Preferences...→Note Input).
- Select your starting position in the score.
- Select the Real-time (metronome) note input method as described above.
- Select a duration from the note input toolbar to represent the metronome click.
- Press and hold a MIDI key or virtual piano key to enter a note of the selected duration.
- Listen for the metronome clicks—with each click the note grows by the selected duration.
- Release the key when the note has reached the desired length.
The score stops advancing as soon as you release the key. If you want the score to continue advancing—necessary to enter rests—then you can use the Real-time Advance shortcut to start the metronome. The same action will stop the metronome again.
Real-time (foot pedal)
With the Real-time (foot pedal) note input method, you indicate your input tempo by tapping on a key or pedal. You can play at any speed you like, and it doesn't have to be constant. The default key for setting the tempo (called "Real-time Advance") is Enter on the numeric keypad (Mac: Fn+Return), but it is highly recommended that you change this to a MIDI key or MIDI pedal (see below).
- Select your starting position in the score.
- Select the Real-time (foot pedal) note input method as described above.
- Select a duration from the note input toolbar to represent the metronome click.
- Press and hold a MIDI key or virtual piano key.
- Press the "Real-time Advance" shortcut with each press, the note grows by the selected duration.
- Release the note when it has reached the desired length.
Real-time Advance shortcut
The "Real-time Advance" shortcut is used to start the metronome with the Real-time (metronome) method or to tap beats with the Real-time (foot pedal) method. It is called "Real-time Advance" because it causes the input position to move forward, or "advance", through the score.
The default key for Real-time Advance is Enter on the numeric keypad (Mac: Fn+Return), but it is highly recommended that you assign this to a MIDI key or MIDI pedal via MuseScore's MIDI remote control. The MIDI remote control is available from the menu: Edit→Preferences...→MIDI mappings (Mac: MuseScore→Preferences...→MIDI mappings).
Alternatively, if you have a USB footswitch or computer pedal which can simulate keyboard keys, you could set it to simulate Enter on the numeric keypad.
Insert
Insert note input method allows you to insert and delete notes and rests within measures, automatically shifting subsequent music forward and backward within the measure. The measure duration is automatically updated as you go.
To insert a note:
- Select your starting position in the score.
- Select the Insert note input method as described above.
- Enter a note or rest as you would in Step time mode. Each note is inserted before the current cursor position, and the measure duration is increased to compensate.
When the notes are entered they will be placed just before the selected starting element, which will be highlighted with a square blue marker. The start element and any subsequent notes or rests within the same measure will be shifted forward. You can move the insertion point forward and backward using the arrow keys → or ←, and the new insertion point will then be highlighted.
Alternatively, if you have only one or two notes to insert, you can do this directly with the default Step time note input method. Press Ctrl+Shift (Mac: Cmd+Shift) while adding the note by mouse or keyboard shortcut (A-G).
To insert a rest, first insert a note of the desired duration, then press Delete.
To delete a note or rest, use the shortcut Ctrl+Shift+Delete. The measure duration is decreased to compensate. The shortcut works with both the Step time and Insert note input methods.
Because inserting and notes may cause the measure duration to increase or decrease beyond what is specified by the time signature, a small "+" or "-" sign will be shown above the measure when this happens.
Adding and removing measures
Inserting measures
MuseScore allows you to insert or delete measures in the score using a variety of methods. Measures can be inserted:
- After a selection
- Before a selection
- At the start of the score
- At the end of the score
Measure context menu
To insert one or more measures:
- Right-click on a blank area of a measure
- From the context menu, choose Insert measures
- From the options presented, choose the location where you want the measure(s) inserted
- Complete the dialog box and press OK.
The Properties panel
To insert one or more measures:
- Click on a measure
- Go to the Properties panel
- Click Insert measures in the Measure section
- Type the number of measures you wish to insert (or leave it as “1” to insert a single measure)
- Select where you want the measure(s) to be inserted from the dropdown menu (or leave it as is to insert the new measure(s) after the selection point)
- Click the + button
This popup remains open until you click another part of the user interface. As such, you can continue pressing the + button as many times as you need to insert further measures.
In addition, you can insert measures from one of two menus:
Note input toolbar
- Select something in your score (can be anything except line objects)
- Click the + button in the Note input toolbar
- Navigate to Measures
- Choose where you want the new measure(s) to be inserted
Menu bar
- Select something in your score (can be anything except line objects)
- Click the Add in the Menu bar
- Navigate to Measures
- Choose where you want the new measure(s) to be inserted
Inserting measures with keyboard shortcuts
To quickly insert one measure before the selection point:
- Select something in your score (can be anything except line objects)
- Press Ins
Insert more measures before the selection point by repeatedly pressing Ins.
To quickly insert multiple measures before the selection point:
- Select something in your score (can be anything except line objects)
- Press Ctrl+Ins (Mac: ⌘+Ins)
- Type the number of required measures in the dialog that appears
- Click OK
To append to the end of your score, you can use the keyboard shortcut Ctrl+B (Mac: ⌘+B) for a single measure, or Alt+Shift+B (Mac: Option+Shift+B) for multiple measures.
Add measures to a frame
It is also possible to add measures to a frame in the score:
- Click on the frame
- Use one of the methods shown under "Note input toolbar" or "Menu bar", or a keyboard shortcut (above).
Deleting measures
To delete one or more measures using keyboard shortcuts:
- Select a measure (or hold Shift and select multiple measures)
- Type Ctrl+Backspace or Ctrl+Del (Mac: ⌘+Backspace or ⌘+Del).
Alternatively,
- Select a measure (or hold Shift and select multiple measures)
- Right-click on any measure within the selection
- Select Delete measures
You can also:
- Select a measure (or hold Shift and select multiple measures)
- Go to Tools
- Select Remove selected range
Remove empty trailing measures
To remove any empty measures at the end of your score:
- Go to Tools
- Select Remove empty trailing measures
See also
Other measure-related pages:
Selecting elements
You can select elements in MuseScore using the keyboard or mouse. Selections can consist of a single element, a list of individual elements that may possibly be discontinuous, or a range of measures and staves that includes the elements within it. Certain commands work only on single elements or lists; some work only on ranges; others work on any type of selection. The documentation for any given command should explain which types of selection are allowed.
When selected, elements display in blue (or whatever color is defined for the voice the element belongs to).

For range selections, a blue rectangle appears around the entire range.

Selecting a single element
To select a single element with the mouse, simply click it.
To select a single element with the keyboard, use the cursor keys to navigate to the element. Note that there is no separate concept of a “cursor” in MuseScore that is separate from the selection, except while in Note Input mode. In Normal mode, the left and right cursor keys select elements one by one as you navigate, so even though there is technically not a cursor, the selection itself acts in a similar way.
By themselves, the cursor keys navigate through notes and rests only. When combined with Alt, they navigate through all elements, including articulation, dynamics, and other markings.
Notes
A note normally consists of multiple elements: the notehead, stem, flag, dot, accidental, etc. Most commands that operate on a single note expect you to select the notehead itself.
Chords
The notes of a chord share a single stem and flag. Even a single note can be considered a “chord” in the sense that it consists of these multiple elements.
To select a complete chord (all noteheads plus the stem and other elements), first make sure nothing is currently selected (you can press Esc to be sure) and then Shift+click the chord. This creates a range selection that encompasses the chord.

Note that the selection may also include content in other voices if present, but see the section on excluding elements from range selections for information on how to avoid that if necessary.
Overlapping elements
If multiple elements overlap, clicking selects the topmost element. To select the element underneath a currently-selected element, Ctrl+click it. This deselects the currently-selected element and selects the next element beneath it, if any. Thus, repeated Ctrl+click operations cycle through a set of overlapping elements.
Selecting a list of individual elements
You can select a list of elements manually by selecting each individually or automatically by using commands to select elements that are similar to a given element.
Selecting multiple elements manually
To add an element to the list of selected elements, Ctrl+click it. If an element is already selected, Ctrl+click removes it from the list of selected elements.

You can also use Ctrl+click to add or remove individual elements from a range selection. In the process, this converts the selection into a list selection.
If the elements you wish to select are outside of the staff and clear of other elements, you may be able to create a list selection by using Shift+drag to draw a selection box around the desired elements. If any notes or rests are included, however, a range selection is performed instead.
Selecting similar elements automatically
To select all elements of a given type in the entire score or in a given staff:
- Right-click one such element
- In the resulting menu, click Select→Similar or Select→Similar on this staff as appropriate
To select all elements of a given type within a range:
- Click the first such element
- Shift+click the last such element
—OR—
- Perform the range selection using the techniques described below
- Right-click one element within the range
- In the resulting menu, click Select→Similar in this range
To create more complex selections of similar elements:
- (Optional) Perform a range selection
- Right-click an element
- In the resulting menu, click Select→More
- Check the desired boxes within the resulting dialog (see below)
The options available in the select dialog will depend on the type of element you right-clicked.

The selection options specific to notes are:
- Same notehead: notes with the same notehead group (normal, cross, slash, etc.)
- Same pitch: notes with the same pitch name, accidental, and octave
- Same string: notes with the on the same string (tablature only)
- Same type: notes of the same type (normal, acciaccatura, appoggiatura)
- Same note type: notes of the same duration, not considering presence of dots or tuplets
- Same duration: notes of the same actual duration
- Same note name: notes with the same pitch name and accidental, not considering octave
- Same staff: notes in the same staff
- Same voice: notes in the same voice
- In selection: notes within the current selection
- Same system: notes in the same system
In addition to the type-specific selection options, there are action options at the bottom of the dialog that are common to all element types. These control what happens to the selected elements, and only one of these can be chosen at a time:
- Replace selection: if checked, this action selection replaces an existing selection
- Add to selection: if checked, this action adds elements to an existing selection
- Subtract from selection: if checked, this action removes elements from an existing selection
Selecting a range of measures and staves
A range selection includes all elements from a given beginning and ending time position across a given set of staves. It is the usual starting point for operations such as copy and paste.
Selecting a range by dragging
To select a range of measures and staves with the mouse alone, use Shift+drag to draw a rectangle around it. Note that this is only feasible for relatively small selections that fit on screen at once.
Selecting a range by clicking
A more flexible method for making selections uses a combination of mouse and keyboard:
- Click the first note or rest of the desired selection
- Shift+click the last
In between the click and Shift+click, you can use navigation commands to position the score. This allows you make selections that span several pages.
This method works just as well if you first click the last note/rest then Shift+click the first.
Selecting a range using the keyboard
You can also make range selections using the keyboard alone or primarily:
- Select the first note or rest using keyboard navigation or by clicking
- Hold Shift while using keyboard navigation to extend the selection as you navigate
The available commands include:
- Shift+Left and Shift+Right to extend the selection one note or rest at a time
- Shift+Ctrl+Left and Shift+Ctrl+Right to extend the selection one measure at a time (Mac: use Cmd instead of Ctrl)
- Shift+Up and Shift+Down to extend the selection one staff at a time
- Shift+Home and Shift+End to extend to the beginning or end of the system
- Shift+Ctrl+Home and Shift+Ctrl+End to extend to the beginning or end of the score (Mac: use Cmd instead of Ctrl)
Special range selections
MuseScore includes some special commands to make command selections:
- Edit→Select all or Ctrl+A (Mac: Cmd+A) to select the entire score
- Edit→Select section to select the current section of the score (everything between the previous and next section breaks)
Excluding elements from a range selection
For certain operations involving range selections, you might want to exclude elements of a given type from the selection. For example, you may wish to copy the notes, rest, and most other markings in a phrase, but skip the lyrics. Or in a passage with multiple voices, you may wish to delete everything not in voice 1. To exclude elements of a given type from a range selection:
- Perform the range selection normally
- Open the Selection Filter with View→Selection filter
- Remove the checkmarks next to any element types you want excluded from the selection

Note that if you exclude voice 1, you will not be able to select any measures that lack content in other voices. So be sure to restore voice 1 after performing the operation for which you are excluding voice 1. For example, if you wish to copy and paste only voice 2, make your range selection, use the Selection Filter to exclude voice 1, use Edit→Copy or Ctrl+C, then restore the checkbox next to voice 1 before attempting to select the destination to paste.
Editing notes and rests
Overview
After you have entered notes into your score, you may wish to change something about them - pitch, duration, time position, etc. MuseScore provides a number of commands for this purpose. Many of the most powerful commands are only available after you leave note input mode and return to normal mode, but there are a number of quick edits possible while still in note input mode.
Making changes in note input mode
Immediately after entering a note or rest, it is selected, and there are a handful of commands that operate on the selected note or rest while in note input mode. These commands also work if you use the cursor keys to navigate to a previously-entered note or rest.
Changing duration in note input mode
There are two commands that alter the duration of an existing note or rest while in note input mode:
- Shift+W increases the duration
- Shift+Q decreases the duration
Both commands will first add or remove a dot if appropriate, then will move to the next larger or smaller note value. So for instance, pressing Shift+W on a quarter note changes it into a dotted quarter, and pressing Shift+W again changes it to a half note.
Changing pitch in note input mode
The commands for changing the pitch of a selected note while in note input mode are:
- ↑ - move pitch up a semitone (spells with sharps)
- ↓ - move pitch down a semitone (spells with flats)
- Alt+Shift+↑ - move pitch up a step diatonically
- Alt+Shift+↓ - move pitch down a step diatonically
- Ctrl+↑ (Mac: Cmd+↑) - move pitch up an octave
- Ctrl+↓ (Mac: Cmd+↓) - move pitch down an octave
Replacing notes and rests in note input mode
Most note input in MuseScore is in what a word processor might call "replace" or "overwrite" mode. This means that if you wish to replace a note with a different one, you don't need to delete the old note first—just enter the new one directly, and it automatically overwrites what was there before.
Note: sometimes you may wish to add a new note and move some of the subsequent notes later to make room. In MuseScore, this is done by moving the subsequent notes directly using cut and paste.
Deleting notes in note input mode
To delete a note and replace it with a rest, simply press Del.
Note: if you instead wish to move subsequent notes earlier to take the place of the deleted note, there is no need to first delete the original note - simply move the subsequent notes directly using cut and paste.
Moving notes in note input mode
Although for the most part, moving notes to a different time position is done in normal mode, there is one pair of commands that can be used to change the time position of a note or rest in certain cases while in note input. If you have two notes or rests of the same duration and you wish to exchange them while in note input mode, you can use Shift+← or Shift+→ to exchange a note or rest with its neighbor of the same duration.
Making changes in normal mode
Most changes one might want to make to notes and rests already entered are more easily performed in normal mode—the mode you are in when you leave note input or any other mode.
Except where noted, the methods described below work on either a single selected note or rest, a list selection consisting of multiple notes or rests, or entire range selections. See the page on selections for more information.
Changing duration in normal mode
Changing selected notes to a specific note value
To change the duration of one or more selected notes in normal mode to a specific note value, simply click the appropriate duration icon or use the keyboard shortcuts 1–9.
Increasing or decreasing the duration of a selected note
To increase the duration of a selected note, you can use the Shift+W command as described above. This adds an augmentation dot if one is not already present, or changes to the next longer note value if the note is already dotted. For example, an eighth note will be changed into a dotted eighth note, and a dotted quarter will be changed into a half note. You can also use W to double the duration, thus changing an eighth note into a quarter note directly, or a dotted eighth into a dotted quarter.
The commands Shift+Q and Q perform the opposite operation, decreasing or halving the duration in the same way.
All of these commands work on only a single selected note.
Doubling or halving all note values in a range selection
If you have entered a passage using eighths and sixteenths but wish to double the durations of all notes and rests—thus doubling the duration of the passage itself—see the section on the paste half/double duration commands.
Changing pitch in normal mode
The same commands that work to change pitch in note input also function in normal mode, including single, list, and range selections. These commands are:
- ↑ - move pitch up a semitone (spells with sharps)
- ↓ - move pitch down a semitone (spells with flats)
- Alt+Shift+↑ - move pitch up a step diatonically
- Alt+Shift+↓ - move pitch down a step diatonically
- Ctrl+↑ (Mac: Cmd+↑) - move pitch up an octave
- Ctrl+↓ (Mac: Cmd+↓) - move pitch down an octave
In addition, when in normal mode, the accidental buttons on the Note input toolbar and corresponding keyboard shortcuts will toggle (add or remove) accidentals on any selected notes, thus potentially changing their pitch. The Accidentals palette can also be used to add accidentals to selected notes.
Deleting notes and rests in normal mode
To delete a note and replace it with a rest, simply press Del.
If multiple notes are selected as a list, Del replaces them each by rests individually.
If you select a range, Del replaces the entire passage with the correct rests according to the meter.
Rests cannot normally be deleted, as removing them would leave a measure with fewer beats than it should have. However, see the remove selected range command below for information on how to do this when required. Also, rests in voices 2–4 can be deleted without removing time from a measure.
Removing notes and rests and their associated time
To completely remove selected notes or rests—thus leaving the piece with fewer measures if entire measures are selected, or fewer beats within the measure if a partial measure is selected—use Tools→Remove selected range or the keyboard shortcut Ctrl+Del (Mac: Cmd+Del).
Adding ties in normal mode
Ties can be added in normal mode, but unlike in note input mode where the tie command automatically adds a note and creates a tie, in normal mode, both notes must already exist.
To add a tie in normal mode:
- Select a note that you wish to tie to the next note of the same pitch
- Click the tie button or use the shortcut T
This works even if the next note of the same pitch is in a different voice.
If you select multiple notes, MuseScore will start a tie at each of them. You can use the technique to tie entire chords at once.
This technique also allows you to tie notes that are not adjacent, such as to show an arpeggiate-and-hold pattern on piano.
Changing voice in normal mode
A note entered into a given voice may be moved into another voice if this is musically possible, or the contents of two voices may be exchanged.
Moving selected notes into another voice
To move a selection of one or more notes into another voice, either press one of the voice buttons on the toolbar or use the keyboard shortcuts Ctrl+Alt+1–4 (Mac: Cmd+Option+1–4). Notes will be moved to the extent it is possible without compromising the current content of the destination voice.
A note can be moved into another voice if there is currently silence (rests, or nothing at all) in the destination voice at that time position for the duration of the note to be moved. In that case, the note will simply be moved to the new voice.
A note can also be moved into another voice if there is already a note or chord of the same duration starting at that time position. In that case, the note will be combined with the existing note or chord.
Exchanging the contents of two voices
MuseScore can also exchange the contents of any pair of voices. These commands work only on full measures (or multiple measures), not on individual notes.
To exchange the contents of any two voices, use the corresponding command in Tools→Voices:
- Exchange voice 1-2
- Exchange voice 1-3
- Exchange voice 1-4
- Exchange voice 2-3
- Exchange voice 2-4
- Exchange voice 3-4
See also
Copy and paste
The cut, copy, and paste commands can be used to reproduce entire passages of music, to move music earlier or later, to copy text or other markings between staves, to exchange the content in different measures, and more.
Accessing the commands
In all cases, the first step is to select what you want to cut or copy.
As with other programs that support cut, copy, and paste, you can access these commands from the Edit menu, from a context menu that appears upon right-click or related gesture (e.g., Ctrl+click, or two-finger tap), or via the standard keyboard shortcuts.
| Command | Shortcut (Windows) | Shortcut (Mac) | Context menu | Main menu |
|---|---|---|---|---|
| Cut | Ctrl+X | Cmd+X | Cut | Edit→Cut |
| Copy | Ctrl+C | Cmd+C | Copy | Edit→Copy |
| Paste | Ctrl+V | Cmd+V | Paste | Edit→Paste |
| Swap with clipboard | Ctrl+Shift+X | Cmd+Shift+X | Swap with Clipboard | Edit→Swap with clipboard |
| Paste half duration | Ctrl+Shift+Q | Ctrl+Shift+Q (as of 4.2) | N/A | Edit→Paste half duration |
| Paste double duration | Ctrl+Shift+W | Ctrl+Shift+W (as of 4.2) | N/A | Edit→Paste double duration |
Note: When using the context menu, take care to always right-click on a selected item; if you right-click on an empty space by mistake your selection will be lost!
Copying a range selection
To copy a range—whether a single chord, a single measure, several measures on one staff, or multiple measures across multiple staves—do the following:
- Select the range you want to copy
- Use the Copy command from the menu or press Ctrl+C (Mac: Cmd+C)
- Select the first note or rest of the destination
-
Use the Paste command from the menu or press Ctrl+V (Mac: Cmd+V)

Copied music will replace the existing content of the destination. All elements in the selected range will be copied, with the exception of system-wide elements such as tempo text, key and time signature changes, and repeats. You can use the Selection Filter to exclude other elements of a given type from the operation.
Copying a single element or a list selection
MuseScore also allows copying a single element, or a list selection of multiple lyrics, chord symbols, dynamics, articulation, or other markings from one place to another, while keeping the content such as notes in the destination intact. Multiple notes list selection cannot be copied.
MuseScore preserves the relative time positions of the markings based on literal note value distance if possible, measure rhythm is not taken into account. This includes case of copying chord symbols and dynamics. Valid note or rest anchors are required at the destination music when pasting lyrics and articulations.
- Select the elements you want to copy
- Use the Copy command from the menu or press Ctrl+C (Mac: Cmd+C)
- Select the first note or rest of the destination
- Use the Paste command from the menu or press Ctrl+V (Mac: Cmd+V)
Moving elements
Cut and paste commands can be used to
- move a passage to another staff, such as music on flute to clarinet, or
- shift a passage earlier or later. This method is especially useful as a way to insert or delete a note or rest and also shifts existing notes and rests to create or trim silence.
Measures (their rhythmic structure) cannot be moved, but see Adding and removing measures and Time signatures chapters. When moving list selection, its elements' relative positions are preserved if possible, see "Copying a list selection" section.
To move a selection:
- Select what you want to move
- Use the Cut command from the menu or press Ctrl+X (Mac: Cmd+X)
- Select the first note or rest of the destination
- Use the Paste command from the menu or press Ctrl+V (Mac: Cmd+V)
Swapping a selection with the clipboard
The swap with clipboard command combines two operations into one: (1) First it overwrites a selected part of the score with the contents of the clipboard, just like the paste command; (2) Second, it transfers the overwritten part of the score back to the clipboard, just like the copy command.
It can be used, for example, to swap two equal-length sections of a score, A and B:
- Select section A
- Apply the cut command
- Select section B
- Apply the swap with clipboard command to paste A over the contents of B while moving the contents of B to the clipboard
- Select section A again (or just the first note, rest, or measure)
- Apply the paste command
Like the other commands discussed here, you can access the swap with clipboard command from the menu or via a keyboard shortcut—in this case, it is Ctrl+Shift+X (Mac: Cmd+Shift+X).
Repeating a selection
A common use for copy and paste is to duplicate a given passage (including notes, chords etc) immediately after the original. Use the special repeat selection command to simplify this process.
- Select a single element or range to be repeated
- Press R
This does not work on list selection. It works on a single chord, either on a range selection of it, and when exactly one note of that chord is selected. See Selecting elements chapter. In note input mode, this command repeats the entire chord that contains the current note. This is useful for creating a series of repeated chords.
Copying a range selection to multiple staves
If you wish to copy a passage to multiple staves—for instance, to double music of flute with oboes and clarinets—you can use the explode command:
- Select the passage you wish to copy
- Extend the selection to include the staves below (e.g., by pressing Shift+↓)
- Use Tools→Explode
This copies the original selection, assuming it contains only single notes—no chords and no multiple voices. If there are chords or multiple voices, then these are distributed among the remaining staves as described in the section on the explode command.
Paste half/double duration
If you have entered a passage using mostly eighth notes but wish to halve the entire passage to using mostly sixteenth notes, or double it to quarter notes, MuseScore provides a pair of special commands to accomplish this. You can either modify the durations of a selection in place or create a separate copy of the passage with the modified durations. To halve or double the duration of a passage:
- Select a range to modify
- Use the copy command
- If you wish to create a separate copy of the passage with the modified durations, select the destination
- Use the paste half duration or paste double duration command Ctrl+Shift+Q/W
Duplicating individual elements
Individual elements—even those that are not selected automatically in a range selection, like time signatures or voltas—can be selected and then duplicated using the mouse.
- While pressing Ctrl+Shift (Mac: Cmd+Shift), and click and hold on an element
- Drag it anywhere in the score
-
When you release the mouse button, the selected element is copied to the new location

See also
Using the palettes
MuseScore Studio places elements in your score automatically according to a set of rules and style settings. These are designed to produce excellent results by default. Elements are positioned according to standard engraving practices while avoiding collisions. Default positions can be customized for any given element.
Default position
Most elements in MuseScore have a default position that is determined by a style setting that can be customized via the Properties panel or the Format→Style dialog. For elements that are placed above the staff, the position is specified as an offset from the top line of the staff; for elements that are placed below the staff, the position is specified as an offset from the bottom line of the staff. These offsets, like most measurements in MuseScore, are expressed in staff spaces—abbreviated sp. For many element types, you can specify an offset to be used when placed above as well as a separate offset to be used when placed below, and also which of these placements should be applied by default.
For example, for dynamics, the default placement is below the staff, and the default offset below the bottom staff line is 2.5 sp. If you flip a dynamic marking above the staff, it defaults to 1.5 sp above the top staff line staff (expressed as a negative offset: -1.5 sp). These settings are all found in Format→Style→Dynamics.
NOT FOUND: dynamics-style.png
Note that the default offset is larger for dynamics placed below the staff than above only because the offset is measured from the baseline of the text.
NOT FOUND: offset.png
Auto-place
Auto-place is the term MuseScore uses for a set of algorithms used to avoid collisions as well as to align certain elements automatically. A basic understanding of how auto-place works can be useful when making adjustments.
Vertical collision avoidance
For most elements placed above or below the staff, collision avoidance works vertically. When an element is being positioned, MuseScore first tries to place it according to the default offset for that element type. If that would result in a collision with another element, then one of the two elements will be moved further from the staff to avoid the overlap. MuseScore follows standard engraving rules in determining which elements to move. For example, tempo markings are placed above trill lines, rather than vice versa.
NOT FOUND: vertical-collision-avoidance.png
The Minimum distance style setting determines how much distance MuseScore places between elements when avoiding collisions in this manner. The corresponding setting in the Properties panel allows you to override this for individual elements where necessary. But MuseScore adjusts this value automatically when positioning elements manually, as seen below in the section on manual adjustment.
Horizontal collision avoidance
For certain elements such as lyrics or chord symbols, MuseScore will widen measures to avoid collisions rather than displace these elements vertically.
NOT FOUND: horizontal-collision-avoidance.png
Vertical alignment
MuseScore will also try to align certain elements vertically, so that if one element of that type needs to be adjusted vertically to avoid a collision, other elements of that same type on the same system will automatically be adjusted as well. Elements that are always aligned vertically include lyrics and pedal markings. Dynamics and hairpins will be aligned if they are directly adjacent.
NOT FOUND: dynamics-align.png
Chord symbols can also be aligned vertically if you enable this in the chord symbol style settings, by setting a Maximum shift value. See Chord symbols for more information.
Disabling auto-place
Auto-place normally does a good job of avoiding collisions and of aligning elements. In cases where you wish to position an element manually, you can usually do so directly without the need to disable auto-place (see manual adjustment below).
However, you may still wish to disable auto-place in some situations. For example, rehearsal markings default to displaying above voltas, but you may wish to reverse this for some specific case where the volta was already displaced higher and there is then room for the rehearsal mark underneath.
NOT FOUND: disable-autoplace.png
In this case, disabling auto-place for the rehearsal mark allows it to display underneath the volta, while still allowing the volta to automatically avoid collisions with the notes.
To disable auto-place for an element, select it and uncheck Auto-place in Properties→General.
NOT FOUND: auto-place-setting.png
The element will be returned to its default position (as determined by its style settings) and it will not be included in the detection of collisions with other elements. Disabling auto-place for an element also causes it to be excluded from any vertical alignment that would otherwise have applied.
Manual adjustment
Whether auto-place has displaced an element from its default position or not, the position of elements can be adjusted manually either by dragging, using the cursor keys, or the Offset fields in the Properties→General→Appearance. See Adjusting elements directly for more information.
MuseScore even allows you to perform manual adjustments that would result in collisions. In the example above, if you drag the rehearsal letter below the volta, MuseScore will allow this and will automatically set the Minimum distance for that element to a negative value, thus effectively allowing the collision without disabling auto-place.
Manual alignment
Elements of the same type will normally be aligned by default simply because they have the same style settings and therefore the same offset. However, auto-place can result in some of the elements being moved further from the staff than others. As described above under Vertical alignment, MuseScore will automatically align some types of elements. For other elements types, you can align them manually by assigning them the same vertical offset.
To do this, simply select the elements you wish to align (e.g., click the first, Shift+click the last), then gradually increase or decrease the vertical offset in the Properties panel. For example, to align a series of tempo markings above the staff, you will need to set their vertical offsets to the same value. To make sure they are aligned and also avoid the collisions that cause auto-place to display one or more of them to begin with, you will need to set the offset to a sufficiently large negative value.
NOT FOUND: align-manually.png
Properties panel
The Properties panel shows settings for objects you select in the score. It was known as the “Inspector” in MuseScore 2 and 3.
You can select one object (say, a dynamic mark) or multiple objects at a time (say, a dynamic mark, a notehead, and a hairpin). If any of the objects you have selected contains editable settings, Properties is the place to find them.
An important thing about Properties is that by default it affects only the object(s) you have selected, so changing how one hairpin looks won’t change all of the hairpins in your score—only those you have selected. However, for most settings, you can save as the default style for the score.
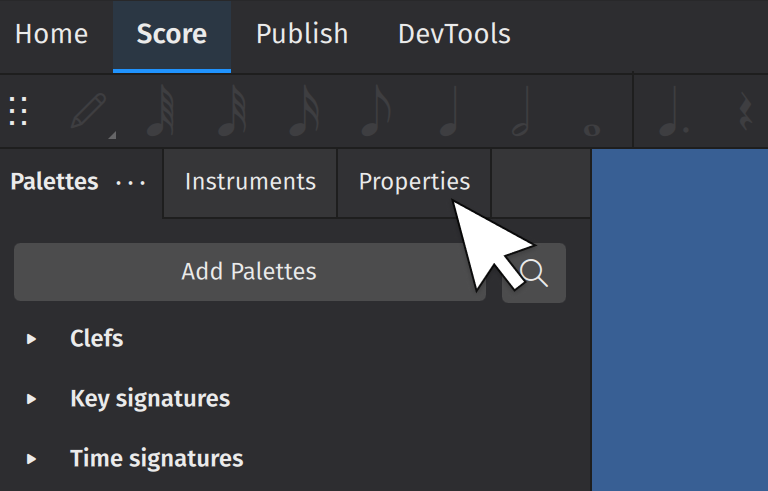
Accessing the Properties panel
- Open the Score tab
- Press the default keyboard shortcut F8, or click on the Properties tab on the left side of the screen.
Global settings
This is what the Properties panel looks like when you have nothing selected in your score. All these settings affect your entire score (not just individual elements):
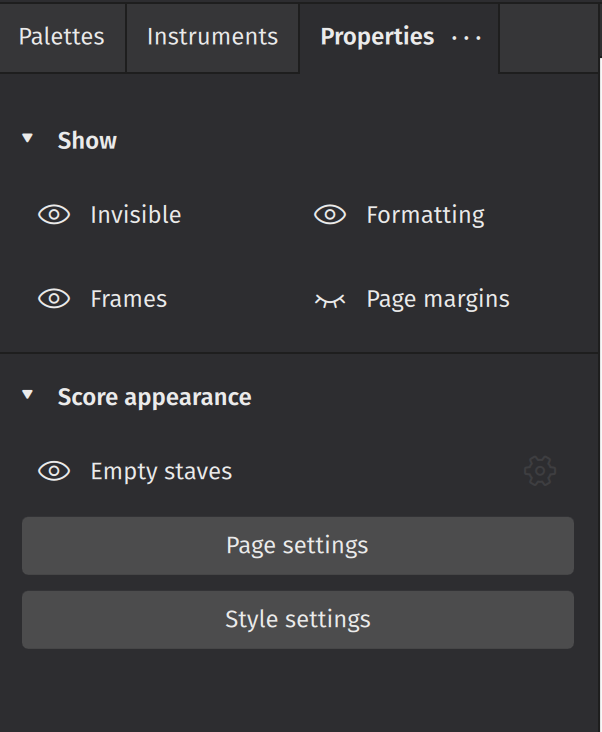
Show
- Invisible hides/shows all invisible objects in your score
- Frames hides/shows Frames
- Formatting hides/shows formatting elements added from the layout palette
- Page margins hides/shows the page margin
- Sound flags hides/shows sound flag buttons on staff text
Score appearance
- Empty staves hides/shows staves that contain no notated music within a system. This setting mirrors the Hide empty staves within systems settings in the Style dialog.
- Page settings opens the Page settings dialog. Same as Format→Page Settings. See Templates and styles.
- Style settings opens the Style dialog. Same as Format→Style. See Templates and styles.
General settings
These settings are visible whenever something is selected in your score.
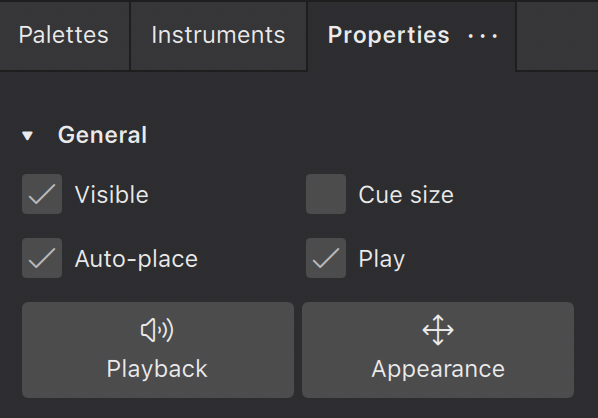
Visible
Click this box to hide/unhide selected elements, or use the keyboard shortcut V.
Use this feature to hide elements so they don't appear in your exported or printed score. This can be useful when, for example, applying tempo marks or dynamics solely to affect playback in MuseScore. Use the Invisible toggle in Properties (when nothing is selected) to show or hide these hidden elements in the score view (hidden elements will be rendered in a lighter shade).
Auto-place
Usually checked by default, this feature positions the selected object according to MuseScore's vertical and horizontal collision avoidance algorithms. Uncheck Auto-place to have more control over the positioning of certain elements. Learn more about this feature in Positioning elements.
Cue size
This feature is used to create small cue notes: i.e. notes provided to assist the performer by indicating what another ensemble/orchestra member is playing at the same time. Checking the box makes any selected notes smaller, including their stems and any attached beams.
Play
When checked, this property allows playback of the selected element. Uncheck Play to silence the element.
Playback settings
The Playback button displays the editable playback properties of the selected elements.
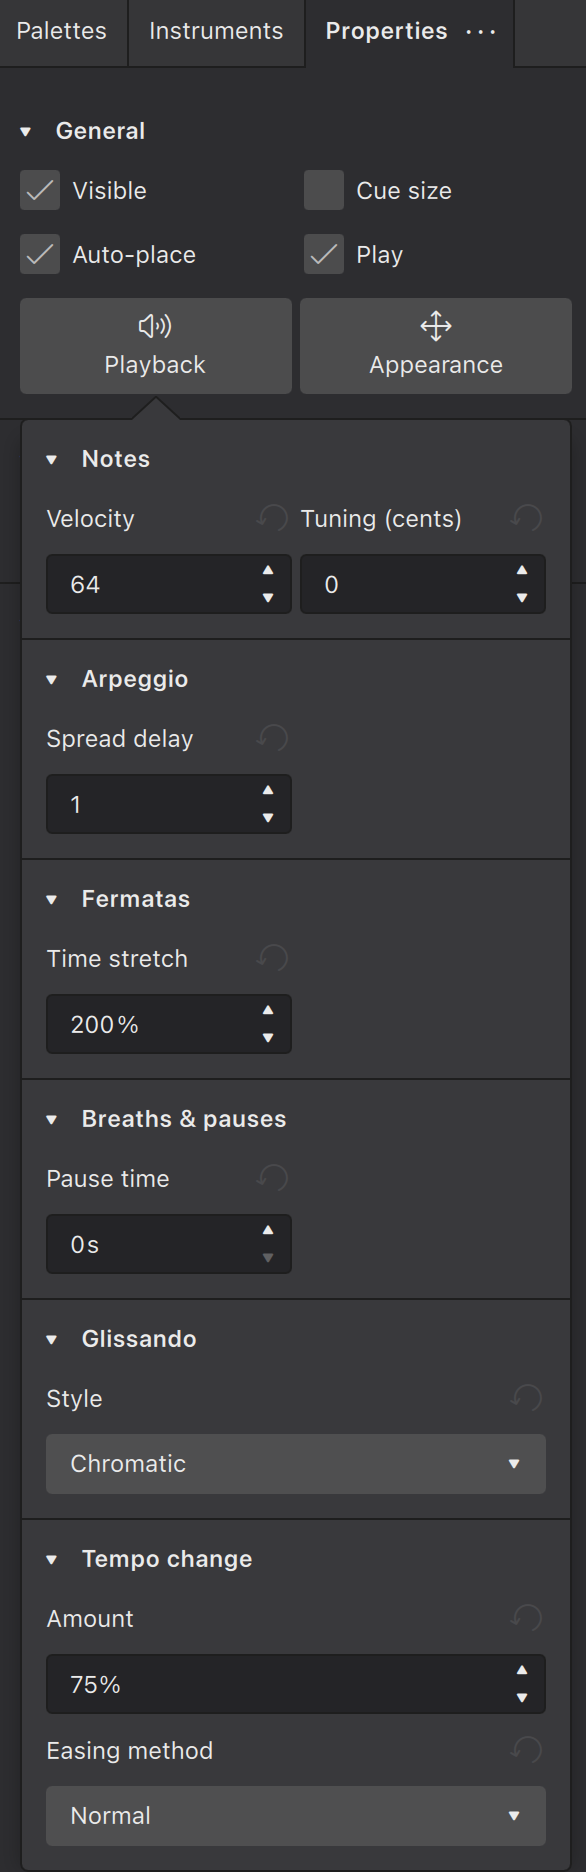
Under the Playback button, playback properties are shown if the selected elements have any.
Velocity
Only notes have the Velocity property. The valid range is 1 to 127. This property is usable for instruments using Soundfonts.
This property has no effect on instruments using Muse Sounds. See Dynamics for changing loudness of playback on instruments using Muse Sounds.
Tuning
Used to adjust the tuning of notes in cents. Only notes have the Tuning property.
Appearance settings
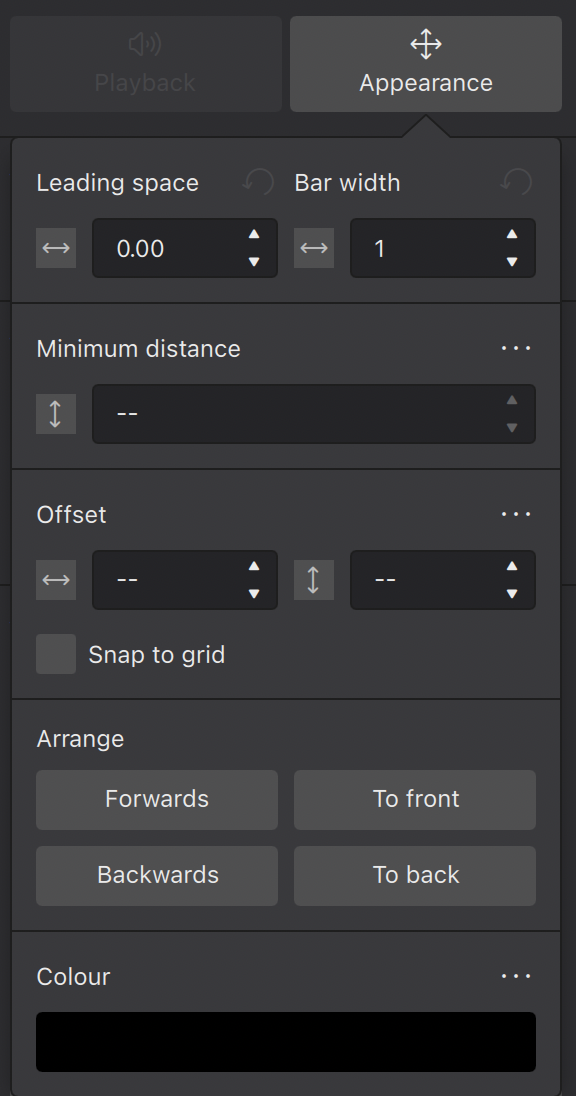
Leading space
This changes the leading space of selected elements: i.e. the space in front of the element. The leading space adjustment is applied across all staves, so that notes at the same time position remain aligned.
Measure width
This changes the width of the measure as a proportion of the original width: e.g. 1.5 = one-and-a-half times the default width.
Minimum distance
This is used by the auto-place collision avoidance algorithm and applies only to elements that are applied above/below the staff by default, such as staff text, dynamics, fingerings, lines etc. It sets the minimum distance (in sp.) of the selected objects from other elements that are closer to the staff, or the staff itself.
Offset
When newly applied, elements assume a default position. The horizontal/vertical offsets give you a more precise way of positioning an element than dragging it or moving with the keyboard arrows.
Snap to grid
This feature allows you to constrain drag operations to increments of a desired distance. First you need to check the Snap to grid box, then press Configure grid and set the desired horizontal/vertical step distances.
You can switch Snap to grid on/off as required by checking/unchecking the box.
Arrange
The four buttons in this section control how overlapping elements are drawn.They work as follows:
- Forwards moves the selected element in front of the next element
- Backwards moves the selected element behind the next element
- To front moves the selected element in front of all other elements.
- To back moves the selected element behind all other elements, including the staff lines.
Color
Click on this button to change the color of selected element(s). Choose a preset or custom color, or create your own by clicking the + button. This is stored for future reference in the list of custom colors to the right.
Properties for characters inside text objects
When Text object(s) are selected (the object, not the characters), the Properties panel shows the formatting settings of the Text object. Editing these properties may affect all of the characters inside.
When character(s) inside a Text object are selected, the Properties panel shows the formatting settings of the characters. Editing these properties only changes the selected characters. See Formatting text.
Saving and restoring default settings
After changing any given setting, you can click the "three dots" menu button adjacent to the setting to reveal a menu that allows you to either Reset the setting to the default for the score, or Save as default style for this score. The latter option is only available for properties that correspond to style settings, but this includes many of the properties in this panel.
Adjusting elements directly
This chapter explains methods to fine tune the literal positioning of elements on a score for layout purpose. The more common musical editing methods are explained in Entering and editing text, and Editing notes and rests chapters.
Changing the position of elements
To fine tune the literal positioning of elements on a score, either
- Drag it, see also Snap to grid chapter, or
- Select element(s) on a score, adjust their Offset property, see Properties panel chapter. or
-
Use Edit mode.
To enter Edit mode, either
- Right-click → Edit element on an element on a score, or
- Select an element on a score, use the keyboard shortcut F2, or
- Select an element on a score, use the keyboard shortcut Alt+Shift+E (Mac: ⌥+Shift+E)
Then, in Edit mode, press the keyboard arrows ← → ↑ ↓ to move the object in step of 0.5 sp, or
-
Edit it directly, this method does not work on notes, rests, and elements added from "Master palette : Symbols" (see Other symbols chapter). Select element(s) on a score, press the keyboard arrow keys ← → ↑ ↓ to move in small steps (0.1 sp). In combination with Ctrl (Mac: ⌘), they are moved in large steps (1 sp).
Read more about spatium (sp.) in Page layout concepts chapter.
Changing the shape of elements
To change the shape of elements such as slurs and ties after adding them to the score:
- Click on the slur or tie to be adjusted
- Click and drag the adjustment handles that appear around the element (N.b. red letters in the below diagram are for reference only)

Note that:
- Handles B, C, and D change the shape of the curve at that point
- Handles A end E adjust the element's length (This can also be achieved by pressing Shift+←/→ to move the ends one chord/rest at a time)
- Handle F repositions the whole line without changing its shape or length
If you wish to change the note to which a slur or tie is connected, the recommended method is to use the keyboard shortcuts described above (Shift+←/→). This is the most efficient way of changing both the visual and playback range of notes encompassed by a slur or tie.
Anchors
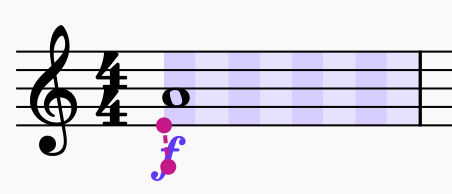
Some types of item – dynamics, hairpins, tempo text, pedal marks – do not have to be attached directly to notes or rests, but can also be attached to rhythmic positions within a duration. We call these anchors.
In general, items cannot be added directly to an anchor point within a duration, but must be added to a note or rest and then moved into the required position. The keyboard shortcuts to move between anchor points are Shift+←/→ (the same shortcuts that move other types of item between notes). The anchor positions are stored in the file as real rhythmic positions, so items will stay in the correct place when the score reformats.
If you select an 'anchorable' item and press Shift, you will see a visualization of the available anchors in that measure as alternating dark and light rectangles. The color is determined by the voice to which the item is assigned (purple for all voices, blue for voice 1, green for voice 2, etc.) Each slice represents a rhythmic subdivision to which you can anchor the item.
Moving between anchors
To move an item between anchors, hold Shift and press ← or →:

With lines (hairpins, pedal markings), both ends can be moved independently.
By default, the subdivisions shown are half of the beat as determined by the time signature (so, in this example, half of the quarter beat, i.e. eighth notes). However, anchors will also be shown for notes on other staves which are at rhythmic positions that fall outside of these subdivisions, which means you can align an item to notes on other staves, whatever their position:
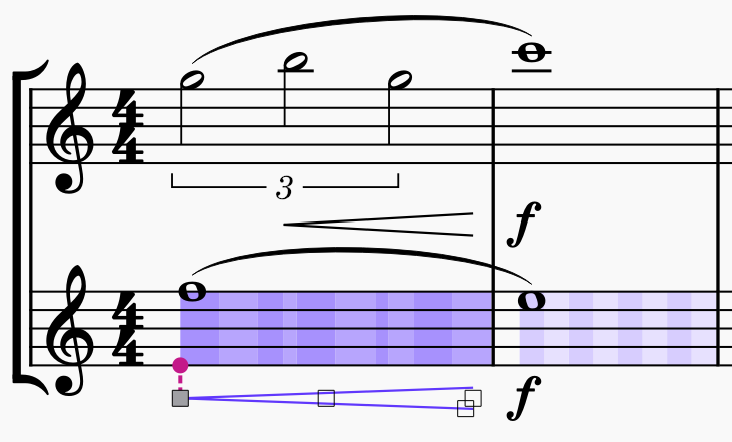
Moving dynamics to the 'end of duration' position
By using Shift+Alt+←/→, you can step not just between rhythmic subdivisions but also the end of each of those subdivisions. This is a special position; for a dynamic, the end of one duration is not the same as the start of the following one (which may have its own dynamic – or may be a rest.) This is most commonly encountered in something like this form:
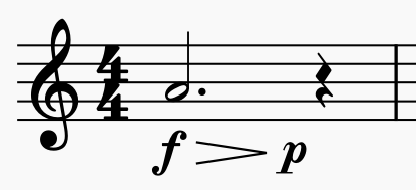
To input the dynamics in this example:
- Add a f dynamic to the note
- Add a hairpin to the note; it will end on the rest
- Add a p dynamic to the hairpin (which will put it at the endpoint of the hairpin, i.e. on the rest), or directly onto the rest
- Select the dynamic and press Shift+Alt+←, which will move the dynamic to the end of the last subdivision of the previous note
Note that hairpins cannot be moved to an 'end of duration' position; if there is no dynamic, then the distinction is meaningless. Therefore, the dynamic should be moved, and any hairpins will follow.
For clarity, when moving hairpins or other lines, the subdivisions that the item spans are shaded darker so you can see the range it spans:

Working with lines
See also the main chapter Other lines.
Changing the range of a line
To change the start and end points of a line:
- Select the line to reveal its adjustment handles

- Press Shift+←/→ to move the end of the line one step at a time (a step = one note/rest, or one measure—depending on the line type).
- Note: You can click or use Tab to move the focus between handles when adjusting. Focus on the left handle to move the beginning of the line.
- Fine-tune the position of handles using the keyboard arrows ←/→ if required. Note that this does not affect the playback range of the line.
As with slurs and ties, it is recommended to use Shift when adjusting line length with the arrow keys to ensure that the playback range also adjusts accordingly.
Creating diagonal lines
Although lines are horizontal by default, they can be set at any angle simply by dragging the start or end adjustment handles; or by selecting a start/end handle and using the Up/Down keyboard arrows.
Editing text of Text line objects
To edit the displayed text of Text line objects ( such as "system text line", "staff text line", and "barré line", see Entering and editing text):
- Select a text line element
- Go to the Properties panel
- Open the Text tab in the Text line section
- Edit these fields
- Beginning text
- Text when continuing to a new system: the text to display if the object spans more than one system (page layout concept), see Page layout concepts chapter.
See also
Parts
Opening a part
MuseScore 4 automatically creates a separate (default) part for every instrument in your score.
To open all parts at once:
- Click Parts in the toolbar (This will open the Parts dialog)
- Click Open all
To open an individual part:
- Click Parts in the toolbar
- Click a part to select it
- Click Open selected
You can also select specific parts to open at once. Do this by holding Control (Mac: ⌘) while selecting the parts you’d like to open, then click Open selected. You can also select a range of contiguous parts by clicking the first and holding Shift while clicking the last.
Closing a part
Click the X close button in a part tab to close a part.
Note that changes you make to a part will be saved with that part and retrievable the next time you open it from the Parts dialog.
Creating custom parts
The Parts dialog is tightly integrated with the Instruments panel. This integration makes it easy for you to create parts with any combination of instruments from your score.
There are two ways to customize parts in MuseScore 4: using the default (i.e. ready-made) parts to reveal other instruments, and creating entirely new parts.
Reveal instruments in default parts
As we’ve already seen, MuseScore 4 automatically creates a new (default) part for every instrument in your score. All you have to do is open the part from the Parts dialog.
In fact, each default part already contains all of the instruments in your score – they’re simply hidden from view (except, of course, the chosen part instrument).
This means you can “reveal” other instruments within any of the default parts. To do this:
- Open a part (as described above)
- Select the Instruments panel
- Click the eye icon next to another instrument
This instrument will now be visible in the chosen part.
This makes creating custom parts an incredibly flexible process. Revealing or hiding other instruments is completely non-destructive, meaning you can customize every instrument in every part, and hide or show only what you want to reveal to different players (or for different musical projects) without having to create entirely new parts each time.
Create a new part
You can create a completely "blank" part from scratch, allowing you full control over which instruments it shows. To do this:
- Click Parts in the toolbar to open the Parts dialog
- Click Create new part
- Give your new part a name
- Click Open selected
Your new part will now be open in the Score tab, but it will appear to contain no instruments. To add instruments to this part:
- Go to the Instruments panel
- Click the "eye" icon next to each instrument you’d like to appear in your part
Choose which voices appear in each part
Sometimes it will be necessary to create individual parts from staves that contain multiple voices. You might, for example, want to extract separate parts for orchestral players who share a staff in the main score (E.g. Flute I and Flute II). Or you might wish to create individual vocal parts from choral scores where, for example, four voices are notated across two staves.
You'll need to first create (see above) or duplicate (see below) a part. To then select which voices will appear in a part:
- Open a part (see above)
- Go to the Instruments panel
- Expand an instrument by clicking on the triangular dropdown icon
- Click the settings icon next to the staff name
- Select which voice(s) you want to appear in your part by ticking/un-ticking the checkboxes under Voices visible in the score
Applying styles to parts
Style settings for a wide range of engraving elements can be applied specifically to parts without affecting the main score.
To change style settings for a specific part:
- Ensure a part has been opened and is currently selected in the Score tab
- Go to Format → Style...
- Make your desired style settings changes (applicable changes will be visible in the score in real time)
- Click OK to confirm your changes
Changes you make in this dialog will affect only the part selected in the Score tab. If you want changes to affect all parts (but not the main score), select Apply to all parts before clicking OK.
Learn more about saving and loading default style settings in Templates and styles.
Managing synchronisation of score and parts
(This section describes features that are new or considerably enhanced in MuseScore 4.2.)
When you make changes to the content of the score - adding or deleting an item, or changing pitches and durations of notes, for example - these changes are always reflected in the parts, and vice versa.
However, just as you can apply different styles to score and parts, you may want the properties (position, style/appearance) of certain items to differ between score and parts. Therefore:
- When you change any property of an item in a part, that change will not be reflected in the score and the item will be marked as 'desynchronised' from the score, if it is not already;
- When you change any property of an item in the score, that change will be reflected in the part, unless that item is already desynchronised.
When an item in a part is desynchronised, its colour when selected changes to orange and, according on which properties have been changed, the toggles which appear in the Properties panel under Score and part synchronisation will switch off:
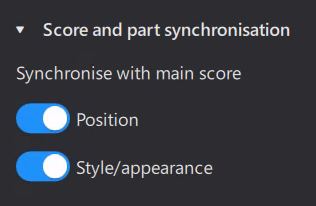
Position refers to offset, leading space, minimum distance, autoplace, direction (up/down, above/below), alignment, and a few other properties specific to certain types. Style/appearance is, essentially, all other properties.
If you have made changes to an item in the part but wish to resynchronise that item with the score, you can turn these toggles back on to reset those properties to match the score.
Text items have a third toggle, Text, which allows you to control synchronisation of the content and formatting of a text item. Unlike other properties, this must be manually switched off before you make changes to a text item in a part which you do not want to be reflected in the score.
Excluding items from parts or score
In some cases you may wish certain items to be in the score but not to appear in the parts at all, or to appear in a part but not in the score. This is not the same as simply making the item invisible, as invisible items sometimes affect the layout.
This option is available for frames, clef changes, ottava lines, staff text and system text. In the case of clefs and ottavas, excluding these items from one view will cause the notes there to be repositioned accordingly.
To exclude an item from parts:
- Select the item in the score
- Open Properties
- Under Score and part synchronisation, check Exclude from parts
To exclude an item from the score:
- Select the item in the part
- Open Properties
- Under Score and part synchronisation, check Exclude from score
Renaming, duplicating and deleting parts
This all takes place in the Parts dialog (accessible from the Parts button in the toolbar).
Simply click the "three dots" menu icon next to a selected part to reveal its options. Note that only newly created parts (created by clicking the Create new part button) can be deleted. All parts can be duplicated or renamed.
To duplicate any part:
- Select a part in the Parts dialog
- Click the "three dots" menu icon for the selected part
- Select Duplicate from the context menu that appears
- Enter a new name for the part (or leave the default name as is)
- Hit Enter, or click anywhere in the Parts dialog
To rename any part:
- Select a part in the Parts dialog
- Click the "three dots" menu icon for the selected part
- Select Rename from the context menu that appears
- Type your new part name
- Hit Enter to confirm the new name
Note you can also double click on any part in the Parts dialog to rename it.
To delete a newly created part:
- Select a newly created part in the Parts dialog
- Click the "three dots" menu icon for the selected part
- Select Delete from the context menu that appears
When a part is deleted, its tab in the Score tab (if already opened) will be closed. Any customizations made to that part will also be lost. The part will also no longer appear in the Parts dialog.
Exporting and printing parts
To export parts:
- Click File → Export... (alternatively, select the Publish tab and click Export...)
- Check the box next to the part(s) you want to export, or click Select all to choose all parts at once
- Select whether to export all parts combined in one file, or leave the default export setting as each part to a separate file
- Click Export...
- Select your destination file and name your score in your operating system's Export dialog
- Click Save
Parts will be exported in the PDF format by default. To change the export format, select your preferred format from the dropdown menu in Export settings. You can export your parts in a range of image and audio formats, as well as the braille format for compatible printers. For more information, see File Export.
To print parts:
- Ensure the part you wish to print is selected in the Score tab
- Click File → Print
- Use your operating system's print dialog to print the selected part
Note that parts can currently only be printed one at a time.
Default keyboard shortcuts
On macOS, make the following substitutions:
- Replace Ctrl with Cmd (or ⌘)
- Replace Alt with Option (or ⌥)
- Replace Home with Fn+Left
- Replace End with Fn+Right
- Replace PgUp with Fn+Up
- Replace PgDn with Fn+Down
- Add Fn with function keys
Navigation
Page navigation
| Action | Windows/Linux | macOS |
|---|---|---|
| Zoom in | Ctrl+= | Cmd+= |
| Zoom out | Ctrl+- | Cmd+- |
| Zoom to 100% | Ctrl+0 | Cmd+0 |
| Go to first element in score | Ctrl+Home | Cmd+Fn+Left |
| Go to last element in score | Ctrl+End | Cmd+Fn+Right |
| Jump to next screen | PgDn | Fn+Down |
| Jump to previous screen | PgUp | Fn+Up |
| Jump to top of first page | Home | Fn+Left |
| Jump to bottom of last page | End | Fn+Right |
| Jump to next page | Ctrl+PgDn | Cmd+Fn+Down |
| Jump to previous page | Ctrl+PgUp | Cmd+Fn+Up |
| Find / Go to | Ctrl+F | Cmd+F |
Score navigation
| Action | Windows/Linux | macOS |
|---|---|---|
| Select next chord | Right | Right |
| Select previous chord | Left | Left |
| Go to next measure | Ctrl+Right | Cmd+Right |
| Go to previous measure | Ctrl+Left | Cmd+Left |
| Select next element in score | Alt+Right | Option+Right |
| Select previous element in score | Alt+Left | Option+Left |
| Select note/rest above | Alt+Up | Option+Up |
| Select note/rest below | Alt+Down | Option+Down |
Note input
General
| Action | Windows/Linux | macOS |
|---|---|---|
| Note input: toggle note input mode | N | N |
| Show/hide piano keyboard | P | P |
| Use voice 1 | Ctrl+Alt+1 | Cmd+Option+1 |
| Use voice 2 | Ctrl+Alt+2 | Cmd+Option+2 |
Duration
| Action | Windows/Linux | macOS |
|---|---|---|
| Set duration | 1 – 9 | 1 – 9 |
| Set duration: 32nd note | 2 | 2 |
| Set duration: 16th note | 3 | 3 |
| Set duration: 8th note | 4 | 4 |
| Set duration: quarter note | 5 | 5 |
| Set duration: half note | 6 | 6 |
| Set duration: whole note | 7 | 7 |
| Toggle duration dot | . | . |
| Enter tuplet | Ctrl+2 – Ctrl+9 | Cmd+2 – Cmd+9 |
| Enter tuplet: duplet | Ctrl+2 | Cmd+2 |
| Enter tuplet: triplet | Ctrl+3 | Cmd+3 |
| Enter tuplet: quadruplet | Ctrl+4 | Cmd+4 |
| Add tied note | T | T |
| Halve selected duration (includes dotted values) | Shift+Q | Shift+Q |
| Double select duration (includes dotted values) | Shift+W | Shift+W |
Pitch
| Action | Windows/Linux | macOS |
|---|---|---|
| Enter note | A – G | A – G |
| Add note to chord | Shift+A – Shift+G | Shift+A – Shift+G |
| Enter interval | Alt+1 – Alt+9 | Option+1 – Option+9 |
| Toggle accidental: flat | - | - |
| Toggle accidental: natural | = | = |
| Toggle accidental: sharp | + | + |
| Enter rest | 0 | 0 |
| Add grace note: acciaccatura | / | / |
Tablature
| Action | Windows/Linux | macOS |
|---|---|---|
| Set duration (TAB) | Shift+0 – Shift+9 | Shift+0 – Shift+9 |
| Set duration: 32nd note (TAB) | Shift+2 | Shift+2 |
| Set duration: 16th note (TAB) | Shift+3 | Shift+3 |
| Set duration: 8th note (TAB) | Shift+4 | Shift+4 |
| Set duration: quarter note (TAB) | Shift+5 | Shift+5 |
| Set duration: half note (TAB) | Shift+6 | Shift+6 |
| Set duration: whole note (TAB) | Shift+7 | Shift+7 |
| Enter TAB: fret | 0 – 9 | 0 – 9 |
| Enter TAB: fret | A – K | A – K |
| Go to string above (TAB) | Up | Up |
| Go to string below (TAB) | Down | Down |
| Toggle ghost note | Shift+X | Shift+X |
Selecting
| Action | Windows/Linux | macOS |
|---|---|---|
| Select all | Ctrl+A | Cmd+A |
| Add to selection: previous note/rest | Shift+Left | Shift+Left |
| Add to selection: next note/rest | Shift+Right | Shift+Right |
| Add to selection: staff above | Shift+Up | Shift+Up |
| Add to selection: staff below | Shift+Down | Shift+Down |
| Select to beginning of measure | Ctrl+Shift+Left | Cmd+Shift+Left |
| Select to end of measure | Ctrl+Shift+Right | Cmd+Shift+Right |
| Select to beginning of score | Ctrl+Shift+Home | Cmd+Shift+Fn+Left |
| Select to end of score | Ctrl+Shift+End | Cmd+Shift+Fn+Right |
Editing
General
| Action | Windows/Linux | macOS |
|---|---|---|
| Escape | Esc | Esc |
| Undo | Ctrl+Z | Cmd+Z |
| Redo | Ctrl+Shift+Z | Cmd+Shift+Z |
| Copy | Ctrl+C | Cmd+C |
| Cut | Ctrl+X | Cmd+X |
| Paste | Ctrl+V | Cmd+V |
| Repeat selection | R | R |
| Insert one measure before selection | Ins | Ins |
| Insert measures before selection | Ctrl+Ins | Cmd+Ins |
| Insert one measure at end of score | Ctrl+B | Cmd+B |
| Insert measures at end of score | Alt+Shift+B | Option+Shift+B |
| Delete | Del | Del |
| Delete selected measures | Ctrl+Del | Cmd+Del |
| Show/hide properties | F8 | Fn+F8 |
| Edit element | F2 | Fn+F2 |
Duration
| Action | Windows/Linux | macOS |
|---|---|---|
| Set duration | 1 – 9 | 1 – 9 |
| Enter tuplet | Ctrl+2 – Ctrl+9 | Cmd+2 – Cmd+9 |
| Add tied note | T | T |
Pitch
| Action | Windows/Linux | macOS |
|---|---|---|
| Toggle accidental: flat | - | - |
| Toggle accidental: natural | = | = |
| Toggle accidental: sharp | + | + |
| Move pitch/selection up | Up | Up |
| Move pitch/selection down | Down | Down |
| Move pitch up an octave | Ctrl+Up | Cmd+Up |
| Move pitch down an octave | Ctrl+Down | Cmd+Down |
| Change enharmonic spelling (concert and written pitch) | J | J |
| Move note to higher string (TAB) | Ctrl+Up | Cmd+Up |
| Move note to lower string (TAB) | Ctrl+Down | Cmd+Down |
Notation
| Action | Windows/Linux | macOS |
|---|---|---|
| Flip direction | X | X |
| Use voice 1 | Ctrl+Alt+1 | Cmd+Option+1 |
| Use voice 2 | Ctrl+Alt+2 | Cmd+Option+2 |
Manual adjustment
| Action | Windows/Linux | macOS |
|---|---|---|
| Move text left | Left | Left |
| Move text right | Right | Right |
| Move text left quickly | Ctrl+Left | Cmd+Left |
| Move text right quickly | Ctrl+Right | Cmd+Right |
| Move selection up | Up | Up |
| Move selection down | Down | Down |
| Move selection up quickly | Ctrl+Up | Cmd+Up |
| Move selection down quickly | Ctrl+Down | Cmd+Down |
Text
General
| Action | Windows/Linux | macOS |
|---|---|---|
| Add text: staff text | Ctrl+T | Cmd+T |
| Add text: expression text | Ctrl+E | Cmd+E |
| Add text: system text | Ctrl+Shift+T | Cmd+Shift+T |
| Add text: tempo marking | Alt+Shift+T | Option+Shift+T |
| Add text: rehearsal mark | Ctrl+M | Cmd+M |
Formatting
| Action | Windows/Linux | macOS |
|---|---|---|
| Format text: bold face | Ctrl+B | Cmd+B |
| Format text: italic | Ctrl+I | Cmd+I |
| Format text: underline | Ctrl+U | Cmd+U |
Lyrics
| Action | Windows/Linux | macOS |
|---|---|---|
| Add text: lyrics | Ctrl+L | Cmd+L |
| Go to next syllable | Space | Space |
| Go to previous syllable | Shift+Space | Shift+Space |
| Lyrics: enter hyphen | - | - |
| Lyrics: enter melisma | _ | _ |
| Add lyric verse | Return | Return |
| Go to next lyric verse | Down | Down |
| Go to previous lyric verse | Up | Up |
Chord symbols, Roman numeral analysis, Nashville numbers, figured bass
| Action | Windows/Linux | macOS |
|---|---|---|
| Add text: chord symbol | Ctrl+K | Cmd+K |
| Next text element | Space | Space |
| Previous text element | Shift+Space | Shift+Space |
| Advance cursor: next beat | ; | ; |
| Advance cursor: previous beat | Shift+; | Shift+; |
| Advance cursor: duration | Ctrl+1 – Ctrl+9 | Cmd+1 – Cmd+9 |
Other score elements
| Action | Windows/Linux | macOS |
|---|---|---|
| Show/hide palettes | F9 | Fn+F9 |
| Search palettes | Ctrl+F9 | Cmd+Fn+F9 |
| Add slur | S | S |
| Add articulation: accent | Shift+V | Shift+V |
| Add articulation: marcato | Shift+O | Shift+O |
| Add articulation: staccato | Shift+S | Shift+S |
| Add articulation: tenuto | Shift+N | Shift+N |
| Add hairpin: crescendo | < | < |
| Add hairpin: decrescendo | > | > |
Score setup and formatting
| Action | Windows/Linux | macOS |
|---|---|---|
| Add/remove instruments | I | I |
| Open instruments dialog | F7 | Fn+F7 |
| Toggle visibility of elements | V | V |
| Decrease layout stretch | { | { |
| Increase layout stretch | } | } |
| Add/remove system break | Return | Return |
| Add/remove page break | Ctrl+Return | Cmd+Return |
| Reset shapes and positions | Ctrl+R | Cmd+R |
File Operations
| Action | Windows/Linux | macOS |
|---|---|---|
| New | Ctrl+N | Cmd+N |
| Open | Ctrl+O | Cmd+O |
| Close | Ctrl+W | Cmd+W |
| Save | Ctrl+S | Cmd+S |
| Ctrl+P | Cmd+P | |
| Quit | Ctrl+Q | Cmd+Q |
User interface
Playback
| Action | Windows/Linux | macOS |
|---|---|---|
| Play | Space | Space |
| Show/hide mixer | F10 | Fn+F10 |