Ký âm
Trong chương "Các thao tác cơ bản" bạn đã học cách nhập nốt và tương tác với bảng công cụ. Chương "Ký âm" mô tả chi tiết hơn về các kiểu ký âm khác nhau, bao gồm cả các ký hiệu âm nhạc nâng cao.
Xem thêm "Các mục nâng cao"
Hóa biểu
Key signatures can be created or changed by dragging one from the Key Signatures palette to a measure, or onto an existing signature.
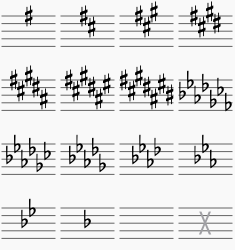
F9 (Mac: fn+F9) toggles the palette window.
Replace an existing key signature
Drag a key signature from the palette directly onto a key signature in the score. If you want to change the key signature to only one staff of your score (which might be done in some contemporary music, for example), press Ctrl (Mac: ⌘) while dragging the key to the right staff.
Add a new key signature
Drag a key signature from the palette onto an empty part of a measure. This will place the key signature at the beginning of the measure. If you want to add the key signature to only one staff of your score (which might be done in some contemporary music, for example), press Ctrl (Mac: ⌘) while dragging the key to the right staff.
Remove a key signature
Click on an existing key signature and press Del, or drag the empty key signature from the palette (in the advanced workspace) onto the measure.
Courtesy key signature
In the Inspector for a selected key signature, there is an option for "Show courtesy." Additionally, Style → General... → Page has on option for "Create courtesy key signatures". The Inspector will affect only the selected one; the style setting will affect the entire score.
Naturals on key signature changes
You can choose whether to show natural(s) in certain cases when changing the key signatire. Under Style → General... → Accidentals you'll see the options:
NOT FOUND: Key_signature-Naturals_en.png
You can Apply the changes, or click OK. If you are in a linked part, rather than in the primary score, you can apply the change to all parts with the corresponding button.
In this example, the key signature change is showing naturals.
 ]
]
Key signature and multimeasure rest
Multimeasure rests are interrupted, if there is change in the key signature.

Courtesy key signature and section break
A courtesy key signature will not be shown just before a section break
See Break or spacer: Section break
Custom key signatures
Press Shift+K to bring up the master key signature palette.
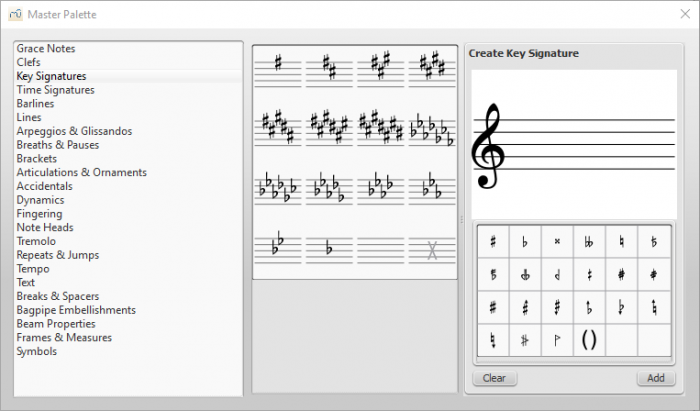
You can even use half-flats, half-sharps, etc.
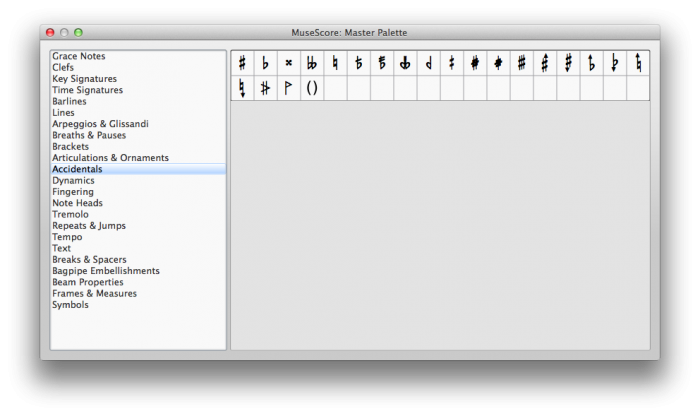
Note, however, that currently the playback of custom key signatures is not supported.
Khóa nhạc
Clefs are created or changed by dragging a clef symbol from the Clefs palette into a measure or onto another clef. Use F9 (Mac: ⌥+⌘+K) to show or hide the palette window.
Note: Some clefs are only available from the master palette.
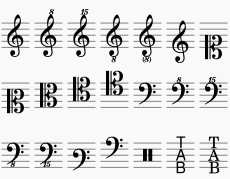
Add
Drag a clef from the palette into an empty part of a measure - this creates a clef at the beginning of the measure.
Drag a clef onto a particular note to create a mid-measure clef - if the measure is not the first in the staff, it is drawn smaller. An example is a piano score, in which the top staff starts with a G clef and switches immediately to an F clef, then after a note and a rest, back to a G clef.
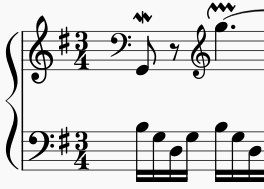
Note: a clef dragged onto a note (and especially onto the first note), will not be affected by 'Courtesy clef' properties.
To see whether the change will apply to the note or the measure, check what changes color when you drag it.
You can also select the note, or measure first, and double-click the clef on the palette to make sure it affects the right one.
Remove
Select a clef and press Del.
Notes:
- Changing a clef does not change the pitch of any note. Instead, the notes move to preserve pitch.
- Special/rarely used clefs are not shown in the palette by default. These can be found in the aforementioned master palette instead.
Số chỉ nhịp
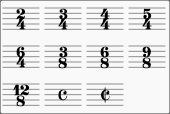
Time signatures are available in the main palette sidebar. You can drag and drop the time signatures onto the score (see Palette for general information on working with palettes in MuseScore).
Create your own Time Signature
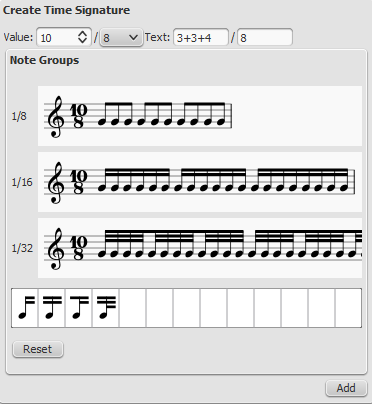
If a time signature is needed that is not found in the corresponding workspace palette, open the Master Palette directly to the Time Signature section (ShiftT) to create your own. You can edit the numerator and the denominator in the Create Time Signature Panel by pressing the Add button. Once added, just drag and drop the time signature to the score from the window where you created it. Be aware that it will not appear in the workspace palette. If you want to add it in the palette, read Custom Palette.
Change default beaming
To adjust beams from the automatic offering, you can click the notes you want to modify.
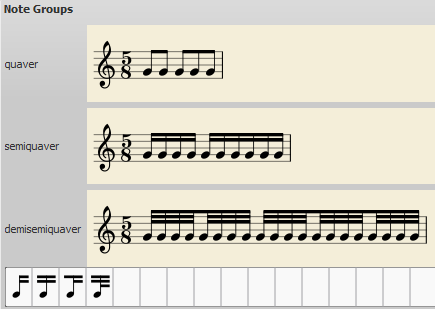
For example: by default 5/8 is beamed 3+2. You can click the third and then fourth note to beam it 2+3. Don't forget to do it for the other two subdivisions. To edit the third one drag an icon from  to the right note. In this example, the "beam start" icon got dragged to the 9th note and the Beam 16th sub icon to the 13th note.
Delete a time signature
Time signatures you don't need (any longer) can be removed in the above dialog box via right-click → "Delete Content".
Edit to additive meters
In most cases, you'll only need to edit the first of the upper numbers. The additional upper numbers are for additive meters, which contain multiple upper numbers separated by a plus sign.
Different duration from time signature: Pickup measures (Anacrusis) and Cadenzas
There are occasions when the actual duration of a measure is different from the duration specified by the time signature. Pickup measures and Cadenzas are a common example. To change the actual duration of a measure without displaying a different time signature, see Measure operations: Properties, Measure duration.
Local Time Signatures
Time signatures can be different for different staves. An example here is Bach's 26. Goldberg Variation:

MuseScore has the concept of a global time signature and an actual (local) time signature. To change the global time signature drag and drop a palette object to a staff. The global time signature is used to count beats (as shown in the status line) and is the reference for tempo markings. The global time signature is the same for all staves and normally identical to the actual time signature.
The actual time signature is set in the time signature property dialog and can deviate from the global time signature for every staff (left hand 18/16 in the example).
NOT FOUND: Time_Signature_Properties_en.png
The text of the time signature can be set independent of the actual values.
A local time signature is set by dropping a time signature symbol while holding the Ctrl key. The local time signature is set only for one staff. A global time signature is replicated for all staves.
Time signature changes and Other Objects
Multimeasure breaks are interrupted when a time signature change occurs.
Also, a section break will prevent a courtesy time signature being shown at the end of the previous measure.
See also
Vạch nhịp
Change bar line type
Bar lines are changed by dragging a bar line symbol from the bar line palette to a bar line in the score.
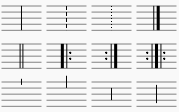
To hide a bar line entirely, select the line and untick Visible in the Inspector (F8).
Create grand staff (great stave)
To extend bar lines over multiple staves, double-click on a bar line (see Edit mode).
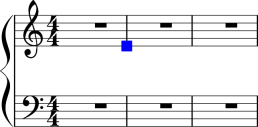
Click and drag the blue handle down to the next staff.
The staff bar line updates appear after leaving edit mode.
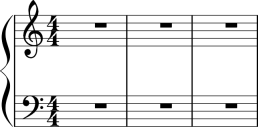
See also
Articulations and ornaments
A comprehensive set of symbols can be found in the Articulations and Ornaments palette in the Advanced workspace:
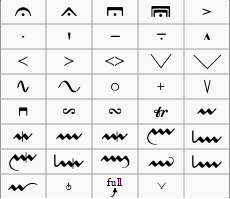
There is also an abbreviated version in the Basic workspace.
Articulations
Articulations are the symbols added to the score to show how a note or chord is to be played. The principal symbols in this group are:
- Fermatas
- Staccato
- Mezzo-staccato / Portato
- Staccatissimo
- Tenuto
- Sforzato
- Marcato
Specialist articulations are also included for bowed and plucked strings, wind instruments etc.
Ornaments
Ornaments include:
- Mordents, Inverted Mordents, Pralltrillers
- Trills
- Turns
- Bends
Note: Appoggiaturas and acciaccaturas can be found in the Grace Notes palette.
Add articulation/ornament
Use either of the following methods:
- Select a note or a range of notes, then double-click a symbol in a palette.
- Drag a symbol from a palette onto a notehead.
Add accidental to an ornament
To apply an accidental to an existing ornament, such as a trill:
- Select the note to which the ornament is attached;
- Open the Symbols section of the Master palette;
- Search for and apply the desired accidental to the score (small accidentals can be found using the search term "figured bass");
- Drag the accidental into position (or reposition using keyboard shortcuts or the Inspector).
Add fermata to a barline
A fermata can be applied directly to a barline by selecting the barline and double-clicking the fermata from a palette. This does not affect playback though.
Keyboard shortcuts
- Toggle Staccato: Shift+S
- Toggle Tenuto: Shift+N
- Toggle Sforzato (accent): Shift+V
- Toggle Marcato: Shift+O
- Add Acciaccatura (grace note): /
Keyboard shortcuts can be customized in MuseScore's Preferences.
Adjust position
Immediately after adding an articulation or ornament from a palette, the symbol is automatically selected: It can then be moved up or down from the keyboard as follows:
- Press up/down arrow keys for fine positioning (0.1 sp at a time);
- Press Ctrl+↑ or Ctrl+↓ (Mac: Cmd+↑ or Cmd+↓) for larger vertical adjustments (1 sp at a time).
- To flip a symbol to the other side of the note (where applicable), select it and press X.
To enable adjustments in all directions from the keyboard:
- Double click on the symbol to enter Edit mode, or click on it and press Ctrl+E (Mac: Cmd+E) , or right-click on the symbol and select "Edit element";
- Press arrow keys for fine positioning (0.1 sp at a time); or press Ctrl+Arrow (Mac: Cmd+Arrow) for larger adjustments (1 sp at a time).
You can also change the horizontal and vertical offset values in the Inspector. To position more than one symbol at a time, select the desired symbols and adjust the offset values in the Inspector.
Note: The symbol can also be repositioned by clicking and dragging, but for more precise control, use the methods above.
Articulation properties
Most properties of articulations/ornaments can be edited from the Inspector. Other properties (i.e. direction and anchor position) can also be accessed by right-clicking on the symbol and selecting Articulation Properties….
You can also make global adjustments to all existing and subsequently-applied articulations by selecting Style… → General… → Articulations, Ornaments.
See also
External links
- Ornaments at Wikipedia
Bends
A variety of simple and complex (multi-stage) bends can be created with the Bend Tool  , located in the Articulations and Ornaments palette of the Advanced workspace.
Apply a bend
To apply one or more bends to the score, use one of the following options:
- Select one or more notes and double-click a bend symbol in the palette.
- Drag a bend symbol from the palette on to a note.
Edit a bend
To edit a bend, use one of the following:
- Right click on a bend symbol in the score and select "Bend properties."
-
Select a bend symbol in the score and press "Properties" in the "Bend" section of the Inspector.
Preset options are available, if needed, on the left hand side of the Bend properties window. The current bend is represented by a graph consisting of gray lines connected by square, blue nodes (see image above). The slope of the line indicates the type of bend:
- Up-slope = Up-bend
- Down-slope = Down-bend
- Horizontal line = Hold
The vertical axis of the graph represents the amount by which the pitch is bent up or down: one unit equals a quarter-tone: 2 units a semitone, 4 units a whole-tone, and so on. The horizontal axis of the graph indicates the length of the bend: each gray line segment extends for 1 space (sp) in the score.
A bend is modified by adding or deleting nodes in the graph:
- To add a node, click on an empty intersection.
- To delete a node, click on it.
Adding a node lengthens the bend by 1 sp; deleting a node shortens the bend by 1 sp. The Start and End points of the bend can be moved up and down only.
Adjust height
The height of the bend symbol is automatically adjusted so that it appears just above the staff. This height can be reduced, if necessary, with a workaround:
- Create another note on the top line (or space) of the staff, vertically above the note at which you want the bend to start.
- Apply the bend to the higher note first: this will give you a bend symbol with the lowest height.
- To increase the height of the bend move this note downward.
- Drag the bend symbol downwards to the correct position.
- Mark the top note invisible and silent (using the Inspector).
Adjust position
To adjust position use one of the following:
- Drag the bend symbol with a mouse.
- Click on the symbol and adjust the horizontal and vertical offsets in the Inspector.
- Double click on the symbol; or click on it and press Ctrl+E (Mac: Cmd+E); or right-click on the symbol and select "Edit element." Then use the arrow keys for fine positioning (0.1 sp at a time); or Ctrl+Arrow (Mac: Cmd+Arrow) for larger adjustments (1 sp at a time).
Custom bends
After a bend has been created in the score it can be saved for future use by dragging and dropping the symbol to a palette while holding down Ctrl+Shift (Mac: Cmd+Shift). See Custom Workspace
Dấu biến cường
Hairpins are line objects. To create a hairpin, select a note to mark the start point.
- <: Creates a crescendo hairpin
- >: Creates a diminuendo hairpin (decrescendo)
You can also create hairpins by dragging a hairpin symbol from the line palette to a note head.
-
< creates a crescendo hairpin:

-
Double click switches to edit mode.
Then select (click on) the end point to move:
-
Shift+→ moves the anchor of the selected end point:

-
→ and Ctrl→ move the selected end point:

Dấu hóa bất thường
Dấu hóa bất thường có thể được thiết-lập/thay-đổi bằng cách kéo một dấu hóa bất thường từ bảng công cụ Dấu-hóa-bất-thường tới một nốt nhạc trong bản nhạc.

Nếu muốn thay đổi cao độ của nốt, bạn có thể chọn nốt và nhấn:
- ↑: Tăng cao độ của nốt lên nửa cung (các dấu thăng hay dùng).
- ↓: Giảm cao độ của nốt xuống nửa cung (các dấu giáng hay dùng).
- Ctrl+↑ (Mac: Cmd+↑): Tăng cao độ của nốt lên một ốc-ta hay quãng tám.
- Ctrl+↓ (Mac: Cmd+↓): Giảm cao độ của nốt xuống một ốc-ta hay quãng tám.
- J: Thay đổi cách viết trùng âm của một nốt.
Để đưa một dấu hóa bất thường thành dạng dấu hóa báo trước (nghĩa là dấu hóa để trong ngoặc đơn), bạn hãy kéo dấu ngoặc đơn từ bảng công cụ dấu hóa bất thường lên trên dấu hóa mà bạn muốn (không phải lên trên đầu nốt nha). Để bỏ dấu ngoặc đơn này đi, hãy chọn dấu hóa đó và nhấn Del.
Nếu sau đó bạn thay đổi cao độ bằng các phím mũi tên, các thiết lập bằng tay này trên dấu hóa bất thường sẽ bị loại bỏ.
Xác định lại cao độ
Chức năng trong trình đơn Nốt → Xác định lại cao độ sẽ cố gắng chỉnh lại cho đúng cách ghi các dấu hóa bất thường cho toàn bộ bản nhạc.
Xem thêm
Liên kết bên ngoài
- Dấu hóa trên trang Wikipedia
Dấu liên
Tuplets are used to write rhythms beyond the beat divisions usually permitted by the time signature. For example, triplet eighth notes (quavers) in a 4-4 time signature divide the quarter note (crotchet) beat into three instead of two.
Instructions
To create a triplet, first select a note on the score that specifies the full duration of the triplet group. For example, a group of triplet eighth notes (quavers) has a "full duration" of one quarter note (crotchet).

From the main menu, choose Notes → Tuplets → Triplet. This creates a triplet by dividing the full duration into three equal parts.

They can be further edited.

Note input mode
Tuplet entry works slightly differently in note input mode than the method outlined above. You must select the duration first, and enter pitches afterward. Below are step-by-step instructions for making triplet eighth notes.
- Switch to note input mode by pressing N
- Make sure the note input marker is in the place that you want to start the tuplet (use the right and left arrow keys if necessary)
- Choose the duration for the whole tuplet group from the note input toolbar. For this example, click on the quarter note (or press 5 on the keyboard)
- From the main menu, choose Notes → Tuplets → Triplet, or press Ctrl+3 (Mac: ⌘+3)
- Notice that an eighth note duration is automatically selected. Click on the staff to add pitches or enter them via computer or MIDI keyboard
Properties
To change the display properties of a tuplet, select the tuplet number, or bracket, and use the Inspector (F8).
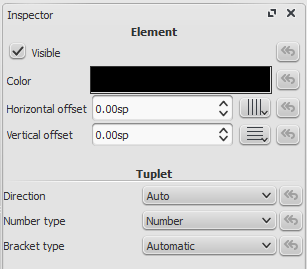
If neither the number nor the bracket is shown, select a note from the tuplet, then use the Tuplet button in Inspector to see the above dialog.

For Direction, choose Auto to place the bracket on the same side of the note heads as the stem, or beam. Choose Up, or Down to explicitly place the bracket above or below the note heads, respectively, regardless of the stem, or beam position.
For Number type, choose Number to show an integer, Relation to show a ratio of two integers, or Nothing to show no number at all.
For Bracket type, choose Automatic to hide the bracket for beamed notes and show the bracket if the tuplet includes unbeamed notes or rests. Choose Bracket, or Nothing to explicitly show, or hide the bracket, respectively.

If you move the bracket, or tuplet number, you can see vertical and horizontal offset being updated (default offsets are 0sp for both).
NOT FOUND: insepector2.png
You can restore default settings with the arrow return button on the right.
NOT FOUND: insepector_restoredafaultsettings.png
Style
Go to Style → General... and select Tuplets. It enables you to change all tuplet properties.
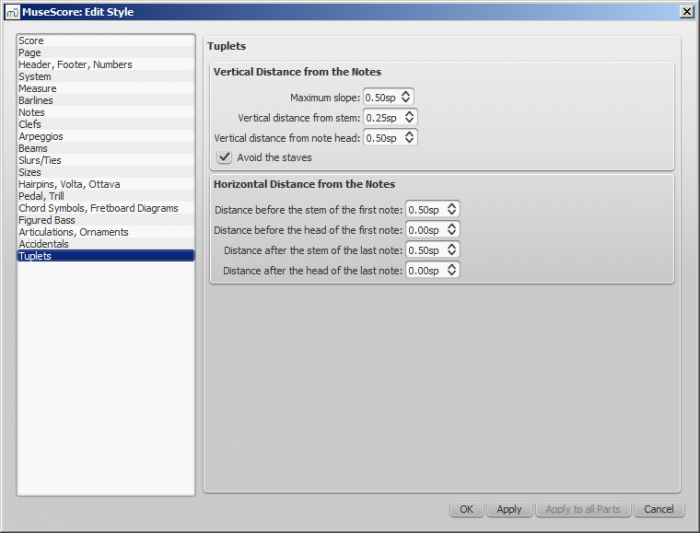
Two adjustments are possible: Vertical and Horizontal
- Vertical adjustment has three options with values in space units and one (un)ticked option
- Maximum slope: default value is 0.50; range is from 0.10 to 1.00
- Vertical distance from stem (see (2) below): default value is 0.25; range is from -5.00 to 5.00
- Vertical distance from note head (see (3) below): default value is 0.50; range is from -5.00 to 5.00
- Avoid the staves: by default ticked
- Horizontal has four options with values in space units
- Distance before the stem of the first note (see (5) below): default value is 0.50; range is from -5.00 to 5.00
- Distance before the head of the first note: default value is 0.00; range is from -5.00 to 5.00
- Distance after the stem of the last note (see (6) below): default value is 0.50; range is from -5.00 to 5.00
- Distance after the head of the last note: default value is 0.00; range is from -5.00 to 5.00

See also
External links
- Tuplet at Wikipedia
- How To Create Triplets in MuseScore [video]
- The User Guide to Tuplets in MuseScore [video]
Dấu luyến
A slur is a curved line between two or more notes that indicates they are to be played without separation. If you mean to join two notes of the same pitch, see Tie
First Method
-
Leave
Note inputmode and select the first note:
-
S creates a slur:

-
Shift+Right moves the slur end to the next note:

-
X flips the slur direction:

-
Esc ends Slur Edit mode:

Second Method
- Leave
Note inputmode and select the first note - Ctrl-select (⌘-select on a Mac) or Shift-select the last note
- Hit S
Third Method
- While in
Note inputmode, key in the first note in the slurred section - Hit S to begin the slurred section
- Key in the remaining notes in the slurred section
- Hit S to end the slurred section
Adjustments
The handles (displayed in the images for steps 2-4 above) can be adjusted with the mouse. The two outer ones adjust the start and end of the slur, whilst the two inner handles adjust the contour.
A slur can span several systems and pages. The start and end of a slur is anchored to a note/chord or rest. If the notes are repositioned due to changes in the layout, stretch or style, the slur also moves and adjusts in size.
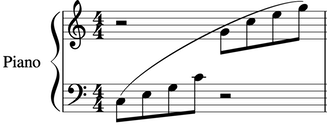
This example shows a slur spanning from the bass to the treble clef. Using the mouse, select the first note of the slur, hold down Ctrl (resp. ⌘ on a Mac) and select the last note for the slur, and press S to add the slur.
Dotted line
Dotted slurs are sometimes used in songs where the presence of a slur varies between stanzas. Dotted slurs are also used to indicate an editor's suggestion (as opposed to the composer's original markings). To change an existing slur into a dotted or dashed slur, select it and then in Inspector (F8) change Line type from Continuous to Dotted or Dashed.
X flips the direction of a selected slur.
See also
Dấu lấy/ngắt hơi
To place a breath symbol, drag it from the breath palette (from the Advanced workspace) to a note in the score. The breath symbol is placed after the note.

Breath symbol in score:
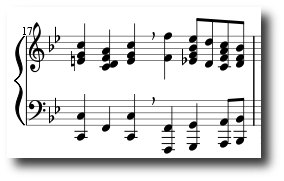
Caesura (informally called tram lines or railroad tracks) work the same way.
Dấu lặng trong ô nhịp
Full measure rest

When an entire measure is devoid of notes, a full measure (full bar) rest is used.
A full measure rest looks like a whole note (semi-breve) rest, except it is centered in the middle of a measure
To create a full measure rest, select a measure and press Del. All notes and rests in this measure are then replaced by a full measure rest.
Multi-measure rest

Multi-measure (multi-bar) rests indicate a long duration of silence for an instrument and are frequently used in ensemble sheet music. They are automatically interrupted at important points, such as double bar lines, rehearsal marks, key- or time signatures, etc.
Multi-measure rests have a number above the staff indicating the duration of the rest by the number of measures
Instructions
- From the menu, choose Style → General...
- Click on the "Score" tab, if it is not already selected
- Add a check mark next to "Create multi-measure rests"
Limitations
The style option automatically creates multi-measure rests throughout the score. Therefore, it is recommended that you enter all your notes first and then turn on multi-measure rests afterward.
Break multimeasure rest
See also: Measure operation: Break multi-measure rest
You may want to have a multi-measure rest divided into two multi-measure rests.
This option should be checked before turning on the "Create multi-measure rests" option in Style → General..., in the "Score" tab.
Select the first measure where you want the second multi-measure rest to start, and do a right-click Measure Properties → Break multi-measure rest.
Note that multi-measure rests are interrupted if there is a rehearsal mark (not a simple text), section break, key or time signature change, or double bar line.
Dấu nối
A tie is a curved line between two notes of the same pitch. If you want a curved line that spans multiple pitches, see Slur.
First method
Select first note:

+ creates a tie:

(+ or the tie button, , located on the top to the right of the notes in the note input toolbar)
Second method
To create ties during note input, press + after the first note of the tie.
Tied chords
To add ties between two chords, select the stem of the first chord, or Shift + click on the first chord and press +. Note input mode must not be enabled.
X flips the direction of a selected tie.
Dấu nối-cờ-nốt
Beams are set automatically, but they can be altered manually. Drag a beam symbol from the "Beam Properties" palette to a note in order to change its behavior.

Alternatively, you can first select a note, and then double-click the appropriate symbol in the palette.
-
 Start a beam at this note.
 -
 Do not end a beam at this note.
 -
 Do not beam this note.
 -
 Start a second level beam at this note.
 -
 Start a third level beam at this note.
 -
 (back to) Automatic mode: the mode MuseScore chooses on note input, dependent on current time signature.
 -
 Start feathered beam (slower) at this note.
 -
 Start feathered beam (faster) at this note.
To change the beam angle, or the distance of the beam to the notes (i.e. the length of the stems), double-click on the beam to put it into edit mode, with the right end handle being selected. Up/down arrow will now change the angle. Selecting the left end handle and using the up/down arrow keys will lengthen/shorten the stems. Hit Esc to get out of edit mode, once done with the changes.
To move a beam from above to below the notes, or vice-versa, flip the direction of the stems by using the button along the second top row (before the voice indicators) that shows a note with stems attached above and below or use the X key.
See also
Dấu rải gam và vuốt phím
Arpeggios are set by dragging an arpeggio symbol from the Arpeggio & Glissando palette to a note of a chord.
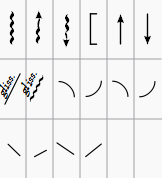
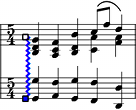
To change the length of the arpeggio, double-click the arpeggio and drag the handle up, or down.
Glissandi are set by dragging a glissando symbol from the Arpeggio & Glissando palette to the first of two consecutive notes on the same staff.

Edit, or delete the text of a glissando by right-clicking it and select "Glissando Properties" in menu or in the Inspector. If there isn't enough room between two notes, MuseScore will not display the text.
External links
Ngoặc nối khuông
Delete
Select the bracket and press Del
Add
Drag a bracket symbol from the bracket palette to an empty space in the first measure of a system.

Change
Drag a bracket symbol from the bracket palette to a bracket in the score.
Edit
Double-click on a bracket to enter edit mode. In edit mode, you can drag the height of a bracket to span arbitrary staves of a system.
Horizontal offset
If you need to move a bracket further left or right, then double-click the bracket to enter edit mode, and press Shift+← or Shift+→.
Nốt láy
Short grace notes (Acciaccatura) appear as small notes with a stroke through the stem. Long grace notes (Appoggiatura) have no stroke. Both are placed before the normal-sized main note.
Instructions
Create a grace note by dragging a grace note symbol from the Grace Notes palette to a regular note on the score. It's also possible to create a grace note by selecting a note head and double-clicking a grace note symbol from the grace notes palette.
To add more than one grace note, drag successive grace notes on the note head.
To add a chord of grace notes, enter the first one and select it, then use Shift+ note names (C, D, E etc...)
If you want to change the duration of a previously created grace note, select it and choose a duration from the toolbar or enter with one of the keys 1 ... 9 (see Note input).
Grace notes after a note (such as a trill termination) may have to be manually adjusted with Ctrl + arrow keys.

External links
- Grace note at Wikipedia
- Appoggiatura at Wikipedia
- Acciaccatura at Wikipedia
Octave lines
Octave (Ottava) lines are used to indicate that a section of music is to be played one or more octaves above or below written pitch: The line may be dotted or solid. Ottavas are available in the Lines palette of the Basic and Advanced workspaces.
8─────┐or 8va─────┐: Play one octave above written pitch
8─────┘or 8vb─────┘: Play one octave below written pitch
8va/8vb lines are particularly common in piano scores, though they are sometimes used in other instrumental music.1 15ma (2 octaves above) and 15mb (2 octaves below) are also occasionally used.
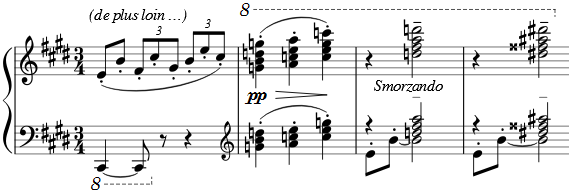
Apply an octave line
Use one of the following:
- Select a range of notes, then double click an octave line from a palette.
- Select one or more measures, then double click an octave line from a palette.
- Click on a note, then double-click an octave line from the palette (extends line from selected note to end of bar).
- Drag an octave line from a palette onto a note (extends line from selected note to end of bar).
See also, Lines: Adjust vertical position.
Change length
See Lines: Change length.
Custom lines
Octaves can be customized just like any other line. See Lines: Custom lines and line properties.
External links
- Octave at Wikipedia
-
Gerou/Lusk. Essential Dictionary of Music Notation (Internet Archive). ↩︎
Tiếng vê
Tremolo is the rapid repetition of one note, or a rapid alternation between two or more notes. It is indicated by strokes through the stems of the notes. If the tremolo is between two or more notes, the bars are drawn between them. Tremolo symbols are also used to notate drum rolls.
The tremolo palette contains separate symbols for one note tremolos (shown with stems below) and for two note tremolos (shown with no stem below).

To add tremolo to the stem of a single note, select the note head and double-click the desired symbol in the tremolo palette.
In a two note tremolo, every note has the value of the whole tremolo duration. To enter a tremolo with the duration of a half note (minim), enter two normal quarter notes (crotchets), and after applying a tremolo symbol to the first note, the note values automatically double to half notes.
Đường kẻ hay nét vẽ
The Lines palette, like other palettes, works via "drag-and-drop". Use the mouse to drag an item from the palette and drop it onto the score.
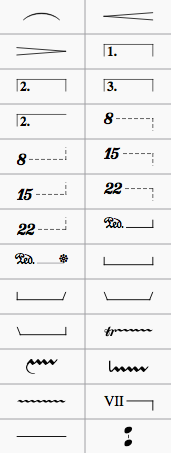
Change length
If you change the length of a line using the mouse, the anchor positions (the notes or measures they apply to) do not change. Therefore, the following method is recommended for adjusting the start or end points of a line.
- If you are in
Note Inputmode then press Esc to leave note input - Double click the line that you want to change
- Move the handles using the following shortcuts
- Shift+→ to move the anchor right by one note (or measure)
- Shift+← to move the anchor left by one note (or measure)
- If you need to change the length visually without changing the notes or measures that the line is anchored to then use the following shortcuts:
- → to move the handle right by one unit
- ← to move the anchor left by one unit
See also
Dấu lặp
The start and end of simple repeats can be defined by setting appropriate bar lines. For instructions on first and second ending measures, see Volta.
Playback
To hear repeats during playback, make sure the "Play Repeats"  button on the toolbar is selected. Likewise, you can turn off repeats during playback by deselecting the button.
In the last measure of a repeat, you can set the property "Repeat count" to define the number of played repeats.
Repeat symbols and text
Text and symbols related to repeats are located in the Repeats palette.
The repeats palette contains the symbols for measure repeat, segno and coda. It also contains 'D.S.', 'D.C.', and Fine text:
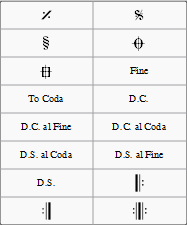
To add an object from the repeats palette, drag it onto (not above) the desired measure (so the measure changes color), then drop. The object will then appear above that measure in your score.
Jumps
Jumps generally consist of three parts:
- Jump to tag
- Play up to tag
- Continue at tag
Tags are names you give to certain measure positions. Two tags ("start", "end") denote the start and end of the score and don't need to get added explicitly.
Examples:
At the jump instruction Da Capo the playback jumps to the start and plays the entire score again (up to the implicit end tag).
At the jump instruction Da Capo al Fine the playback jumps to the start and plays the score up to the tag Fine.
Dal Segno al Fine (or D.S. al Fine) jumps to the Segno tag and then plays up to the tag Fine
Dal Segno al Coda jumps to the Segno tag and then plays up the first Coda tag. Playback then continues at the second Coda tag. The properties of jumps can get set via a right-click at the D.S. al Coda tag.
See also
External links
Dấu Volta
Volta brackets, or first and second ending brackets are used to mark different endings for a repeat.

To place a volta bracket on the score, drag-and-drop the item from the Lines palette.
The brackets can span more than one measure. Double-click the volta to enter edit mode, and move the handles with:
- one measure right Shift+→
- one measure left Shift+←
These commands move the "logical" start or end of the volta bracket, which determines playback in MuseScore and layout over multiple systems. Moving the handles using the left or right arrows keys only, or using the mouse allows finer adjustments, but does not change how the repeat is played.
If you move the handles, a dashed line from the logical position to the actual position is shown

Text
You can change the text and many other properties of a volta bracket using the line properties dialog. Right-click on a volta bracket and choose Line Properties.... The figure below shows the volta text as "1.-5."
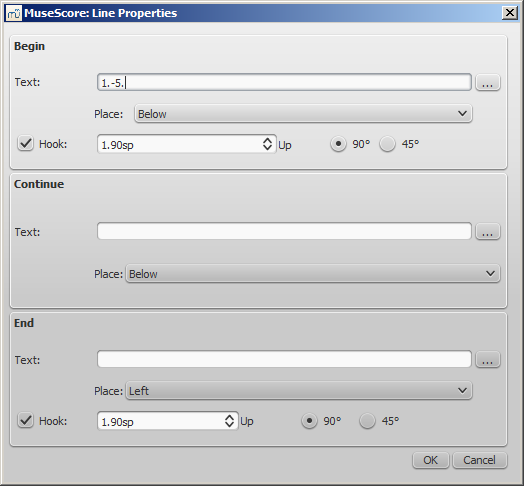

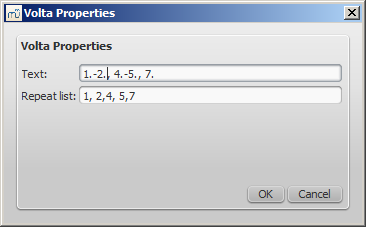
You can also right-click on the volta and bring up the volta properties dialog. From here, you can change both the displayed Volta text (the same from the line properties above) and the repeat list. If you want one volta to be played only on certain repeats and another volta on other repeats, enter the repeat times in a comma separated list. In the example below, this volta will be played during repeat 1, 2, 4, 5 and 7. Another volta will have the other ending, like 3, 6 and possibly other higher numbers like 8, 9, etc.
Playback
Sometimes a repeat plays more than two times. In the figure above, the volta text indicates that it should play five times before it continues. If you want to change the number of times MuseScore plays a repeat, go to the measure containing the end repeat bar line and change its Repeat count (see Measure operations: Other properties for details).
External links
Sự chuyển tông hay giọng
Transposition moves a selection of notes higher, or lower on the staff. MuseScore supports several kinds of transposition.
Chromatic transposition, by key
Chromatic transposition moves notes up or down in semitone increments. From the main menu, choose Notes → Transpose..., select which key signature to transpose - closest, up or down.
Chromatic transposition, by interval
Chromatic transposition moves notes up or down in semitone increments. From the main menu, choose Notes → Transpose.... Tick "By Interval", select the interval from the popup menus and whether to transpose up or down.
You can also transpose a selection of notes using the arrow keys (↑ or ↓).
Diatonic transposition
Diatonic transposition (also known as scalar transposition) moves notes up, or down the current scale according to the key signature. You can move a single note by dragging it up, or down. You can move a selection of multiple notes with Ctrl + click and drag.
Transposing instruments
Certain instruments such as B-flat trumpet or alto sax are known as transposing instruments. These instruments sound lower, or higher than their written pitch. MuseScore has built-in support for transposing instruments.
The Concert Pitch button and Notes → Concert Pitch from the main menu lets you switch between concert pitch and transposing pitch. Concert pitch helps composers and arrangers because it displays every instrument in the same key, so the notes on the staff match their sounding pitches. When concert pitch is turned off, the notes on some instrument staves may not match their sounding pitches, but they are ready for an instrumentalist to play from. If you use concert pitch during your session, remember to turn off concert pitch before printing the parts.
Instrument transpositions are already set up in MuseScore. However, if you want a rare instrument or transposition that is not available in MuseScore, you may need to edit the instrument transposition manually. Right-click an empty part of the instrument staff and choose Staff Properties.... At the bottom of the Staff Properties window, you can select the interval of transposition, any octave shifts, and whether the interval is "Up" (sounds higher than written) or "Down" (sounds lower than written).
See also
Ký âm cho trống
Example drum notation:

Notation for drumsets often includes simultaneous upstem and downstem notes. If you are unfamiliar with editing multiple voices in a single staff, see Voices for an overview. See below for instructions specific to percussion notation.
MIDI Keyboard
The easiest way to add drum notation to your score is via MIDI keyboard. Some MIDI keyboards have percussion markings above each key. If you press the key for high hat, then MuseScore will add the correct notation to the score. MuseScore automatically takes care of the stem direction and type of note head.
Computer Keyboard
7 drum sounds are mapped to a shortcut (A-G) by default and you can only remap those 7 shortcuts to other drum-instruments (or change other properties of the drum palettes contents) via the Edit Drumset button of the drum input tool (see →below).
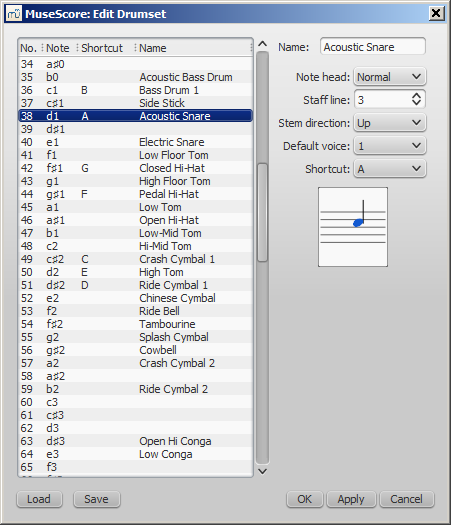
If you wish to enter a new drum note at the same position as an existing note - for example if you wanted the snare and hi-hat to sound simultaneously - and you were entering the new note via the computer keyboard you would need to hold Shift when entering the new note so as not to overwrite the existing note. This is the same method as used when entering chords for tuned instruments under MuseScore.
Mouse
Note input for unpitched percussion works differently than for other instruments, so here are the special steps:
- Select a note or rest in the percussion staff
- Press N to begin note input
Please note that the drum input tool will only appear when you have completed this step:

- Select a note duration from the note input toolbar
- Select a type of note (such as bass drum, or snare) from the drum input tool
- Click on the percussion staff to add the note to the score
Drumset
Drumsets are stored as .drm files, but customizations can be saved and loaded into others.
External links
Tablature
Music for fretted, stringed instruments is commonly notated using tablature, also known as tab, which provides a visual representation of the strings and fret numbers:

Tablature can also be combined with traditional staff notation:
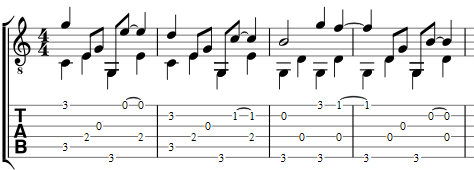
Create a new tablature staff
If you wish to create tablature as part of a new score, use the New Score Wizard. If you want to add tablature to an existing score, use the Instruments dialog. Or, alternatively, you can convert an existing standard staff. See below for details.
With the New Score wizard
To create tablature in a new score (for combined staff/tablature systems see → below):
- Open the New Score wizard.
- Enter the score details (optional). Click Next.
- On the Chose template file page, click on Choose Instruments.
-
On the Instruments page, select one (or more) tablature options under "Plucked strings" in the left-hand column (see image below). Then click Add.
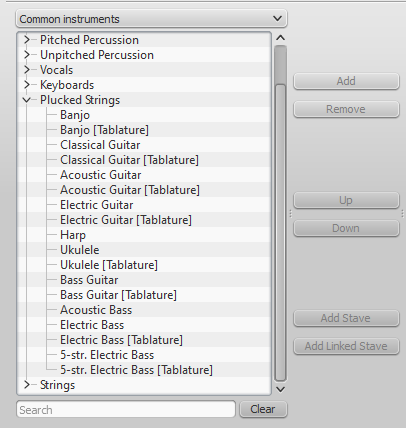
Note: You can use the dropdown list above the Instrument list to change the category displayed. Alternately you can search for the instrument using the "Search" field below the Instrument list.
-
Complete the rest of the New Score Wizard.
If the desired tablature is not available in the Choose Instrument list:
- At step "4" (above), select an existing "Plucked strings" tablature staff.
- Press Add to move it to the right-hand column.
- Check the drop-down menu to the right of the newly-added instrument for the most suitable Tab option, if any.
- Complete the rest of the New Score wizard and exit.
- Modify the number of strings and tuning of the tablature, if needed, in the Staff properties window (see → below).
- Change the Instrument name in Staff Properties, if required.
This allows you to create tablature for any chromatically-fretted instrument.
With the Instruments dialog
To add a single tablature staff to an existing score (for combined staff/tab system see → below):
- Open the instruments dialog (press I; or from the menu bar, select Edit → Instruments…).
- Add the tab staff as described in Add instruments ("Create a new score").
By changing staff type
To convert an existing standard staff to tablature, or tablature to a standard staff:
- Right click on the staff and select Staff Properties…. If "Instrument" is already set to a plucked-strings type, then exit staff properties and go to step 4.
- If "Instrument" is not a plucked-strings type, click on Change instrument and select an appropriate instrument from "Plucked strings."
- Click on OK twice to exit staff properties.
- Open the instruments dialog (press I, or from the menu bar select Edit → Instruments…).
- Click on the staff in the right-hand column and change the "Staff type" to the desired option.
- Click OK to exit the Instrument editor and return to the score page.
Note: If you subsequently need to make further adjustments to the staff (e.g. tuning, number of lines/strings etc.), right click on the staff and select Staff Properties….
Alternative method (using just the "Staff Properties" dialog):
- Right click on the staff and select Staff Properties….
- If the Instrument displayed is in the "Plucked strings" category, go to step 4.
- If the Instrument displayed is not in the "Plucked strings" category, click Change instrument and select an appropriate instrument from "Plucked strings". Click on OK.
- Click Advanced Style Properties..., change "Template" to the desired option and press < Reset to Template.
- Click OK twice to close the Staff Properties dialog box..
Note: Other adjustments to the staff (e.g. tuning, number of lines/strings etc.), can also be made in the Staff Properties… dialog.
Edit string data
Change tuning
Note: If you only want to view (rather than change) the instrument tuning, follow steps 1 and 2 only.
-
Right-click on the staff and select Staff Properties….
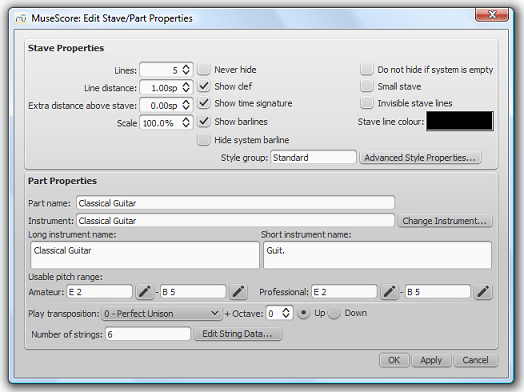
-
Press the Edit String Data… button at the bottom of the dialog box. The String Data dialog opens:
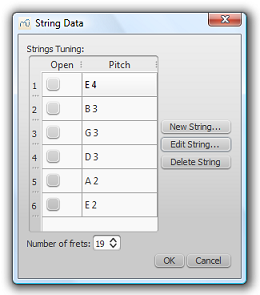
-
Click on a string pitch and select Edit String…. Or, alternatively, just double-click the string pitch.
- Select a new pitch in the Note Selection box and click OK. Or, alternatively, just double-click the new pitch.
- Click OK to close the "String Data" dialog box. Then click OK to close the "Staff/Part Edit Properties" dialog box.
Notes: (1) If tuning is changed when the tablature for that instrument already contains some notes, fret marks will be adjusted automatically (if possible); (2) Any change of tuning to a particular instrument applies only to the score at hand, and does not change any program default settings.
Add a string
- Right-click on the staff, select Staff Properties…, then press Edit String Data.
- Click on a string pitch and select New String....
- Select the new pitch and press OK—or, alternatively, just double-click the new pitch. The new string is inserted below the selected string.
Note: After adding a tablature string you will need to adjust the number of lines in the Staff properties dialog.
Delete a string
- Right-click on the staff, select Staff Properties…, then press Edit String Data.
- Click on a string pitch and select Delete String.
Note: After deleting a tablature string you will need to adjust the number of lines in the Staff properties dialog.
Mark unfretted string "open"
This feature is used to mark a (bass) course as unstopped (i.e. outside of the fingerboard and always sounding open): as on a Baroque lute or Theorbo etc. This means that only "0" (zero) or "a" is accepted as a fret mark: any other fret mark will be converted to 0/a.
- Right-click on the staff, select Staff Properties…, then press Edit String Data.
- Check one or more boxes in the "Open" column.
Change number of instrument frets
This property defines the maximum fret number which can be entered on a tablature staff.
- Right-click on the staff, select Staff Properties…, then press Edit String Data.
- Select or enter a new number in the "Number of frets" spin box.
Change tablature display
You can customize both the appearance of a tablature staff and the way that it displays the fret marks. To access these options:
- Right click on the staff and select Staff Properties….
- Click on the Advanced Style Properties… button.
Combine pitched staff with tablature
Plucked-string instruments—such as the guitar—are commonly notated using both a music staff and tablature (TAB) together. MuseScore gives you the option of having the two staves either unlinked or linked:
-
Unlinked Staves: You can enter, delete or edit notation in one staff without affecting the other. To transfer music notation from one staff to the other, select the desired range and copy and paste it into the other staff.
-
Linked Staves: Any changes you make in one staff are automatically applied to the other staff as well ("mutual translation").
A note on fret mark conflicts: When the same note is entered in two different voices, MuseScore tries to ensure that the fret marks do not overlap on the same string. Any overlaps which do occur are marked with red squares: these appear only in the document window and not on any printed copy. In almost all cases (e.g. frets 0 to 4 on the 6th string), overlapping is the desired result and no further adjustment is required. As of version 2.2, you can hide the red marks by selecting "View" and unticking "Show Unprintable."
Create a staff/tablature pair with the New Score wizard
- Open the New Score wizard.
- Enter the score details (optional). Click Next.
- On the Chose template file page, click on Choose Instruments.
- Select a pitched staff in the "Plucked strings" section of the left-hand column. Then click Add.
- Select the newly-created staff line (i.e. marked "Staff …") in the right-hand column and chose one of two options:
- Click Add Staff to create an unlinked staff/tab pair.
- Click Add Linked Staff to create a linked staff/tab pair.
- In the Staff type column, click on the dropdown list for the newly-created staff and select a tablature option (this can be modified later, if required, on the score page—see Staff Properties).
- Complete the rest of the New Score Wizard, or click Finish.
Note: To create unlinked staves with separate mixer channels, instead of step "5" (above), select a Tablature staff in the left-hand column and click Add. Then continue with steps 6 and 7.
Create a staff/tablature pair in an existing score
- Open the Instruments editor (press I, or from the menu bar, select Edit → Instruments…).
- Select a pitched staff in the "Plucked strings" section of the left-hand column. Then click Add.
- Select the newly-created staff line (i.e. marked "Staff …") in the right-hand column and chose one of two options:
- Click Add Staff to create an unlinked staff/tab pair.
- Click Add Linked Staff to create a linked staff/tab pair.
- In the Staff type column, click on the dropdown list for the newly-created staff and select a tablature option (this can be modified later, if required, on the score page—see Staff Properties).
- Change the staff order using the ↑ button if needed.
- Click OK to return to the score.
Note: To create unlinked staves with separate mixer channels, instead of step "3" (above), select a Tablature staff in the left-hand column and click Add. Then continue with steps 4–6.
Create a staff/tablature pair from an existing staff
To add tablature to a plucked-string staff in the score (or vice versa):
- Open the Instruments editor (press I, or from the menu bar, select Edit → Instruments…).
- Select the staff line (marked "Staff 1") in the right-hand column that you want to add to.
- Chose one of two options:
- Click Add Staff to create an unlinked staff/tab pair
- Click Add Linked Staff to create a linked staff/tab pair
- In the Staff type column, click on the dropdown list for the newly-created staff and select an option (this can be modified later, if required, on the score page—see Staff Properties).
- Change the staff order using the ↑ button if needed.
- Click OK.
Notes: To create unlinked staves with separate mixer channels, instead of step "3" (above), select an appropriate staff in the left-hand column and click Add. Then continue with steps 4–6.
Enter notes in tablature
Using a computer keyboard
- First, ensure that you are not in note-input mode. Select the measure or existing note from which you want to begin note entry.
- Switch to note input mode (N): a short 'blue rectangle' appears around one tablature string: this is the current string.
- Select the duration of the note or rest that you wish to enter (see below).
- Press the up/down arrow keys to move the cursor to the desired string. Use the left/right arrow keys to navigate through the score.
-
Press 0 to 9 to enter a fret mark from 0 to 9 on the current string; to enter numbers with several digits press each digit in sequence. Keys A to K (skipping I) can also be used: convenient when working in French tablature. For L , M, N, use the alphanumeric keyboard and type respectively 10, 11, 12...
Note: You cannot enter a number higher than the "Number of frets" value set in the Edit String Data dialog.
-
Press ; (semicolon) to enter a rest of the selected duration.
- You can enter notes in different voices if required—just as you would in a standard staff.
See also, Edit notes (below).
Historical tablature
As of version 2.1, period notation for bass strings (lutes and sim.) is supported:
-
French tablature: letters with prefixed slash-like strokes right under the tab body: i.e. 7th string: "a", 8th string: "/a", 9th string: "//a" and so on, all in the first position below the tab body.
-
Italian tablature: numbers with 'ledger line'- like segment of string above the tab body: i.e. 7th string: "0" one position above the tab body with one 'ledger line'; 8th string: "0" two positions above the tab body with two 'ledger lines' and so on.
Input of is via computer keyboard only: by moving the note entry cursor below (French) or above (Italian) the tab body, 'shadow' slashes or ledger lines will indicate the target string to which the fret mark will be applied; pressing one of the fret keys, will enter (and lay out) the note on that string.
Using a mouse
To enter notes into tablature with a mouse:
- Enter note input mode and select the note or rest duration (see below).
- Click on a string to create a note there. Notes are initially created on fret 0 (or a for French tablatures): to correct, type in the right number from the keyboard.
- You can also increase/decrease the fret mark using Alt+Shift+↑ or Alt+Shift+↓.
- You can enter notes in different voices if required—just as you would in a standard staff.
See also, Edit notes (below).
Select note duration
In note input mode, you can use any of the following methods to set note duration in tablature:
- Press Shift+1 to Shift+9: Sets duration from a 128th note to a longa (availability of these shortcuts may depend on the platform and/or keyboard layout);
- Press NumPad 1 to Numpad 9: Sets duration from a 128th note to a longa (if a numeric keypad exists and NumLock is on);
- Click on a note duration icon in the Note Input toolbar above the document window;
- Press Q to decrease the selected duration and W to increase it.
Edit notes
Note input mode
To edit an existing fret mark in note-input mode:
- Position the cursor above the fret mark and simply retype the number.
- Increment or decrement the fret mark using Alt+Shift+↑ or Alt+Shift+↓.
Non note input mode
To edit an existing fret mark outside note-input mode:
- Select one or more fret marks.
- Use any of the following commands:
- To increment or decrement, without changing the string: Press ↑ / ↓.
- To increment or decrement, changing strings, when possible, to minimize the fret number: Press Alt+Shift+↑ / ↓
- To move to an adjacent string (if the string is free and can produce that note): Press Ctrl+↑ / ↓ (Mac: Cmd+↑ / ↓) .
Note: The fret mark cannot be higher than the "Number of frets" value set in the Edit String Data dialog.
Crosshead notes
To change a fret mark to a crosshead note:
- Select one or more fret marks (in non-note-input mode).
- Press Shift+X to toggles ghost noteheads on/off.
Summary of keyboard commands
Note input mode
| Type: | to get: |
|---|---|
| ↑ | Select above string as current. |
| ↓ | Select below string as current. |
| Shift+1 to Shift+9 | Select a duration (128th note to a longa) |
| NumPad 1 to NumPad 9 | Select a duration (128th note to a longa) |
| Q | Decrease current input duration. |
| W | Increase current input duration. |
| 0 to 9 | Enter a fret digit / letter. |
| A to K | Enter a fret digit / letter (I excluded). |
| Alt+Shift+↑ | Increase current fret mark. |
| Alt+Shift+↓ | Decrease current fret mark. |
| ; (semicolon) | Enter a rest |
Normal mode
| Type: | to get: |
|---|---|
| 0 to 9 | Change duration of selected note or rest (128th note to longa) |
| Alt+Shift+↑ | Increase the pitch of the selected note (MuseScore chooses the string). |
| ↑ | Increase the pitch without changing string. |
| Alt+Shift+↓ | Decrease the pitch of the selected note (MuseScore chooses the string). |
| ↓ | Decrease the pitch without changing string. |
| Ctrl+↑ (Mac: Cmd+↑) | Move note to above string, keeping the pitch. |
| Ctrl+↓ (Mac: Cmd+↓) | Move note to below string, keeping the pitch. |
| Shift+X | Toggle the ghost notehead on/off. |